阅读视图

发现新文章,点击刷新页面。

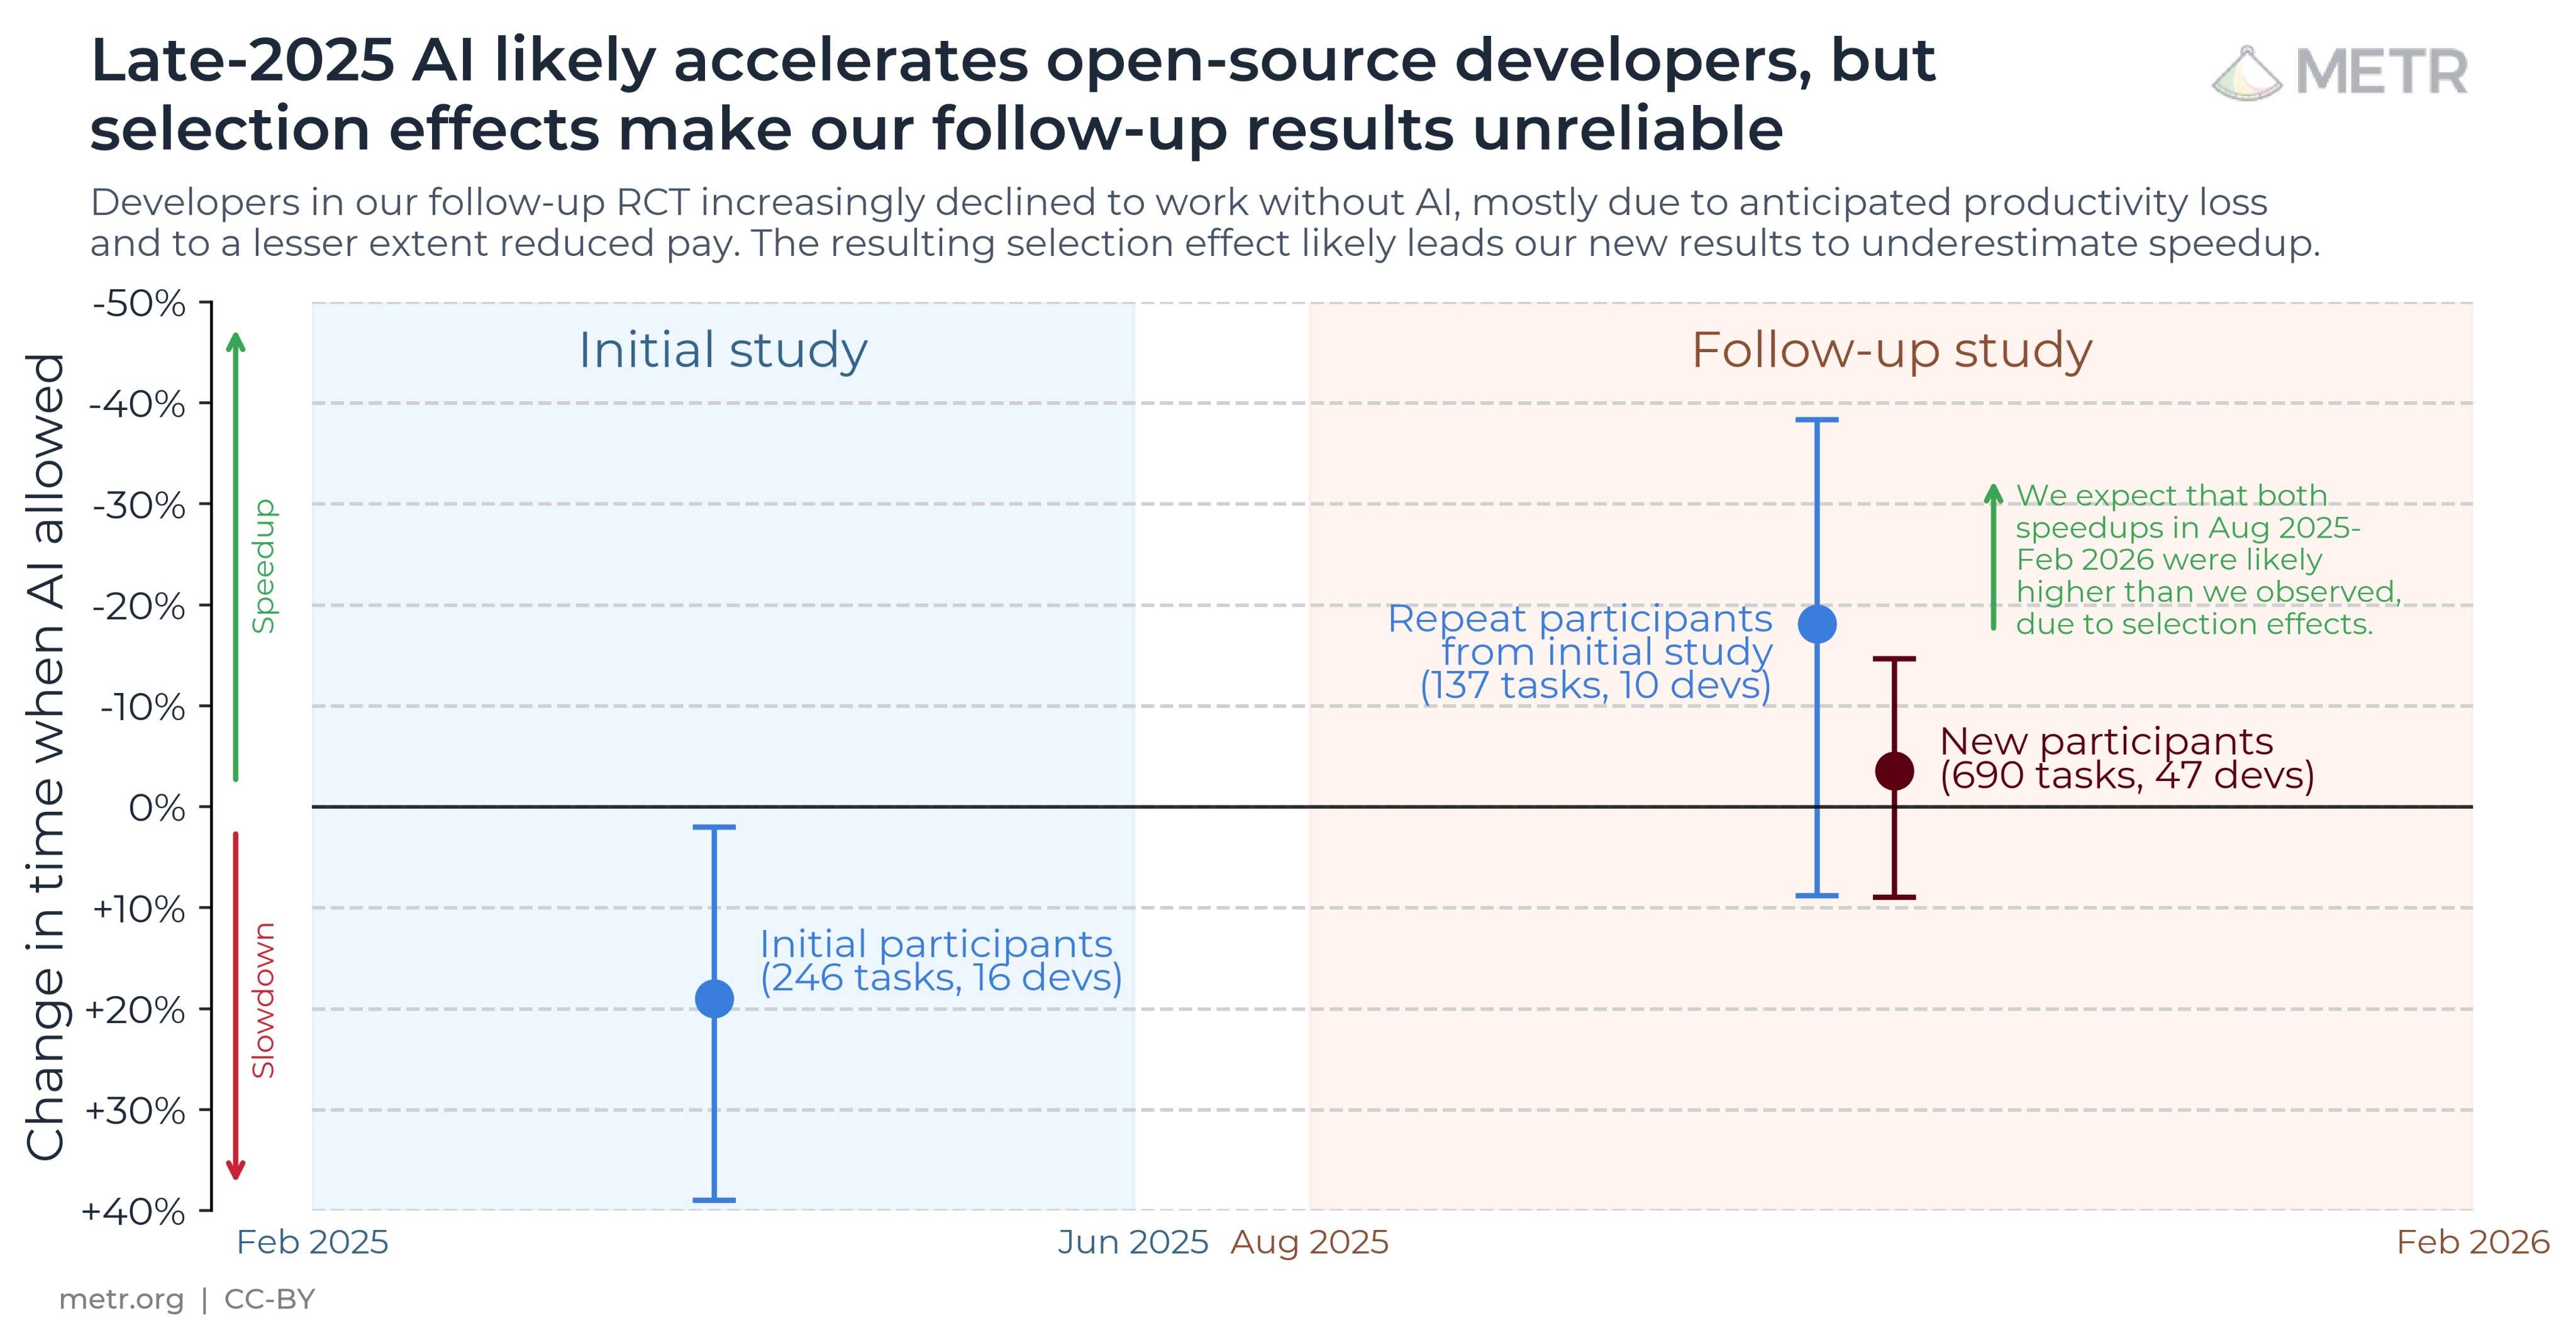
BEM、OOCSS、SMACSS、ITCSS、AMCSS、SUITCSS:CSS命名规范简介

本来是希望讲一下CSS组件化发展历史上的技术,但所有内容放到一个文章中描述太长了,因此对各类技术分开写一下。这篇文章讲一下CSS命名规范。

在前端开发中,不同组件/模块的class类名都是公用的,假设两个组件中起了同样的类名,那么就会出现样式污染。既然问题出在名字,那么让不同组件的类名不同就能解决问题了。因此,社区中出现了一些CSS命名规范,希望使用规范将CSS的冲突污染减少,同时通过命名起到和HTML标签关系更紧密,封装公共CSS样式,以及一些其它作用。

BEM

BEM介绍

BEM是最知名的CSS命名规范,由Yandex团队开发。BEM的全称为Block Element Modifier,翻译成和中文就是块,元素和修饰符。BEM使用这三种层级来规范CSS的命名:

  • Block 区块 表示页面中一个独立可复用的模块或者组件
  • Element 元素 表示区块中的一个组成元素
  • Modifier 修饰符 修饰元素的状态或者行为

每个层级内部使用串行命名法(kebab-case),中间分隔单词使用单连字符-。元素前的分隔符为双下划线__,修饰符前的分隔符为双连字符--。元素不能独立存在,必须依附于区块内。修饰符则必须跟在元素或者区块后面。因此可以这样组合命名:

  • block 单区块
  • block__element 区块+元素
  • block--modifier 区块+修饰符
  • block__element--modifier 区块+元素
<div class="container">
  <input class="container__input" />
  <button class="container__button--primary">提交<button>
</div>

<style>
.container {}
.container__input {}
.container__button--primary {}
</style>

在上面的例子中,container是区块,input和button是元素,primary则是修饰符。这样每个元素都有自己的类型,不需要考虑名称冲突的问题,而且这样命名是有页面结构含义在的,即通过命名就知道这个元素属于哪个组件,有什么用处。因此,BEM也不推荐使用嵌套选择器。

BEM的应用和优缺点

BEM的应用比较广泛,很多项目都是使用它来命名class,还有一些项目利用了他的命名思路。这里我们以Vue3的组件库Element-Plus为例,来看一下BEM的应用:

css-name-1.png

这里是一个复合型输入框组件,名称叫做el-input-group。组件包含左边的前置展示元素和右边的输入框,其中组件结构和以BEM方式命名的class如下:

  • el-input-group--prepend: 区块 el-input-group 修饰符 prepend
    • el-input-group__prepend: 区块 el-input-group 元素 prepend
    • el-input__wrapper: 区块 el-input 元素 wrapper
      • el-input__inner: 区块 el-input 元素 inner

通过这种方式,Element-Plus有着清晰的元素class名,不仅组件内部开发使用,使用组件库的用户也可以使用这些类名来覆盖组件库样式。下面我们来总结一下BEM命名规范的优缺点:

  • 优点
    • 清晰的类名,只看class就能知道元素的作用和归属,不会发生混淆
    • 组件和组件之间的名称是独立的,不会样式污染
    • 提供了命名规范,团队协作开发时命名不会混乱,也可以提供给外部使用
  • 缺点
    • 对于包含很多元素的复杂组件,仅仅三个层级,命名可能并不够用
    • 组件名称太长,对开发者并不方便

这些优缺点不仅仅是BEM的优缺点,也是大部分CSS命名规范的优缺点了。

OOCSS

面对对象简介

OOCSS的全称为Object Oriented CSS,即为面对对象的CSS。接触过编程的同学大多知道,Object Oriented即面对对象,是一种编程模式,是将一些数据属性和对应的方法结合起来,抽象成一个类,类可以生成实例对象。面对对象还有继承,封装,多态等特性。这里举个简单的例子:

类别 类名 属性 方法
基类 水果 名称 重量 体积 切开水果
子类 继承水果 苹果 甜度 做苹果派
子类 继承水果 橘子 酸度 作陈皮

每一种类都封装了属性和方法。苹果和橘子都是水果的子类,继承了水果的属性和方法。子类可以有自己独立的方法,也能调用父类的方法。调用父类的方法时,可以有子类自己的实现,这是多态。例如苹果和橘子都可以使用切开水果这个方法,但切开的效果不一样。一个类可以生成很多个实例对象,每个对象可以有不同的数据。

JavaScript中也有面对对象相关的方法,老方法有原型链,ES6中直接提供了class关键字,并且在逐渐完善面对对象相关的语法。但CSS并不是编程语言,无法提供直接提供面对对象语法,只能在概念上简单模拟一下。OOCSS就是利用CSS,对面对对象的概念进行了简单的模拟。

分离结构和皮肤

按照OOCSS的设想,CSS样式可以分为结构structure和皮肤skin。结构表示它的尺寸/位置/边距等内容;皮肤表示颜色,字体,背景等。因为皮肤可能会根据不同的场景变化,而且皮肤可能被多个组件所公用,因此分开作为两个类来处理。这里我们举个例子,首先是不使用OOCSS的做法,两个CSS类独立互相没有依赖:

<div>
  <button class="btn-small">jzplp按钮1</button>
  <button class="btn-large">jzplp按钮2</button>
<div>
<style>
.btn-small {
  width: 20px;
  height: 20px;
  Padding: 5px;
  color: red;
  background: blue;
}
.btn-large {
  width: 200px;
  height: 200px;
  Padding: 50px;
  color: red;
  background: blue;
}
</style>

这样写会造成一些重复属性存在,例如这里的skin相关属性就是重复的,我们将他抽象出来作为单独的skin共享:

<div>
  <button class="btn-small btn-skin">jzplp按钮1</button>
  <button class="btn-large btn-skin">jzplp按钮2</button>
<div>
<style>
.btn-skin {
  color: red;
  background: blue;
}
.btn-small {
  width: 20px;
  height: 20px;
  Padding: 5px;
}
.btn-large {
  width: 200px;
  height: 200px;
  Padding: 50px;
}
</style>

这样皮肤的样式就可以在不同的元素中复用了。如果要修改皮肤,修改一个位置就统一修改了所有元素的皮肤。

分离容器和内容

很多人在写CSS时,遇到容器和内容这样组合的HTML结构,经常会把CSS也写为组合的样式,例如与HTML一样也保持了父子的结构。但OOCSS认为,这样限制了这些CSS的引用场景,不利于其它元素复用这些CSS代码。需要将它们分开撰写。这里举个例子,首先依然是嵌套CSS的场景:

<div class="container">
  <div>jzplp内容1</div>
  <div>jzplp内容2</div>
<div>
<style>
.container {
  width: 100%;
  height: 200px;
  div {
      width: 30px;
      margin-right: 10px;
      height: 100%;
  }
}
</style>

假设有其它场景只希望复用内部div的CSS代码,是没有办法的,因为嵌套的结构限制了这里的使用场景。因此按照OOCSS的设想,应该不使用嵌套结构,将CSS代码解耦:

<div class="container">
  <div class="content">jzplp内容1</div>
  <div class="content">jzplp内容2</div>
<div>
<style>
.container {
  width: 100%;
  height: 200px;
}
.content {
  width: 30px;
  margin-right: 10px;
  height: 100%;
}
</style>

OOCSS的优缺点

除了上面OOCSS的两个原则“分离结构和皮肤/分离容器和内容”之外,OOCSS最核心的原则其实是:拆开元素的CSS样式,变为更方便复用,更独立的样式。上面两个原则是这个核心原则的部分具体做法。

这时候有些同学会问,这些原则和面对对象有什么关系?实话说我也觉得关系确实不大。但按照OOCSS的说法,我们定义的类选择器就是面对对象中的类。将这个类的提供给HTML元素,就相当于将这个类实例化。使用OOCSS的原则,拆开的可复用CSS样式相当于基类,那些拆开后依然无法复用的CSS样式称为子类。(例如前面btn-small是子类,btn-skin是父类)。

如果这样抽象的话,即使不了解OOCSS的开发者,肯定也无意间使用过OOCSS的原则,也用过“面对对象方法”组织过CSS。这里我们总结一下OOCSS的优缺点:

  • 优点
    • 复用已有的CSS规则更方便(这也是OOCSS的核心原则)
    • CSS文件更少,可提高页面加载速度(这也是复用程度高造成的)
    • 有利于CSS规则更新和扩展(只改一个CSS规则,所有位置都可以生效)
  • 缺点
    • 一个元素上可能挂多个类名,可能造成属性混乱
    • 如何拆分抽象公共CSS规则需要根据业务设计与平衡
    • 结构和皮肤有时候时互相关联的,有时候并不容易区分
    • 部分CSS本身就要求父子有联系,例如flex,grid布局等等,必须要求父子元素独立可能并不适合

总之,OOCSS只是一个组织CSS的思路,我们不需要教条化的拆分,而是根据具体场景拆分和抽象公共CSS规则。

SMACSS

SMACSS的全称叫做Scalable and Modular Architecture for CSS,意思是可扩展和模块化的CSS结构。他与OOCSS类似,也是制定了一些CSS组织的规范,但比OOCSS更细致。这两个命名规范的思想上有很多相似之处。SMACSS将页面的CSS规则分为五种类型,下面我们将分别介绍:

  • Base 基础样式
  • Layout 布局样式
  • Module 模块样式
  • State 状态样式
  • Theme 主题样式

Base基础样式

基础样式是整个页面通用的公共样式。一个常用的例子是CSS reset样式表。在CSS优先级,没有想的那么简单!全面介绍影响CSS优先级的各类因素中我们介绍过,浏览器会提供一些预置的默认样式,叫做“用户代理样式表”。但是很多用户不希望使用这些默认样式,因此使用一个全局的CSS reset样式表处理这些默认样式。

除了reset样式表之外,基础样式还可以包含一些对于所有元素通用的样式,例如标题样式,默认链接样式,页面背景等。SMACSS不推荐在基础样式中使用类或者ID选择器。例如:

body, form {
  margin: 0;
  padding: 0;
}
a {
  color: #039;
}
a:hover {
  color: #03F;    
}
body {
  background-color: red;
}

Layout布局样式

布局指的是将页面划分为几个大部分,这几个部分的样式作为布局样式。例如页面可以划分为头部、主内容区、底部、侧边栏等。这些样式通常是全局样式,一个布局元素中可以包含很多个模块。如果布局元素确定只出现一次,甚至可以使用ID选择器。可以使用l-或者layout-前缀来表示是布局样式,但也可以不使用。这里举几个例子:

#header, #article, #footer {
    width: 960px;
    margin: auto;
}
.sidebar {
    float: right;
}

Module模块样式

SMACSS中的模块和其它CSS命名规范中模块的含义一致,都是页面中独立可复用的模块,也就是组件。模块中的规则避免使用ID选择器或者元素选择器,而使用类名。为了规则不发生冲突,每个模块内部可以用模块名称本身作为前缀,例如.module-。

.card { padding: 5px; }
.card-top { font-size: 10px; }

State状态样式

SMACSS中的状态类似于BEM中的修饰符modifier,它表示模块或者布局在某些状态下的外观或者行为。但SMACSS中的状态样式倾向于是全局使用的,即多个模块和布局都可以使用。状态样式也可以是依赖JavaScript驱动的,例如点击或者其它操作展示的效果。状态样式可以用is-作为前缀。因为要覆盖元素本身的默认样式,因此允许使用!important。

.is-collapsed {
  width: 10px;
}
.is-selected {
  color: red !important;
}
/* 仅供模块使用的状态规则,可以添加模块前缀 */
.is-card-selected {
  color: yellow !important;
}

Theme主题样式

主题描述了模块或布局的外观样式,一些小的页面不要求主题样式,但有些页面有特殊要求,甚至要求换肤。将皮肤抽象出来作为的独立样式,方便抽象和更改。这里和OOCSS的皮肤规则有点像。

.normal {
  color: blue;
  background: grey;
}

.primary {
  color: red;
  background: white;
}

SMACSS的优缺点

SMACSS不仅描述了五种CSS规则类型,还包含很多规范说明,比如:类名规范、选择器使用规范和性能优化、字体、页面状态变化、嵌套选择器、与HTML5集成,与CSS预处理器集成、特殊CSS规则、甚至是CSS代码缩进等等。这里我们总结一下SMACSS的优缺点:

  • 优点
    • 提供了比较详尽的CSS组织规范
    • 考虑到了各种类型的公共样式,组件/模块的独立样式,可复用和隔离能力相对平衡
    • 由于比较详尽,更有利于团队协作开发
  • 缺点
    • 规范比较落后,没有适应现在前端框架的发展,有些想法也过时了
    • Layout也经常以模块/组件的形式组织
    • 规范太详尽,导致经常出现不符合实际情况的场景
    • 虽然说了不要死板套用,但如果不符合的场景太多,那还是需要重新定义自己的规范

ITCSS

ITCSS的全称为Inverted Triangle Cascading Style Sheets,翻译成中文为倒三角CSS。ITCSS把CSS规则分成了七层,并且把这七层展示为了一个倒三角的形式。

css-name-2.png

倒三角的形式指的是从上到下CSS规则的普遍性减少,特殊性增加,即越往下,影响范围和可复用性越低。这里我们说明一下每一层的内容:

  • Settings 预先定义的颜色变量,数值变量等
  • Tools 全局使用的mixins和函数等
  • Generic 全局标准化样式,例如CSS reset样式表
  • Elements HTML元素的通用样式
  • Objects 整个工程的布局样式,但不包含外观属性
  • Components 具体的组件样式
  • Trumps 可以覆盖的辅助样式,可以接受!important

可以看到,前两层都没有真正的CSS规则代码;三四层是不带类选择器的CSS规则。ITCSS利用了CSS预处理的特性,例如mixins和函数等。

AMCSS

AMCSS的全称为Attribute Modules for CSS,即使用属性作为模块的CSS。它与其它CSS命名规范都不相同:其它命名规范主要使用HTML的class属性作为选择器,而它则采用自定义HTML属性作为选择器。

  • Modules 模块
    • 类似于BEM中区块和元素的概念
    • 使用HTML属性描述,属性名称采用大驼峰命名法BlockName,如果嵌套子模块名使用连字符-
  • Variations 变体
    • 类似于BEM中的修饰符,表示模块中变化的部分,用来新增和覆盖部分属性
    • 使用HTML属性值描述,多个用空格分隔
  • Traits 特征
    • 一组某个用途的CSS规则,可以用来描述一些公共的CSS
    • 同一组特征的HTMl属性相同,值不同。特征的属性名采用小驼峰式命名法featureName

上面讲的有点晦涩,这里还是要用实际例子说明一下。AMCSS要求属性名添加前缀,推荐am-,其它前缀也可以。

<div am-MainCard>
</div>
<div am-Card>
  <div am-Card-Container> jzplp1 </div>
</div>
<div am-Card="sp1 primary"> 
  <div am-textType="title"> jzplp2 </div>
</div>

<style>
  /* 仅模块名 */
  [am-Card] { color: red; }
  /* 模块名采用大驼峰命名法 */
  [am-MainCard] { color: red; }
  /* 子模块名使用连字符- */
  [am-Card-Container] { color: red; }
  /* 变体使用属性 */
  [am-Card~="primary"] { color: red; }
  /* 特征名使用小驼峰式命名法 */
  [am-textType] { color: red; }
  /* 特征名和限制特征值 */
  [am-textType~="title"] { color: red; }
</style>

可以看到,AMCSS实际上就是将类选择器的那一套用法搬到了属性选择器上面,属性选择器的~=符号同样支持多个属性值。而且由于属性有属性名和属性值两种,因此相比于class名更灵活也更清晰。这种属性命名方式并不是推荐的HTML规范,但也可以正常使用。

SUITCSS

SUITCSS是一套组件化的样式工具。它不仅包含CSS命名规范,而且也提供了一些CSS预设包,构建工具,预处理器(实际上是PostCSS的插件集合),测试工具等。这里我们主要描述一下命名规范:

  • 公共样式: 表示一些公共样式
    • 命名规则 u-[sm-|md-|lg-]<utilityName>
    • 使用-u开头,后面跟骆驼命名法。中间也可以加响应式规则sm-|md-|lg-
  • 组件样式:描述独立组件内部的样式
    • 命名规则 [<namespace>-]<ComponentName>[-descendentName][--modifierName]
    • namespace 可选的命名空间,例如组件库中的组件避免与业务组件冲突,可以加前缀,例如 el-label, el-tag等。
    • ComponentName 组件名称,用Pascal命名法。组件名称需要与其他组件不同。
    • descendentName 组件内后代的名称,即为组件内部组成元素的类名,使用骆驼命名法。
    • modifierName 组件修饰符,修饰元素的状态或者行为。使用骆驼命名法,且前面有两个连字符。

SUITCSS命名规范中还规定了组件的设计原则,CSS变量名的命名方式,预置公共样式,甚至是代码风格等。

总结

即使没有了解过这些命名方案,其中的部分思想在我们的开发中也不知不觉会用到一些。这些命名规范确实能够解决很多问题,在前端发展的历史中起到过很多作用,也引导和启发了后续CSS组件化和工程化的发展。

但这些命名规范需要“手工处理”:手工定义各种名称,手工抽象CSS文件等。一个人开发还好,如果是多人协作团队开发,还要让每个人遵守规则,检查代码,这就成了一个麻烦的问题(少量规范有工具)。另外规范给出的类名大多很长,虽然更容易识别代码含义,但也造成了代码冗长,代码传输速度慢。

另外很多命名规范都有这样一个冲突:如果规范将CSS代码分类和组织的太过明确,这会造成应用范围小,很多工程根本不适用。如果规范将CSS代码分类和组织的太模糊,那代码就太随心所欲了,与没定义差不多。因此我们最好根据每个工程的具体实际情况定义合适的规范和抽象。

还有很多CSS命名规范比较老,跟不上时代发展。有些老旧的规范并不适应部分新内容:例如新的CSS布局方案,CSS变量,前端框架,CSS Modules,CSS代码格式规范(有自动化工具)等。CSS命名规范也存在互相吸收想法和思路的,晚出的方案相对更完善一些,但没有早出的方案更知名。

参考

常见的内存泄漏有哪些?

在 JavaScript 中,内存泄漏指的是应用程序不再需要某块内存,但由于某种原因,垃圾回收机制(GC, Garbage Collection)无法将其回收,导致内存占用持续升高,最终可能引发性能下降或崩溃。

以下是 JavaScript 中导致内存泄漏的最常见情况及示例:

1. 意外的全局变量

在 JavaScript 中,如果未声明的变量被赋值,它会自动成为全局对象的属性(浏览器中是 window,Node.js 中是 global)。全局变量在页面关闭前永远不会被垃圾回收。

function leak() {
  // 忘记了使用 let/const/var
  secretData = "这是一段敏感数据"; // 变成了 window.secretData
}
leak();

解决方案:

  • 使用严格模式 ('use strict') 来避免意外的全局变量。
  • 使用完后手动设置为 null

2. 被遗忘的定时器或回调函数

如果代码中设置了 setIntervalsetTimeout,但忘记清除(clear),且定时器内部引用了外部变量,那么这些变量无法被释放。

const someResource = hugeData(); // 很大的数据

setInterval(function() {
  // 这个回调引用了 someResource
  console.log(someResource);
}, 1000);

// 如果没有调用 clearInterval,someResource 会一直留在内存中

解决方案:

  • 在组件卸载或页面关闭时,清除定时器:clearInterval(id)

3. 闭包(Closures)的不当使用

闭包是 JavaScript 的强大特性,但如果闭包长期持有父函数的变量,而这些变量又很大,就会造成泄漏。

function outer() {
  const largeArray = new Array(1000000).fill('data');

  return function inner() {
    // inner 函数引用了 outer 作用域的 largeArray
    // 只要 inner 函数还存在,largeArray 就无法被回收
    console.log(largeArray.length);
  };
}

const innerFunc = outer(); // largeArray 被保留
// 如果后续没有释放 innerFunc,内存就会泄漏

解决方案:

  • 确保不再需要的函数被释放(innerFunc = null)。
  • 在闭包外尽量避免引用大对象。

4. DOM 引用未被清理

当把 DOM 元素存储为 JavaScript 对象或数据结构时,即使该元素已从 DOM 树中移除,只要 JS 中还有引用,该 DOM 元素连同其事件监听器就不会被释放。

const elements = {
  button: document.getElementById('button')
};

function removeButton() {
  document.body.removeChild(document.getElementById('button'));
  // 注意:elements.button 仍然指向那个 DOM 对象,所以它无法被回收
}

解决方案:

  • 移除 DOM 节点后,同时将变量设置为 null

5. 事件监听器未移除

向 DOM 元素添加了事件监听器,但在移除该元素前没有移除监听器。现代浏览器(尤其是针对原生 DOM 的监听器)处理得比以前好,但在单页应用(SPA, Single Page Application)中,如果频繁添加和移除元素,累积的监听器仍会导致泄漏。

const element = document.getElementById('button');
element.addEventListener('click', onClick);

// 如果后来 element 被移除了,但没有 removeEventListener
// 并且 onClick 函数引用了外部变量,就会造成泄漏

解决方案:

  • 在移除元素前调用 removeEventListener
  • 使用框架(如 React、Vue)时,框架的生命周期通常会自动处理,但要注意在 useEffect 的清理函数中移除原生监听器。

6. 脱离 DOM 树的引用(DOM 树内部引用)

这通常发生在给 DOM 元素添加自定义属性时。如果两个 DOM 元素相互引用,即使从文档流中移除,也可能因为循环引用导致泄漏(在老版本 IE 中常见,现代浏览器有所改进,但仍需注意)。

7. Map 或 Set 的不当使用

使用对象作为 MapSet 的 key,如果只把 key 置为 null,而没有从 Map 中删除它,key 依然被 Map 引用着,无法被回收。

let obj = {};
const map = new Map();
map.set(obj, 'some value');

obj = null; // 这里 obj 被置为 null
// 但 map 里仍然有对原对象的引用,所以原对象无法被回收

解决方案:

  • 使用 WeakMapWeakSet。它们的 key 是弱引用,不会阻止垃圾回收。

8. console.log 的影响

在开发环境调试时打印对象,如果线上环境忘记删除 console.log,控制台会一直持有对象的引用(特别是打印复杂对象时),导致对象无法被回收。现代浏览器在处理 console.log 时有所优化,但仍需注意。

建议:

  • 生产环境打包时移除所有 console.log

总结:如何避免内存泄漏?

  1. 使用 WeakMapWeakSet 存储对象引用。
  2. 及时清理:清除定时器、取消订阅、解绑事件。
  3. 避免全局变量,使用 let/const 和严格模式。
  4. 合理使用闭包,避免在闭包中持有大量数据的引用。
  5. 善用工具
    • 使用 Chrome DevTools 的 Memory 面板拍摄堆快照(Heap Snapshot),分析内存占用。
    • 使用 Performance 面板监控内存变化。

什么是事件循环?调用堆栈和任务队列之间有什么区别?

事件循环 (Event Loop)

事件循环是 JavaScript 运行时处理异步操作的核心机制,它使得 JavaScript 虽然是单线程的,但能够非阻塞地处理 I/O 操作和其他异步任务。

主要组成部分

  1. 调用堆栈 (Call Stack)

    • 一个后进先出(LIFO)的数据结构
    • 用于跟踪当前正在执行的函数
    • 当函数被调用时,会被推入堆栈;执行完毕后弹出
  2. 任务队列 (Task Queue)

    • 一个先进先出(FIFO)的数据结构
    • 存储待处理的消息(异步操作的回调)
    • 包括宏任务队列和微任务队列

调用堆栈 vs 任务队列

特性 调用堆栈 (Call Stack) 任务队列 (Task Queue)
结构 LIFO (后进先出) FIFO (先进先出)
内容 同步函数调用 异步回调函数
执行时机 立即执行 等待调用堆栈为空时才执行
优先级
溢出 可能导致"栈溢出"错误 不会溢出,但可能导致内存问题

事件循环的工作流程

  1. 执行调用堆栈中的同步代码
  2. 当调用堆栈为空时,事件循环检查任务队列
  3. 如果有待处理的任务,将第一个任务移到调用堆栈执行
  4. 重复这个过程

微任务队列 (Microtask Queue)

  • 比普通任务队列优先级更高
  • 包含 Promise 回调、MutationObserver 等
  • 在当前任务完成后、下一个任务开始前执行
  • 会一直执行直到微任务队列为空
console.log('1'); // 同步代码,直接执行

setTimeout(() => console.log('2'), 0); // 宏任务,放入任务队列

Promise.resolve().then(() => console.log('3')); // 微任务,放入微任务队列

console.log('4'); // 同步代码,直接执行

// 输出顺序: 1, 4, 3, 2

理解事件循环和这些队列的区别对于编写高效、无阻塞的 JavaScript 代码至关重要。

处理 I/O 操作的含义

I/O(Input/Output,输入/输出)操作是指程序与外部资源进行数据交换的过程。在JavaScript中,处理I/O操作特别重要,因为JavaScript是单线程的,而I/O操作通常是阻塞的(需要等待响应)。

常见的I/O操作类型

  1. 文件系统操作

    • 读写文件
    • 例如Node.js中的fs.readFile()
  2. 网络请求

    • HTTP/HTTPS请求
    • WebSocket通信
    • 例如fetch()XMLHttpRequest
  3. 数据库操作

    • 查询或更新数据库
    • 例如MongoDB、MySQL等数据库操作
  4. 用户输入

    • 键盘输入
    • 鼠标点击等交互事件

JavaScript如何处理I/O操作

JavaScript通过异步非阻塞方式处理I/O:

  1. 非阻塞特性

    • 发起I/O请求后,不等待结果立即继续执行后续代码
    • 避免线程被阻塞
  2. 回调机制

    • I/O完成后通过回调函数处理结果
    • 例如:
      fs.readFile('file.txt', (err, data) => {
        if (err) throw err;
        console.log(data);
      });
      
  3. Promise/async-await

    • 更现代的异步处理方式
    • 例如:
      async function fetchData() {
        const response = await fetch('https://api.example.com/data');
        const data = await response.json();
        console.log(data);
      }
      

为什么需要特殊处理I/O

  1. 性能考虑:I/O操作通常比CPU操作慢得多

    • 磁盘读取:毫秒级(10^-3秒)
    • 网络请求:可能达到秒级
  2. 单线程限制:JavaScript只有一个主线程

    • 如果同步等待I/O,整个程序会卡住
  3. 用户体验:在浏览器中,阻塞会导致页面无响应

事件循环中的I/O处理

当I/O操作完成时:

  1. 相应的回调函数被放入任务队列
  2. 事件循环在调用栈为空时从队列中取出回调执行
  3. 这使得JavaScript能够高效处理大量并发I/O
console.log('开始请求'); // 同步代码

// 异步I/O操作
fetch('https://api.example.com/data')
  .then(response => response.json())
  .then(data => console.log('收到数据:', data)); // 回调

console.log('请求已发起,继续执行其他代码'); // 立即执行

// 可能的输出顺序:
// 开始请求
// 请求已发起,继续执行其他代码
// 收到数据: {...}

这种机制使得JavaScript特别适合I/O密集型应用(如Web服务器),能够高效处理大量并发请求而不需要创建多个线程。

从 8 个实战场景深度拆解:为什么资深前端都爱柯里化?

你一定见过无数臃肿的 if-else 和重复嵌套的逻辑。在追求 AI-Native 开发的今天,代码的“原子化”程度直接决定了 AI 辅助重构的效率。

柯里化(Currying) 绝不仅仅是面试时的八股文,它是实现逻辑复用、配置解耦的工业级利器。通俗地说,它把一个多参数函数拆解成一系列单参数函数:f(a,b,c)f(a)(b)(c)f(a, b, c) \rightarrow f(a)(b)(c)

以下是 8 个直击前端实战痛点的柯里化应用案例。


1. 差异化日志系统:环境与等级的解耦

在web系统中,我们经常需要根据不同环境输出不同等级的日志。

JavaScript

const logger = (env) => (level) => (msg) => {
  console.log(`[${env.toUpperCase()}][${level}] ${msg} - ${new Date().toLocaleTimeString()}`);
};

const prodError = logger('prod')('ERROR');
const devDebug = logger('dev')('DEBUG');

prodError('支付接口超时'); // [PROD][ERROR] 支付接口超时 - 10:20:00

2. API 请求构造器:预设 BaseURL 与 Header

不用每次请求都传 Token 或域名,通过柯里化提前“锁死”配置。

JavaScript

const request = (baseUrl) => (headers) => (endpoint) => (params) => {
  return fetch(`${baseUrl}${endpoint}?${new URLSearchParams(params)}`, { headers });
};

const apiWithAuth = request('https://api.finance.com')({ 'Authorization': 'Bearer xxx' });
const getUser = apiWithAuth('/user');

getUser({ id: '888' }); 

3. DOM 事件监听:优雅传递额外参数

在 Vue 或 React 模板中,我们常为了传参写出 () => handleClick(id)。柯里化可以保持模板整洁并提高性能。

JavaScript

const handleMenuClick = (menuId) => (event) => {
  console.log(`点击了菜单: ${menuId}`, event.target);
};

// 模板中直接绑定:@click="handleMenuClick('settings')"

4. 复合校验逻辑:原子化验证规则

将复杂的表单校验拆解为可组合的原子。

JavaScript

const validate = (reg) => (tip) => (value) => {
  return reg.test(value) ? { pass: true } : { pass: false, tip };
};

const isMobile = validate(/^1[3-9]\d{9}$/)('手机号格式错误');
const isEmail = validate(/^\w+@\w+.\w+$/)('邮箱格式错误');

console.log(isMobile('13800138000')); // { pass: true }

5. 金融汇率换算:固定基准率

在处理多币种对账时,柯里化能帮你固定变动较慢的参数。

JavaScript

const convertCurrency = (rate) => (amount) => (amount * rate).toFixed(2);

const usdToCny = convertCurrency(7.24);
const eurToCny = convertCurrency(7.85);

console.log(usdToCny(100)); // 724.00

6. 动态 CSS 类名生成器:样式逻辑解耦

配合 CSS Modules 或 Tailwind 时,通过柯里化快速生成带状态的类名。

JavaScript

const createCls = (prefix) => (state) => (baseCls) => {
  return `${prefix}-${baseCls} ${state ? 'is-active' : ''}`;
};

const navCls = createCls('nav')(isActive);
const btnCls = navCls('button'); // "nav-button is-active"

7. 数据过滤管道:可组合的 Array 操作

在处理海量 AI Prompt 列表时,将过滤逻辑函数化,方便链式调用。

JavaScript

const filterBy = (key) => (value) => (item) => item[key].includes(value);

const filterByTag = filterBy('tag');
const prompts = [{ title: 'AI助手', tag: 'Finance' }, { title: '翻译机', tag: 'Tool' }];

const financePrompts = prompts.filter(filterByTag('Finance'));

8. AI Prompt 模板工厂:多层上下文注入

为你正在开发的 AI Prompt Manager 设计一个分层注入器:先注入角色,再注入上下文,最后注入用户输入。

JavaScript

const promptFactory = (role) => (context) => (input) => {
  return `Role: ${role}\nContext: ${context}\nUser says: ${input}`;
};

const financialExpert = promptFactory('Senior Financial Analyst')('Analyzing 2026 Q1 Report');
const finalPrompt = financialExpert('请总结该季报风险点');

不用折腾部署 OpenClaw,我用 MiniMax Agent 一键养「龙虾」,还拍了个短剧

春节假期,帮亲戚朋友们部署 OpenClaw 成了我一份额外的工作。虽然不一定能真正用上,但这只龙虾是不得不拥有。

AI 进入我们的工作流,在 OpenClaw 爆火之后,这种感觉变得更加强烈。在「不用 AI 会被淘汰,用了 AI 也像是能被替代」的悖论下,不错过任何一个能放大自身价值的 AI 工具,让人陷入了无止境的 FOMO。

越来越多的「龙虾变体」也涌现出来,但是当被问到打算怎么把这个部署好的 OpenClaw 融入工作流,答案往往又是个未知数。更不用说光是部署好 OpenClaw,就有两道大关,一是要手动部署和配置复杂的模型 API,二是让人心疼的额外 API 费用。

今天,更新后的 MiniMax Agent 推出了两项新功能。

专业度更高,更会干活的 Expert 智能体社区,涵盖从技术开发、创意写作到音视频图片生成等多模态领域,超过 1.6 万个专家,且还在持续增长。大多数场景下,我们几乎都能直接找到现成可用的专家;即便没有完全匹配的,用几句话还能快速创建一个自己的 Expert。

另一项新增的 MaxClaw 模式,能让我们一键打通 OpenClaw 生态,而且完全不需要自己配置 API,以及承担额外的 API 费用,解决了「不知道 OpenClaw 能做什么」和「怎么部署 OpenClaw」这两个问题。

这也就意味着,即便是纯小白,现在也能拥有开箱即用的专属 AI 专家团队了

APPSO 也实测了一波智能体专家和 MaxClaw 这两项新功能,它确实和一般的智能体 Agent 不同,结合了 Skills 的能力和 OpenClaw 的兼容能力,我们直接就能操作飞书、钉钉等即时通讯软件。

而和市面上不同版本的 OpenClaw 对比,MiniMax Agent 的 MaxClaw 又有了预置的专家智能体,整个体验会更加友好。

体验地址:国内版🔗 https://agent.minimaxi.com
海外版🔗 https://agent.minimax.io

超过 1.6 万个 Experts 的大社区

对于 AI 创作来说,无论是文本还是多媒体,大多数时候用大模型,最痛苦的就是「AI 味太重」或者「废话连篇」。究其原因,往往是「提示词不当」、「模型不够强」,总结在普通的聊天形式缺乏深度的垂直领域优化。

MiniMax Agent 这次推出的 Expert(专家智能体) 虽然还是在聊天对话里进行,但底层逻辑做了一些改变。它主打即开即用,提供了针对各种深度垂类场景优化的 Agent

▲MiniMax Agent 内提供了办公效率、商业金融、教育学习、生活娱乐等上万个专家

在处理对应垂直领域的任务上,和非专家的单纯对话形式相比,专家能交付更专业、质量更高的结果。为了验证这一点,我们直接从它目前已经 1.6w+公开的 Expert 库(大部分是用户创作)里,挑了几个热门的场景进行实测。

PPT、网页、行业分析,AI 开始按场景分工干活

从目前 Expert 社区的使用热度来看,用户最先跑起来的,往往还是那些直接指向生产力的刚需场景,比如办公制作、内容搭建,以及金融与行业分析。

在 MiniMax Agent 首页,我们点击左侧边栏的「探索专家」,就能进入已经按场景分好类的专家社区。不同专家不仅标注了能力方向,还能看到背后调用的「子代理」和完整项目指令,相当于把一套成熟工作流直接摆在用户面前。

找到合适的专家后,点击「开始聊天」,输入需求,它就会按既定流程自动推进任务。

▲股票价值分析专家介绍

在办公与内容生产场景中,落地页生成和 PPT 制作依然是浏览量最高的一类专家。

我们先测试了 Landing Page Builder 专家。输入需求:「我要给初中生做一个五代十国历史的网页,得让他们真的能听进去,内容翔实有考据,一节课 45 分钟的内容。要解释清楚、配图到位、动效得当、沉浸感强,举的例子能让他们产生共鸣,再加几道题检验下理解程度。」

整个过程中,专家几乎不需要额外干预,而是按照预设流程自动完成结构设计、内容填充和页面生成。

▲预览链接:https://qvwu1nyvju2u.space.minimax.io/

从最终效果来看,这类 Expert 和传统 Agent 最大的区别在于,它从边聊天边拼凑,转成了沿着一条完整生产流程在推进,结果的稳定性和完成度明显更高。

生成的网页不仅信息完整,画面和动效也有一定沉浸感,相比过去一些 vibe coding 产品常见的模板化和渐变紫风格,要更克制也更可用。

在偏专业的分析类任务上,Expert 的优势会更明显。我们选择了 McKinsey PPT(麦肯锡风格演示文稿生成)专家进行测试。按照介绍,它会自动补充数据、图表以及行业洞察。

实际测试中,我们只输入了一句非常简单的需求,「制作一份关于全球机器人市场的10页幻灯片演示文稿」。但最终生成的 PPT,在信息密度、结构完整度和图表配置上都没有明显缩水,基本具备拿来就能用的初稿质量。

这类场景也很能体现 Expert 的定位,它尝试把一整段专业工作流程产品化,从增强单次问答的模式里彻底跳了出来。

有了多模态能力的专家,一句话拍出顾北辰的短剧宇宙

还没听说过有能生成视频的通用 Agent 产品,但现在结合多个不同的 Skills、Agents 的专家,输入一段剧情,直接就能给我们一部短剧。

▲提示词:霸总重生在电子厂打螺丝,宫崎骏动漫风格,1-3分钟视频长度,台词激烈有冲突,剧情跌宕起伏有反转。

我们使用 AI 短剧导演+摄影+剪辑师专家进行测试,和一般的视频生成模型只能产出 5-10s 左右的视频不同,这个专家能自动生成完整的分镜,并且把视频进行剪辑和拼接。

最后生成的视频,完成度很高,虽然没能对口型把台词一字一句说出来,但是也配了一段应景的 BGM。而且大概率是检测到了提示词里面的「宫崎骏」,整个动画的风格,乃至角色和公司名字,都透露着一股日漫的味道。

简单对话,每个人都能创建一个专家

如果觉得官方或别人做的专家,还不够贴合我们的使用习惯和工作场景,MiniMax Agent 也提供了自定义功能,通过简单的一两句话就能创建一个专家。

我们完全不需思考什么是 Skill 或者专家,也不用遵守标准文件的规则设置等,只需要通过自然语言交互,就能更方便地把个性化的工作流、SOP 等集成,创建专属 Expert。

热点追踪是媒体编辑一项非常重要的工作,我们在 MiniMax Agent 的专家社区里,也使用过多次热点追踪的专家。例如当我们要求它基于输入的「春晚被机器人刷屏」这个主题,去搜索最新消息和近期热门话题时;它最后能给我们一份完整详细的长文,但是不够个性化。

于是,我们开始自己来创建一个 APPSO 的热点追踪。

▲在探索专家页面右上角点击「创建专家」,输入自己的需求,MiniMax Agent 会自动帮我们完成创建

创建专家的过程是可以连续对话,如果对目前专家的输出不满意,我们可以继续在对话框内要求 MiniMax Agent 进行更新。

创建完成之后,我们只需要发送一句「开始,帮我整理今天的科技快讯」,专家就会给我们 24h 内最值得关注的 AI 消息,并且以早报的文风和格式要求写好。此外,这些自己创建的专家,MiniMax 还提供了 15 轮免费,即不消耗积分的优惠,体验门槛更低。

▲APPSO 自定义的专家,现在可以自主完成一份快讯早报

除了大量可以直接使用和自定义的 Experts,更值得关注的是即将上线的 Marketplace。用户创建的 Expert,如果被使用,就能获得相应的积分,可以用来在 MiniMax Agent 里完成更多的任务。

而后续 MiniMax 还将开放专家自行定价,这意味着如果你在某个垂直领域有真正的专业积累,封装成 Expert 除了分享自用,还可能是一种新的变现路径。

说白了,一个 Skills 专家的应用商店雏形,已经摆在我们面前了。

一键接入 OpenClaw 的 MaxClaw

如果说 Expert 是强大的大脑,那么 MaxClaw 就是让大脑连接到现实的双手,这也是 MiniMax Agent 这次升级里,玩法最丰富的一个功能。我把它叫做升级版的 OpenClaw。

根据网络上到处都是的 OpenClaw 指南,想要真正好用的OpenClaw生态,我们要先学会手动部署、配置复杂的模型API,还要时刻盯着后台,生怕一不小心跑出天价的 API 账单。

对于绝大多数不懂代码的普通小白来说,这门槛属实是太高了。我只是想把好用的 AI 接入自己的飞书或钉钉,创建一个机器人,但是第一步就困住了。

MiniMax Agent 新增的 MaxClaw 模式,一键打通了 OpenClaw 生态,不需要繁琐的手动部署和配置模型 API,通过MiniMax Agent 网页端就可以快速上手。

目前,它也兼容手机端多个即时通讯交互工具,我们可以在飞书、钉钉、Telegram、WhatsApp、Discord、Slack 中使用。

拿部署到飞书机器人举例,甚至不用额外的部署指南,我们只需要点开首页左侧边栏的 MaxClaw 按钮,点击「立即开始」,我们可以选择使用默认配置,或者其他专家。

这也是 MaxClaw 对比 OpenClaw 的一大亮点,除了能像 OpenClaw 一样连接到不同的聊天应用,在自己常用的 App 里就能指挥 AI 干活;我们在初始配置时,就可以直接选择那些已经有的预置专家 Agent 配置。

创建之后,在对话框里发送消息,「我想连接到飞书」,按照 MaxClaw 回复的消息,我们点击飞书开放平台的链接,登录之后,按照流程,创建一个企业自建应用,获取 App ID 和 App Secret。接着把复制的信息发送给 MaxClaw,它会提示重启,重启之后在飞书的配置事件订阅里选择添加对应的事件就能启用。

不出所料,整个过程肯定会有一些问题。例如我们在拿公司飞书账号测试时,就被提示相关的授权需要审核才能发布,以及在权限管理和事件配置部分,飞书里面的内容太多太杂乱,根本不知道授予哪些权限。

这个时候,直接回到 MaxClaw,把遇到的问题统统发给它,跟着它的提示走,基本上都能解决。

顺利部署之后,我们在自己的飞书里,就能看到一个对应名字的机器人,然后直接开启对话,所有的对话也会同步在 MiniMax Agent 网页里的 MaxClaw 显示。

▲现在,飞书就能指挥你的 MaxClaw

让 MaxClaw 帮我们干活,都只用在飞书里面指挥它。我们直接把之前创建的「热点追踪」专家的指令发给它,然后在飞书里对话,输入一句简单指令,「帮我整理今天的快讯」。

很快,一份结构完整的 AI 早报就直接回到了飞书对话框里,完全按照要求的格式,摘要、关键信息提炼、标题等全部都有。并且还能设置定时任务,让 MaxClaw 在飞书里主动给我们发送消息。

除了热点追踪,之前的股票价值分析等专家,我们现在也可以直接通过飞书聊天的方式,就让 MaxClaw 为我们总结出一份逻辑清晰的完整报告。同时,继续让它为我们监控英伟达最新的动态。

而如果直接在配置的时候,选择对应的专家,我们可以看到它的 Skills 情况,MaxClaw 会自动添加开箱即用的 Skills 来帮助我们更好的上手。

▲在效率工具里面有「博客监控」和「内容摘要」等 Skills 用于「热点追踪」专家

时间一到,MaxClaw 在飞书里,准时给我们推送了最新的资讯。

「Claw」是 Agent 之后一种新的智能阶段

这次更新,真正值得关注的,其实不是又多了一个 Agent 工具。

OpenClaw 的爆火,让我们看到了一个能真正干活的「Agent」是什么样。它是个性化的,部署在自己的电脑上,告别了过去一个网页解决所有用户问题的统一;它是互联互通的,打穿了终端设备上不同应用的壁垒,在 Telegram 也能指挥 AI 帮助我们回复工作邮件……

▲知名博主 Simon Willison 提到 Claw 似乎正在成为像 Agent 一样的专用术语,用来描述一种新的智能体类别|图片来源:https://simonwillison.net/2026/Feb/21/

这本质上是在提醒我们一件事:AI 正在从「辅助回答问题」,走向「直接进入工作流」。当 AI 开始能够调用工具、跨应用执行任务、甚至在后台持续运转,我们原有的工作组织方式,本身就已经在发生变化。

问题只在于,大多数普通用户其实卡在门外。

▲全球 81 亿人中, 84% 的人从未用过 AI,而只有 0.3% 的用户愿意为 AI 付费|图片来源:https://global-ai-adoption.netlify.app/

一边是大家都知道 Agent 很强、OpenClaw 很火;另一边,是复杂的部署流程、看不懂的 API 配置,以及随时可能失控的调用成本。很多人不是不想用,而是很难真正用起来。

MiniMax Agent 这次做的事情,某种程度上就是在把这道门槛往下搬,让普通打工人也能轻松搭建自己的顶级 AI 工作流。

▲MiniMax Agent 会员定价|对比大部分 AI 动辄 20 美元一个月的订阅费用,MiniMax Agent 39 元的价格,大约一杯咖啡的钱,却已经足够能帮我们把写稿、做 PPT、跑多 Agent 工作流一口气打通,让这只「龙虾」多线程干活

Expert 把过去需要反复调 Prompt、反复试错的专业流程,打包成了即开即用的专家社区;MaxClaw 则把原本偏极客向的 OpenClaw 生态,压缩成了一键可用的连接能力。

对于普通用户来说,这种变化的意义很直接,我们不用懂什么是终端,不用让自己费尽力气做个半吊子「工程师」,也能开始搭建自己的 AI 工作流。

▲METR 此前的研究显示 AI 工具对开发人员生产力的影响,导致生产力下降了 20%;但 METR 表示现在这一发现已经过时,生产力提升似乎更有可能|图片来源:https://x.com/METR_Evals/status/2026355544668385373/

当越来越多「Agent」能够被像软件一样使用,AI 对工作方式的影响,才会真正开始外溢。

从这个角度看,MiniMax 推出这些产品,价值或许不只在于功能多了两个按钮,更在于它正在把一套原本属于少数人的先进工作范式,逐步变成更多人可以上手的日常工具。

对普通用户来说,这或许才是 Agent 真正开始变得有用的时刻。

#欢迎关注爱范儿官方微信公众号:爱范儿(微信号:ifanr),更多精彩内容第一时间为您奉上。

爱范儿 | 原文链接 · 查看评论 · 新浪微博


AI 写代码总是半途而废?试试这个免费的工作流工具

作为一个用过多种 IDE 的开发者,我想分享一个让我效率 up up 的小工具。

你有没有遇到过这种情况?

  • 跟 AI 聊了半天需求,代码写了一半,上下文满了,AI "失忆"了
  • 项目做到一半搁置,一周后回来完全忘了做到哪了
  • 想加一个功能,结果 AI 把之前的代码改坏了

这些问题都有一个共同原因:上下文衰减(Context Rot)

简单来说,AI 的"记忆"是有限的。当对话太长时,它会慢慢忘掉之前说过的话,导致代码质量下降。

GSD 是什么?

GSD = Get Shit Done(把事做完)

它是一个开源的 AI 编程工作流框架,核心思路很简单:

把项目信息存到文件里,而不是全部塞给 AI。

就像你写代码会用 Git 做版本控制一样,GSD 帮你做"AI 对话的版本控制"。

GSD for Trae

原版 GSD 是为 Claude Code 设计的。因为我日常用 Trae,所以做了这个适配版本。

安装只需一行命令:

npx gsd-trae

或者:

bash <(curl -s https://raw.githubusercontent.com/Lionad-Morotar/get-shit-done-trae/main/install.sh)

它能帮你做什么?

1. 新项目规划

输入 /gsd:new-project,它会:

  • 问你一系列问题,搞清楚你要做什么
  • 自动研究技术方案(可选)
  • 生成项目路线图

2. 阶段式开发

大项目拆成小阶段:

  • /gsd:plan-phase 1 - 规划第一阶段
  • /gsd:execute-phase 1 - 执行第一阶段
  • /gsd:verify-work - 验证做得对不对

每完成一个阶段,进度都会被记录,随时可以接着做。

3. “断点续传”

关掉电脑、明天再来,输入 /gsd:progress,AI 马上知道:

  • 项目做到哪了
  • 接下来该做什么
  • 之前的决策是什么

实际使用感受

我用了一个月,相比 Trae 的 Plan Build 模式最明显的变化:

以前:一个功能聊到一半,AI 开始"胡言乱语",只能新开对话重来

现在:每个阶段都有清晰的目标和验收标准,AI 一直保持在正确的方向上

以前:同时开多个功能,代码互相冲突

现在:按阶段来,做完一个再做下一个,井井有条(进阶用户也可以选择 Worktree 模式)

以前:Plan 文档随意仍在 .trae 的文档目录,没有管理,很难查找

现在:结构化的目录,GSD 和开发者都能轻松阅读

适合谁用?

  • 用 Trae/Gemini/Claude 写代码的开发者
  • 做独立项目、 side project 的人
  • 觉得 AI 编程"聊不动"的新手

相比其他工具的优势

市面上有不少 AI 编程工作流工具,比如 GitHub 的 Spec Kit、OpenSpec、BMAD 等。GSD 的定位不太一样:

工具 特点 GSD 的区别
Spec Kit 企业级、严格阶段门控、30分钟启动 GSD 更轻量,5分钟上手,没有繁琐的仪式
OpenSpec 灵活快速、Node.js 运行 GSD 额外解决了 Context Rot 问题,支持断点续传
BMAD 21个 AI Agent、完整敏捷流程 GSD 不模拟团队,而是聚焦"让开发者高效完成项目"

简单说:如果你期待快速而结构化的流程,又不想被复杂的企业开发规范束缚的同时,确保 AI 编程能稳定输出,GSD 可能是目前最合适的选择。

它是免费的

开源项目,GitHub 地址: github.com/Lionad-Moro…

MIT 协议,可以随便用、随便改。

最后说一句

AI 编程工具越来越强大,但工具只是工具。

好的工作流能让你事半功倍,而 GSD 就是这样一套经过验证的工作流。

不需要改变你现有的开发习惯,安装后输入 /gsd:new-project 试试看。


如果你试过觉得好用,欢迎点个 Star ⭐

如果发现问题,也欢迎提 Issue

React 状态管理:Easy-Peasy 入门指南

大家好!今天我们来聊聊 React 状态管理中的一个非常简单且高效的库——Easy-Peasy。它可以帮助我们轻松管理应用中的状态,让开发更加高效和清晰。

相关链接

官网 Github仓库 npm

为什么选择 Easy-Peasy?

Easy-Peasy 是对 Redux 的一种抽象。它提供了一个重新构思的 API,专注于开发者体验,使你能够快速轻松地管理状态,同时利用 Redux 强大的架构保障,并与其广泛的生态系统进行集成。

所有功能均已内置,无需配置即可支持一个健壮且可扩展的状态管理解决方案,包括派生状态、API 调用、开发者工具等高级特性,并通过 TypeScript 提供完整的类型支持体验。

它社区活跃、更新稳定,跟随社区的 redux 版本同步更新。

  • Zero configuration 零配置

  • No boilerplate 无冗余代码

  • React hooks based API 基于React Hook的API

  • Extensive TypeScript support 广泛的TypeScript支持

  • Encapsulate data fetching 封装数据获取

  • Computed properties 计算属性

  • Reactive actions 响应式动作

  • Redux middleware support 支持 Redux 中间件

  • State persistence 状态持久性

  • Redux Dev Tools 支持Redux开发工具

  • Global, context, or local stores 全局、上下文或本地存储

  • Built-in testing utils 内置测试工具

  • React Native supported 支持 React Native

  • Hot reloading supported 支持热重载

所有这些功能只需安装一个依赖项即可实现。

创建nextjs项目

(base) pe7er@pe7erdeMacBook-Pro github % npx create-next-app@latest
npm http fetch GET 200 https://mirrors.cloud.tencent.com/npm/create-next-app 1151ms (cache updated)
Need to install the following packages:
create-next-app@14.2.13
Ok to proceed? (y)

npm http fetch GET 200 https://mirrors.cloud.tencent.com/npm/create-next-app 1071ms (cache miss)
npm http fetch POST 200 https://mirrors.cloud.tencent.com/npm/-/npm/v1/security/advisories/bulk 621ms
npm http fetch GET 200 https://mirrors.cloud.tencent.com/npm/create-next-app/-/create-next-app-14.2.13.tgz 1034ms (cache miss)
✔ What is your project named? … nextjs-easy-peasy-template
✔ Would you like to use TypeScript? … No / Yes
✔ Would you like to use ESLint? … No / Yes
✔ Would you like to use Tailwind CSS? … No / Yes
✔ Would you like to use `src/` directory? … No / Yes
✔ Would you like to use App Router? (recommended) … No / Yes
✔ Would you like to customize the default import alias (@/*)? … No / Yes
✔ What import alias would you like configured? … @/*
Creating a new Next.js app in /Users/pe7er/Developer/github/nextjs-easy-peasy-template.
控制台完整输出
            (base) pe7er@pe7erdeMacBook-Pro github % npx create-next-app@latest
npm http fetch GET 200 https://mirrors.cloud.tencent.com/npm/create-next-app 1151ms (cache updated)
Need to install the following packages:
create-next-app@14.2.13
Ok to proceed? (y)
npm http fetch GET 200 https://mirrors.cloud.tencent.com/npm/create-next-app 1071ms (cache miss)
npm http fetch POST 200 https://mirrors.cloud.tencent.com/npm/-/npm/v1/security/advisories/bulk 621ms
npm http fetch GET 200 https://mirrors.cloud.tencent.com/npm/create-next-app/-/create-next-app-14.2.13.tgz 1034ms (cache miss)
✔ What is your project named? … nextjs-easy-peasy-template
✔ Would you like to use TypeScript? … No / YesWould you like to use ESLint? … No / YesWould you like to use Tailwind CSS? … No / YesWould you like to use `src/` directory? … No / YesWould you like to use App Router? (recommended) … No / YesWould you like to customize the default import alias (@/*)? … No / YesWhat import alias would you like configured? … @/*
Creating a new Next.js app in /Users/pe7er/Developer/github/nextjs-easy-peasy-template.
Using npm.
Initializing project with template: app-tw
Installing dependencies:
- react
- react-dom
- next
Installing devDependencies:
- typescript
- @types/node
- @types/react
- @types/react-dom
- postcss
- tailwindcss
- eslint
- eslint-config-next
npm http fetch GET 200 https://mirrors.cloud.tencent.com/npm/react 720ms (cache updated)
npm http fetch GET 200 https://mirrors.cloud.tencent.com/npm/react-dom 1250ms (cache updated)
npm http fetch GET 200 https://mirrors.cloud.tencent.com/npm/next 2449ms (cache updated)
npm http fetch GET 200 https://mirrors.cloud.tencent.com/npm/@opentelemetry%2fapi 591ms (cache updated)
npm http fetch GET 200 https://mirrors.cloud.tencent.com/npm/@playwright%2ftest 1250ms (cache updated)
npm http fetch GET 200 https://mirrors.cloud.tencent.com/npm/sass 422ms (cache updated)
npm http fetch GET 200 https://mirrors.cloud.tencent.com/npm/typescript 2082ms (cache updated)
npm http fetch GET 200 https://mirrors.cloud.tencent.com/npm/@types%2fnode 1414ms (cache updated)
npm http fetch GET 200 https://mirrors.cloud.tencent.com/npm/@types%2freact 742ms (cache updated)
npm http fetch GET 200 https://mirrors.cloud.tencent.com/npm/@types%2freact-dom 566ms (cache updated)
npm http fetch GET 200 https://mirrors.cloud.tencent.com/npm/postcss 309ms (cache updated)
npm http fetch GET 200 https://mirrors.cloud.tencent.com/npm/tailwindcss 1018ms (cache updated)
npm http fetch GET 200 https://mirrors.cloud.tencent.com/npm/eslint 479ms (cache updated)
npm http fetch GET 200 https://mirrors.cloud.tencent.com/npm/eslint-config-next 1234ms (cache updated)
npm http fetch GET 200 https://mirrors.cloud.tencent.com/npm/@eslint-community%2feslint-utils 365ms (cache updated)
npm http fetch GET 200 https://mirrors.cloud.tencent.com/npm/undici-types 370ms (cache updated)
npm http fetch GET 200 https://mirrors.cloud.tencent.com/npm/@types%2fprop-types 487ms (cache updated)
npm http fetch GET 200 https://mirrors.cloud.tencent.com/npm/@eslint-community%2fregexpp 498ms (cache updated)
npm http fetch GET 200 https://mirrors.cloud.tencent.com/npm/csstype 508ms (cache updated)
npm http fetch GET 200 https://mirrors.cloud.tencent.com/npm/@eslint%2fjs 606ms (cache updated)
npm http fetch GET 200 https://mirrors.cloud.tencent.com/npm/@eslint%2feslintrc 685ms (cache updated)
npm http fetch GET 200 https://mirrors.cloud.tencent.com/npm/@humanwhocodes%2fmodule-importer 326ms (cache updated)
npm http fetch GET 200 https://mirrors.cloud.tencent.com/npm/@nodelib%2ffs.walk 331ms (cache updated)
npm http fetch GET 200 https://mirrors.cloud.tencent.com/npm/chalk 329ms (cache updated)
npm http fetch GET 200 https://mirrors.cloud.tencent.com/npm/ajv 629ms (cache updated)
npm http fetch GET 200 https://mirrors.cloud.tencent.com/npm/doctrine 337ms (cache updated)
npm http fetch GET 200 https://mirrors.cloud.tencent.com/npm/@ungap%2fstructured-clone 663ms (cache updated)
npm http fetch GET 200 https://mirrors.cloud.tencent.com/npm/debug 469ms (cache updated)
npm http fetch GET 200 https://mirrors.cloud.tencent.com/npm/@humanwhocodes%2fconfig-array 871ms (cache updated)
npm http fetch GET 200 https://mirrors.cloud.tencent.com/npm/cross-spawn 555ms (cache updated)
npm http fetch GET 200 https://mirrors.cloud.tencent.com/npm/escape-string-regexp 413ms (cache updated)
npm http fetch GET 200 https://mirrors.cloud.tencent.com/npm/esutils 221ms (cache updated)
npm http fetch GET 200 https://mirrors.cloud.tencent.com/npm/eslint-visitor-keys 351ms (cache updated)
npm http fetch GET 200 https://mirrors.cloud.tencent.com/npm/espree 361ms (cache updated)
npm http fetch GET 200 https://mirrors.cloud.tencent.com/npm/eslint-scope 376ms (cache updated)
npm http fetch GET 200 https://mirrors.cloud.tencent.com/npm/file-entry-cache 251ms (cache updated)
npm http fetch GET 200 https://mirrors.cloud.tencent.com/npm/find-up 316ms (cache updated)
npm http fetch GET 200 https://mirrors.cloud.tencent.com/npm/esquery 626ms (cache updated)
npm http fetch GET 200 https://mirrors.cloud.tencent.com/npm/fast-deep-equal 559ms (cache updated)
npm http fetch GET 200 https://mirrors.cloud.tencent.com/npm/graphemer 291ms (cache updated)
npm http fetch GET 200 https://mirrors.cloud.tencent.com/npm/glob-parent 399ms (cache updated)
npm http fetch GET 200 https://mirrors.cloud.tencent.com/npm/globals 422ms (cache updated)
npm http fetch GET 200 https://mirrors.cloud.tencent.com/npm/ignore 384ms (cache updated)
npm http fetch GET 200 https://mirrors.cloud.tencent.com/npm/is-glob 218ms (cache updated)
npm http fetch GET 200 https://mirrors.cloud.tencent.com/npm/is-path-inside 223ms (cache updated)
npm http fetch GET 200 https://mirrors.cloud.tencent.com/npm/imurmurhash 294ms (cache updated)
npm http fetch GET 200 https://mirrors.cloud.tencent.com/npm/js-yaml 262ms (cache updated)
npm http fetch GET 200 https://mirrors.cloud.tencent.com/npm/levn 163ms (cache updated)
npm http fetch GET 200 https://mirrors.cloud.tencent.com/npm/json-stable-stringify-without-jsonify 337ms (cache updated)
npm http fetch GET 200 https://mirrors.cloud.tencent.com/npm/lodash.merge 272ms (cache updated)
npm http fetch GET 200 https://mirrors.cloud.tencent.com/npm/strip-ansi 279ms (cache updated)
npm http fetch GET 200 https://mirrors.cloud.tencent.com/npm/optionator 301ms (cache updated)
npm http fetch GET 200 https://mirrors.cloud.tencent.com/npm/natural-compare 414ms (cache updated)
npm http fetch GET 200 https://mirrors.cloud.tencent.com/npm/minimatch 471ms (cache updated)
npm http fetch GET 200 https://mirrors.cloud.tencent.com/npm/@rushstack%2feslint-patch 296ms (cache updated)
npm http fetch GET 200 https://mirrors.cloud.tencent.com/npm/text-table 470ms (cache updated)
npm http fetch GET 200 https://mirrors.cloud.tencent.com/npm/eslint-import-resolver-node 446ms (cache updated)
npm http fetch GET 200 https://mirrors.cloud.tencent.com/npm/eslint-import-resolver-typescript 567ms (cache updated)
npm http fetch GET 200 https://mirrors.cloud.tencent.com/npm/eslint-plugin-import 519ms (cache updated)
npm http fetch GET 200 https://mirrors.cloud.tencent.com/npm/eslint-plugin-jsx-a11y 598ms (cache updated)
npm http fetch GET 200 https://mirrors.cloud.tencent.com/npm/@next%2feslint-plugin-next 958ms (cache miss)
npm http fetch GET 200 https://mirrors.cloud.tencent.com/npm/eslint-plugin-react 393ms (cache updated)
npm http fetch GET 200 https://mirrors.cloud.tencent.com/npm/@swc%2fhelpers 391ms (cache updated)
npm http fetch GET 200 https://mirrors.cloud.tencent.com/npm/@typescript-eslint%2fparser 1477ms (cache updated)
npm http fetch GET 200 https://mirrors.cloud.tencent.com/npm/busboy 688ms (cache updated)
npm http fetch GET 200 https://mirrors.cloud.tencent.com/npm/postcss 12ms (cache hit)
npm http fetch GET 200 https://mirrors.cloud.tencent.com/npm/graceful-fs 350ms (cache updated)
npm http fetch GET 200 https://mirrors.cloud.tencent.com/npm/eslint-plugin-react-hooks 1006ms (cache updated)
npm http fetch GET 200 https://mirrors.cloud.tencent.com/npm/caniuse-lite 903ms (cache updated)
npm http fetch GET 200 https://mirrors.cloud.tencent.com/npm/@typescript-eslint%2feslint-plugin 1840ms (cache updated)
npm http fetch GET 200 https://mirrors.cloud.tencent.com/npm/@next%2fenv 1474ms (cache updated)
npm http fetch GET 200 https://mirrors.cloud.tencent.com/npm/styled-jsx 723ms (cache updated)
npm http fetch GET 200 https://mirrors.cloud.tencent.com/npm/@next%2fswc-darwin-arm64 831ms (cache updated)
npm http fetch GET 200 https://mirrors.cloud.tencent.com/npm/@next%2fswc-linux-arm64-gnu 728ms (cache updated)
npm http fetch GET 200 https://mirrors.cloud.tencent.com/npm/@next%2fswc-darwin-x64 894ms (cache updated)
npm http fetch GET 200 https://mirrors.cloud.tencent.com/npm/loose-envify 302ms (cache updated)
npm http fetch GET 200 https://mirrors.cloud.tencent.com/npm/@next%2fswc-linux-x64-gnu 1025ms (cache updated)
npm http fetch GET 200 https://mirrors.cloud.tencent.com/npm/nanoid 365ms (cache updated)
npm http fetch GET 200 https://mirrors.cloud.tencent.com/npm/@next%2fswc-win32-x64-msvc 851ms (cache updated)
npm http fetch GET 200 https://mirrors.cloud.tencent.com/npm/@next%2fswc-win32-arm64-msvc 1187ms (cache updated)
npm http fetch GET 200 https://mirrors.cloud.tencent.com/npm/@next%2fswc-linux-x64-musl 1279ms (cache updated)
npm http fetch GET 200 https://mirrors.cloud.tencent.com/npm/source-map-js 269ms (cache updated)
npm http fetch GET 200 https://mirrors.cloud.tencent.com/npm/arg 380ms (cache updated)
npm http fetch GET 200 https://mirrors.cloud.tencent.com/npm/@alloc%2fquick-lru 540ms (cache updated)
npm http fetch GET 200 https://mirrors.cloud.tencent.com/npm/scheduler 1241ms (cache updated)
npm http fetch GET 200 https://mirrors.cloud.tencent.com/npm/chokidar 492ms (cache updated)
npm http fetch GET 200 https://mirrors.cloud.tencent.com/npm/is-glob 1ms (cache hit)
npm http fetch GET 200 https://mirrors.cloud.tencent.com/npm/dlv 235ms (cache updated)
npm http fetch GET 200 https://mirrors.cloud.tencent.com/npm/didyoumean 360ms (cache updated)
npm http fetch GET 200 https://mirrors.cloud.tencent.com/npm/fast-glob 367ms (cache updated)
npm http fetch GET 200 https://mirrors.cloud.tencent.com/npm/micromatch 324ms (cache updated)
npm http fetch GET 200 https://mirrors.cloud.tencent.com/npm/lilconfig 401ms (cache updated)
npm http fetch GET 200 https://mirrors.cloud.tencent.com/npm/jiti 638ms (cache updated)
npm http fetch GET 200 https://mirrors.cloud.tencent.com/npm/normalize-path 479ms (cache updated)
npm http fetch GET 200 https://mirrors.cloud.tencent.com/npm/object-hash 447ms (cache updated)
npm http fetch GET 200 https://mirrors.cloud.tencent.com/npm/@next%2fswc-win32-ia32-msvc 2878ms (cache updated)
npm http fetch GET 200 https://mirrors.cloud.tencent.com/npm/@next%2fswc-linux-arm64-musl 3484ms (cache updated)
npm http fetch GET 200 https://mirrors.cloud.tencent.com/npm/postcss-load-config 302ms (cache updated)
npm http fetch GET 200 https://mirrors.cloud.tencent.com/npm/picocolors 2077ms (cache updated)
npm http fetch GET 200 https://mirrors.cloud.tencent.com/npm/postcss-js 509ms (cache updated)
npm http fetch GET 200 https://mirrors.cloud.tencent.com/npm/picocolors 848ms (cache updated)
npm http fetch GET 200 https://mirrors.cloud.tencent.com/npm/postcss-nested 206ms (cache updated)
npm http fetch GET 200 https://mirrors.cloud.tencent.com/npm/postcss-import 803ms (cache updated)
npm http fetch GET 200 https://mirrors.cloud.tencent.com/npm/postcss-selector-parser 398ms (cache updated)
npm http fetch GET 200 https://mirrors.cloud.tencent.com/npm/resolve 409ms (cache updated)
npm http fetch GET 200 https://mirrors.cloud.tencent.com/npm/sucrase 382ms (cache updated)
npm http fetch GET 200 https://mirrors.cloud.tencent.com/npm/eslint 5ms (cache hit)
npm http fetch GET 200 https://mirrors.cloud.tencent.com/npm/jiti 1ms (cache hit)
npm http fetch GET 200 https://mirrors.cloud.tencent.com/npm/eslint-visitor-keys 7ms (cache hit)
npm http fetch GET 200 https://mirrors.cloud.tencent.com/npm/espree 8ms (cache hit)
npm http fetch GET 200 https://mirrors.cloud.tencent.com/npm/minimatch 9ms (cache hit)
npm http fetch GET 200 https://mirrors.cloud.tencent.com/npm/debug 11ms (cache hit)
npm http fetch GET 200 https://mirrors.cloud.tencent.com/npm/fast-deep-equal 5ms (cache hit)
npm http fetch GET 200 https://mirrors.cloud.tencent.com/npm/import-fresh 207ms (cache updated)
npm http fetch GET 200 https://mirrors.cloud.tencent.com/npm/strip-json-comments 315ms (cache updated)
npm http fetch GET 200 https://mirrors.cloud.tencent.com/npm/fastq 318ms (cache updated)
npm http fetch GET 200 https://mirrors.cloud.tencent.com/npm/json-schema-traverse 352ms (cache updated)
npm http fetch GET 200 https://mirrors.cloud.tencent.com/npm/@nodelib%2ffs.scandir 397ms (cache updated)
npm http fetch GET 200 https://mirrors.cloud.tencent.com/npm/uri-js 208ms (cache updated)
npm http fetch GET 200 https://mirrors.cloud.tencent.com/npm/fast-json-stable-stringify 453ms (cache updated)
npm http fetch GET 200 https://mirrors.cloud.tencent.com/npm/@humanwhocodes%2fobject-schema 493ms (cache updated)
npm http fetch GET 200 https://mirrors.cloud.tencent.com/npm/ansi-styles 206ms (cache updated)
npm http fetch GET 200 https://mirrors.cloud.tencent.com/npm/shebang-command 163ms (cache updated)
npm http fetch GET 200 https://mirrors.cloud.tencent.com/npm/supports-color 268ms (cache updated)
npm http fetch GET 200 https://mirrors.cloud.tencent.com/npm/path-key 365ms (cache updated)
npm http fetch GET 200 https://mirrors.cloud.tencent.com/npm/which 340ms (cache updated)
npm http fetch GET 200 https://mirrors.cloud.tencent.com/npm/ms 363ms (cache updated)
npm http fetch GET 200 https://mirrors.cloud.tencent.com/npm/esrecurse 375ms (cache updated)
npm http fetch GET 200 https://mirrors.cloud.tencent.com/npm/acorn-jsx 352ms (cache updated)
npm http fetch GET 200 https://mirrors.cloud.tencent.com/npm/estraverse 451ms (cache updated)
npm http fetch GET 200 https://mirrors.cloud.tencent.com/npm/acorn 412ms (cache updated)
npm http fetch GET 200 https://mirrors.cloud.tencent.com/npm/locate-path 183ms (cache updated)
npm http fetch GET 200 https://mirrors.cloud.tencent.com/npm/flat-cache 393ms (cache updated)
npm http fetch GET 200 https://mirrors.cloud.tencent.com/npm/path-exists 323ms (cache updated)
npm http fetch GET 200 https://mirrors.cloud.tencent.com/npm/argparse 260ms (cache updated)
npm http fetch GET 200 https://mirrors.cloud.tencent.com/npm/is-extglob 351ms (cache updated)
npm http fetch GET 200 https://mirrors.cloud.tencent.com/npm/estraverse 657ms (cache updated)
npm http fetch GET 200 https://mirrors.cloud.tencent.com/npm/brace-expansion 362ms (cache updated)
npm http fetch GET 200 https://mirrors.cloud.tencent.com/npm/prelude-ls 548ms (cache updated)
npm http fetch GET 200 https://mirrors.cloud.tencent.com/npm/prelude-ls 362ms (cache updated)
npm http fetch GET 200 https://mirrors.cloud.tencent.com/npm/type-fest 661ms (cache updated)
npm http fetch GET 200 https://mirrors.cloud.tencent.com/npm/word-wrap 229ms (cache updated)
npm http fetch GET 200 https://mirrors.cloud.tencent.com/npm/type-check 550ms (cache updated)
npm http fetch GET 200 https://mirrors.cloud.tencent.com/npm/deep-is 461ms (cache updated)
npm http fetch GET 200 https://mirrors.cloud.tencent.com/npm/ansi-regex 287ms (cache updated)
npm http fetch GET 200 https://mirrors.cloud.tencent.com/npm/fast-levenshtein 360ms (cache updated)
npm http fetch GET 200 https://mirrors.cloud.tencent.com/npm/type-check 365ms (cache updated)
npm http fetch GET 200 https://mirrors.cloud.tencent.com/npm/parent-module 269ms (cache updated)
npm http fetch GET 200 https://mirrors.cloud.tencent.com/npm/resolve-from 297ms (cache updated)
npm http fetch GET 200 https://mirrors.cloud.tencent.com/npm/reusify 217ms (cache updated)
npm http fetch GET 200 https://mirrors.cloud.tencent.com/npm/run-parallel 253ms (cache updated)
npm http fetch GET 200 https://mirrors.cloud.tencent.com/npm/@nodelib%2ffs.stat 363ms (cache updated)
npm http fetch GET 200 https://mirrors.cloud.tencent.com/npm/queue-microtask 393ms (cache updated)
npm http fetch GET 200 https://mirrors.cloud.tencent.com/npm/punycode 219ms (cache updated)
npm http fetch GET 200 https://mirrors.cloud.tencent.com/npm/color-convert 261ms (cache updated)
npm http fetch GET 200 https://mirrors.cloud.tencent.com/npm/has-flag 314ms (cache updated)
npm http fetch GET 200 https://mirrors.cloud.tencent.com/npm/color-name 286ms (cache updated)
npm http fetch GET 200 https://mirrors.cloud.tencent.com/npm/isexe 301ms (cache updated)
npm http fetch GET 200 https://mirrors.cloud.tencent.com/npm/shebang-regex 355ms (cache updated)
npm http fetch GET 200 https://mirrors.cloud.tencent.com/npm/eslint 9ms (cache hit)
npm http fetch GET 200 https://mirrors.cloud.tencent.com/npm/eslint-plugin-import-x 371ms (cache miss)
npm http fetch GET 200 https://mirrors.cloud.tencent.com/npm/glob 498ms (cache updated)
npm http fetch GET 200 https://mirrors.cloud.tencent.com/npm/@typescript-eslint%2ftype-utils 856ms (cache updated)
npm http fetch GET 200 https://mirrors.cloud.tencent.com/npm/ts-api-utils 958ms (cache updated)
npm http fetch GET 200 https://mirrors.cloud.tencent.com/npm/@typescript-eslint%2ftypes 1264ms (cache updated)
npm http fetch GET 200 https://mirrors.cloud.tencent.com/npm/@typescript-eslint%2futils 1615ms (cache updated)
npm http fetch GET 200 https://mirrors.cloud.tencent.com/npm/resolve 13ms (cache hit)
npm http fetch GET 200 https://mirrors.cloud.tencent.com/npm/@typescript-eslint%2fvisitor-keys 1670ms (cache updated)
npm http fetch GET 200 https://mirrors.cloud.tencent.com/npm/@typescript-eslint%2fvisitor-keys 1291ms (cache updated)
npm http fetch GET 200 https://mirrors.cloud.tencent.com/npm/is-core-module 518ms (cache updated)
npm http fetch GET 200 https://mirrors.cloud.tencent.com/npm/fast-glob 1ms (cache hit)
npm http fetch GET 200 https://mirrors.cloud.tencent.com/npm/@nolyfill%2fis-core-module 533ms (cache updated)
npm http fetch GET 200 https://mirrors.cloud.tencent.com/npm/@typescript-eslint%2fscope-manager 2208ms (cache updated)
npm http fetch GET 200 https://mirrors.cloud.tencent.com/npm/eslint-module-utils 513ms (cache updated)
npm http fetch GET 200 https://mirrors.cloud.tencent.com/npm/enhanced-resolve 687ms (cache updated)
npm http fetch GET 200 https://mirrors.cloud.tencent.com/npm/@typescript-eslint%2fscope-manager 1509ms (cache updated)
npm http fetch GET 200 https://mirrors.cloud.tencent.com/npm/get-tsconfig 609ms (cache updated)
npm http fetch GET 200 https://mirrors.cloud.tencent.com/npm/array.prototype.findlastindex 180ms (cache updated)
npm http fetch GET 200 https://mirrors.cloud.tencent.com/npm/doctrine 2ms (cache hit)
npm http fetch GET 200 https://mirrors.cloud.tencent.com/npm/eslint-module-utils 2ms (cache hit)
npm http fetch GET 200 https://mirrors.cloud.tencent.com/npm/is-bun-module 458ms (cache updated)
npm http fetch GET 200 https://mirrors.cloud.tencent.com/npm/is-core-module 2ms (cache hit)
npm http fetch GET 200 https://mirrors.cloud.tencent.com/npm/array.prototype.flatmap 249ms (cache updated)
npm http fetch GET 200 https://mirrors.cloud.tencent.com/npm/@rtsao%2fscc 451ms (cache updated)
npm http fetch GET 200 https://mirrors.cloud.tencent.com/npm/hasown 231ms (cache updated)
npm http fetch GET 200 https://mirrors.cloud.tencent.com/npm/array.prototype.flat 381ms (cache updated)
npm http fetch GET 200 https://mirrors.cloud.tencent.com/npm/array-includes 674ms (cache updated)
npm http fetch GET 200 https://mirrors.cloud.tencent.com/npm/object.values 372ms (cache updated)
npm http fetch GET 200 https://mirrors.cloud.tencent.com/npm/object.fromentries 434ms (cache updated)
npm http fetch GET 200 https://mirrors.cloud.tencent.com/npm/object.groupby 481ms (cache updated)
npm http fetch GET 200 https://mirrors.cloud.tencent.com/npm/semver 371ms (cache updated)
npm http fetch GET 200 https://mirrors.cloud.tencent.com/npm/tsconfig-paths 410ms (cache updated)
npm http fetch GET 200 https://mirrors.cloud.tencent.com/npm/aria-query 241ms (cache updated)
npm http fetch GET 200 https://mirrors.cloud.tencent.com/npm/@typescript-eslint%2ftypescript-estree 2575ms (cache updated)
npm http fetch GET 200 https://mirrors.cloud.tencent.com/npm/ast-types-flow 650ms (cache updated)
npm http fetch GET 200 https://mirrors.cloud.tencent.com/npm/emoji-regex 509ms (cache updated)
npm http fetch GET 200 https://mirrors.cloud.tencent.com/npm/es-iterator-helpers 487ms (cache updated)
npm http fetch GET 200 https://mirrors.cloud.tencent.com/npm/damerau-levenshtein 591ms (cache updated)
npm http fetch GET 200 https://mirrors.cloud.tencent.com/npm/axobject-query 623ms (cache updated)
npm http fetch GET 200 https://mirrors.cloud.tencent.com/npm/safe-regex-test 344ms (cache updated)
npm http fetch GET 200 https://mirrors.cloud.tencent.com/npm/estraverse 9ms (cache hit)
npm http fetch GET 200 https://mirrors.cloud.tencent.com/npm/jsx-ast-utils 492ms (cache updated)
npm http fetch GET 200 https://mirrors.cloud.tencent.com/npm/string.prototype.includes 446ms (cache updated)
npm http fetch GET 200 https://mirrors.cloud.tencent.com/npm/axe-core 1117ms (cache updated)
npm http fetch GET 200 https://mirrors.cloud.tencent.com/npm/language-tags 517ms (cache updated)
npm http fetch GET 200 https://mirrors.cloud.tencent.com/npm/array.prototype.findlast 479ms (cache updated)
npm http fetch GET 200 https://mirrors.cloud.tencent.com/npm/array.prototype.tosorted 564ms (cache updated)
npm http fetch GET 200 https://mirrors.cloud.tencent.com/npm/object.entries 458ms (cache updated)
npm http fetch GET 200 https://mirrors.cloud.tencent.com/npm/jsx-ast-utils 482ms (cache updated)
npm http fetch GET 200 https://mirrors.cloud.tencent.com/npm/string.prototype.repeat 345ms (cache updated)
npm http fetch GET 200 https://mirrors.cloud.tencent.com/npm/prop-types 545ms (cache updated)
npm http fetch GET 200 https://mirrors.cloud.tencent.com/npm/string.prototype.matchall 679ms (cache updated)
npm http fetch GET 200 https://mirrors.cloud.tencent.com/npm/foreground-child 164ms (cache updated)
npm http fetch GET 200 https://mirrors.cloud.tencent.com/npm/path-scurry 299ms (cache updated)
npm http fetch GET 200 https://mirrors.cloud.tencent.com/npm/minipass 343ms (cache updated)
npm http fetch GET 200 https://mirrors.cloud.tencent.com/npm/jackspeak 447ms (cache updated)
npm http fetch GET 200 https://mirrors.cloud.tencent.com/npm/eslint 6ms (cache hit)
npm http fetch GET 200 https://mirrors.cloud.tencent.com/npm/typescript 27ms (cache hit)
npm http fetch GET 200 https://mirrors.cloud.tencent.com/npm/semver 2ms (cache hit)
npm http fetch GET 200 https://mirrors.cloud.tencent.com/npm/micromatch 4ms (cache hit)
npm http fetch GET 200 https://mirrors.cloud.tencent.com/npm/brace-expansion 5ms (cache hit)
npm http fetch GET 200 https://mirrors.cloud.tencent.com/npm/glob-parent 6ms (cache hit)
npm http fetch GET 200 https://mirrors.cloud.tencent.com/npm/merge2 320ms (cache updated)
npm http fetch GET 200 https://mirrors.cloud.tencent.com/npm/supports-preserve-symlinks-flag 352ms (cache updated)
npm http fetch GET 200 https://mirrors.cloud.tencent.com/npm/path-parse 617ms (cache updated)
npm http fetch GET 200 https://mirrors.cloud.tencent.com/npm/graceful-fs 8ms (cache hit)
npm http fetch GET 200 https://mirrors.cloud.tencent.com/npm/resolve-pkg-maps 513ms (cache updated)
npm http fetch GET 200 https://mirrors.cloud.tencent.com/npm/tapable 631ms (cache updated)
npm http fetch GET 200 https://mirrors.cloud.tencent.com/npm/call-bind 165ms (cache updated)
npm http fetch GET 200 https://mirrors.cloud.tencent.com/npm/call-bind 186ms (cache updated)
npm http fetch GET 200 https://mirrors.cloud.tencent.com/npm/define-properties 251ms (cache updated)
npm http fetch GET 200 https://mirrors.cloud.tencent.com/npm/is-string 280ms (cache updated)
npm http fetch GET 200 https://mirrors.cloud.tencent.com/npm/get-intrinsic 378ms (cache updated)
npm http fetch GET 200 https://mirrors.cloud.tencent.com/npm/es-object-atoms 511ms (cache updated)
npm http fetch GET 200 https://mirrors.cloud.tencent.com/npm/call-bind 5ms (cache hit)
npm http fetch GET 200 https://mirrors.cloud.tencent.com/npm/define-properties 10ms (cache hit)
npm http fetch GET 200 https://mirrors.cloud.tencent.com/npm/es-errors 288ms (cache updated)
npm http fetch GET 200 https://mirrors.cloud.tencent.com/npm/define-properties 378ms (cache updated)
npm http fetch GET 200 https://mirrors.cloud.tencent.com/npm/es-object-atoms 269ms (cache updated)
npm http fetch GET 200 https://mirrors.cloud.tencent.com/npm/es-shim-unscopables 344ms (cache updated)
npm http fetch GET 200 https://mirrors.cloud.tencent.com/npm/es-abstract 562ms (cache updated)
npm http fetch GET 200 https://mirrors.cloud.tencent.com/npm/es-abstract 271ms (cache updated)
npm http fetch GET 200 https://mirrors.cloud.tencent.com/npm/es-shim-unscopables 420ms (cache updated)
npm http fetch GET 200 https://mirrors.cloud.tencent.com/npm/es-abstract 503ms (cache updated)
npm http fetch GET 200 https://mirrors.cloud.tencent.com/npm/es-shim-unscopables 551ms (cache updated)
npm http fetch GET 200 https://mirrors.cloud.tencent.com/npm/json5 287ms (cache updated)
npm http fetch GET 200 https://mirrors.cloud.tencent.com/npm/function-bind 365ms (cache updated)
npm http fetch GET 200 https://mirrors.cloud.tencent.com/npm/@types%2fjson5 368ms (cache updated)
npm http fetch GET 200 https://mirrors.cloud.tencent.com/npm/strip-bom 296ms (cache updated)
npm http fetch GET 200 https://mirrors.cloud.tencent.com/npm/minimist 481ms (cache updated)
npm http fetch GET 200 https://mirrors.cloud.tencent.com/npm/es-abstract 1950ms (cache updated)
npm http fetch GET 200 https://mirrors.cloud.tencent.com/npm/es-define-property 193ms (cache updated)
npm http fetch GET 200 https://mirrors.cloud.tencent.com/npm/set-function-length 251ms (cache updated)
npm http fetch GET 200 https://mirrors.cloud.tencent.com/npm/has-property-descriptors 283ms (cache updated)
npm http fetch GET 200 https://mirrors.cloud.tencent.com/npm/arraybuffer.prototype.slice 341ms (cache updated)
npm http fetch GET 200 https://mirrors.cloud.tencent.com/npm/data-view-byte-length 133ms (cache updated)
npm http fetch GET 200 https://mirrors.cloud.tencent.com/npm/define-data-property 493ms (cache updated)
npm http fetch GET 200 https://mirrors.cloud.tencent.com/npm/data-view-buffer 272ms (cache updated)
npm http fetch GET 200 https://mirrors.cloud.tencent.com/npm/object-keys 537ms (cache updated)
npm http fetch GET 200 https://mirrors.cloud.tencent.com/npm/available-typed-arrays 358ms (cache updated)
npm http fetch GET 200 https://mirrors.cloud.tencent.com/npm/array-buffer-byte-length 573ms (cache updated)
npm http fetch GET 200 https://mirrors.cloud.tencent.com/npm/function.prototype.name 284ms (cache updated)
npm http fetch GET 200 https://mirrors.cloud.tencent.com/npm/es-set-tostringtag 398ms (cache updated)
npm http fetch GET 200 https://mirrors.cloud.tencent.com/npm/data-view-byte-offset 474ms (cache updated)
npm http fetch GET 200 https://mirrors.cloud.tencent.com/npm/has-property-descriptors 11ms (cache hit)
npm http fetch GET 200 https://mirrors.cloud.tencent.com/npm/gopd 250ms (cache updated)
npm http fetch GET 200 https://mirrors.cloud.tencent.com/npm/es-to-primitive 397ms (cache updated)
npm http fetch GET 200 https://mirrors.cloud.tencent.com/npm/globalthis 409ms (cache updated)
npm http fetch GET 200 https://mirrors.cloud.tencent.com/npm/has-symbols 205ms (cache updated)
npm http fetch GET 200 https://mirrors.cloud.tencent.com/npm/get-symbol-description 534ms (cache updated)
npm http fetch GET 200 https://mirrors.cloud.tencent.com/npm/has-proto 298ms (cache updated)
npm http fetch GET 200 https://mirrors.cloud.tencent.com/npm/is-data-view 185ms (cache updated)
npm http fetch GET 200 https://mirrors.cloud.tencent.com/npm/is-callable 279ms (cache updated)
npm http fetch GET 200 https://mirrors.cloud.tencent.com/npm/is-regex 201ms (cache updated)
npm http fetch GET 200 https://mirrors.cloud.tencent.com/npm/internal-slot 460ms (cache updated)
npm http fetch GET 200 https://mirrors.cloud.tencent.com/npm/is-array-buffer 521ms (cache updated)
npm http fetch GET 200 https://mirrors.cloud.tencent.com/npm/is-negative-zero 332ms (cache updated)
npm http fetch GET 200 https://mirrors.cloud.tencent.com/npm/is-shared-array-buffer 304ms (cache updated)
npm http fetch GET 200 https://mirrors.cloud.tencent.com/npm/is-weakref 378ms (cache updated)
npm http fetch GET 200 https://mirrors.cloud.tencent.com/npm/string.prototype.trim 210ms (cache updated)
npm http fetch GET 200 https://mirrors.cloud.tencent.com/npm/object.assign 365ms (cache updated)
npm http fetch GET 200 https://mirrors.cloud.tencent.com/npm/object-inspect 388ms (cache updated)
npm http fetch GET 200 https://mirrors.cloud.tencent.com/npm/is-typed-array 547ms (cache updated)
npm http fetch GET 200 https://mirrors.cloud.tencent.com/npm/regexp.prototype.flags 435ms (cache updated)
npm http fetch GET 200 https://mirrors.cloud.tencent.com/npm/typed-array-byte-offset 138ms (cache updated)
npm http fetch GET 200 https://mirrors.cloud.tencent.com/npm/typed-array-byte-length 171ms (cache updated)
npm http fetch GET 200 https://mirrors.cloud.tencent.com/npm/safe-array-concat 550ms (cache updated)
npm http fetch GET 200 https://mirrors.cloud.tencent.com/npm/has-proto 3ms (cache hit)
npm http fetch GET 200 https://mirrors.cloud.tencent.com/npm/typed-array-length 204ms (cache updated)
npm http fetch GET 200 https://mirrors.cloud.tencent.com/npm/unbox-primitive 168ms (cache updated)
npm http fetch GET 200 https://mirrors.cloud.tencent.com/npm/string.prototype.trimstart 369ms (cache updated)
npm http fetch GET 200 https://mirrors.cloud.tencent.com/npm/string.prototype.trimend 462ms (cache updated)
npm http fetch GET 200 https://mirrors.cloud.tencent.com/npm/which-typed-array 189ms (cache updated)
npm http fetch GET 200 https://mirrors.cloud.tencent.com/npm/typed-array-buffer 524ms (cache updated)
npm http fetch GET 200 https://mirrors.cloud.tencent.com/npm/has-tostringtag 333ms (cache updated)
npm http fetch GET 200 https://mirrors.cloud.tencent.com/npm/define-data-property 6ms (cache hit)
npm http fetch GET 200 https://mirrors.cloud.tencent.com/npm/is-callable 7ms (cache hit)
npm http fetch GET 200 https://mirrors.cloud.tencent.com/npm/has-tostringtag 9ms (cache hit)
npm http fetch GET 200 https://mirrors.cloud.tencent.com/npm/is-shared-array-buffer 11ms (cache hit)
npm http fetch GET 200 https://mirrors.cloud.tencent.com/npm/which-typed-array 4ms (cache hit)
npm http fetch GET 200 https://mirrors.cloud.tencent.com/npm/possible-typed-array-names 128ms (cache updated)
npm http fetch GET 200 https://mirrors.cloud.tencent.com/npm/is-symbol 179ms (cache updated)
npm http fetch GET 200 https://mirrors.cloud.tencent.com/npm/is-date-object 258ms (cache updated)
npm http fetch GET 200 https://mirrors.cloud.tencent.com/npm/isarray 271ms (cache updated)
npm http fetch GET 200 https://mirrors.cloud.tencent.com/npm/functions-have-names 323ms (cache updated)
npm http fetch GET 200 https://mirrors.cloud.tencent.com/npm/set-function-name 369ms (cache updated)
npm http fetch GET 200 https://mirrors.cloud.tencent.com/npm/for-each 330ms (cache updated)
npm http fetch GET 200 https://mirrors.cloud.tencent.com/npm/side-channel 517ms (cache updated)
npm http fetch GET 200 https://mirrors.cloud.tencent.com/npm/for-each 384ms (cache updated)
npm http fetch GET 200 https://mirrors.cloud.tencent.com/npm/for-each 544ms (cache updated)
npm http fetch GET 200 https://mirrors.cloud.tencent.com/npm/which-boxed-primitive 359ms (cache updated)
npm http fetch GET 200 https://mirrors.cloud.tencent.com/npm/has-bigints 517ms (cache updated)
npm http fetch GET 200 https://mirrors.cloud.tencent.com/npm/for-each 528ms (cache updated)
npm http fetch GET 200 https://mirrors.cloud.tencent.com/npm/language-subtag-registry 438ms (cache updated)
npm http fetch GET 200 https://mirrors.cloud.tencent.com/npm/deep-equal 513ms (cache updated)
npm http fetch GET 200 https://mirrors.cloud.tencent.com/npm/iterator.prototype 516ms (cache updated)
npm http fetch GET 200 https://mirrors.cloud.tencent.com/npm/object-is 334ms (cache updated)
npm http fetch GET 200 https://mirrors.cloud.tencent.com/npm/is-arguments 452ms (cache updated)
npm http fetch GET 200 https://mirrors.cloud.tencent.com/npm/which-collection 508ms (cache updated)
npm http fetch GET 200 https://mirrors.cloud.tencent.com/npm/es-get-iterator 577ms (cache updated)
npm http fetch GET 200 https://mirrors.cloud.tencent.com/npm/is-set 282ms (cache updated)
npm http fetch GET 200 https://mirrors.cloud.tencent.com/npm/is-set 5ms (cache hit)
npm http fetch GET 200 https://mirrors.cloud.tencent.com/npm/is-number-object 376ms (cache updated)
npm http fetch GET 200 https://mirrors.cloud.tencent.com/npm/stop-iteration-iterator 422ms (cache updated)
npm http fetch GET 200 https://mirrors.cloud.tencent.com/npm/is-bigint 449ms (cache updated)
npm http fetch GET 200 https://mirrors.cloud.tencent.com/npm/is-boolean-object 456ms (cache updated)
npm http fetch GET 200 https://mirrors.cloud.tencent.com/npm/is-weakmap 189ms (cache updated)
npm http fetch GET 200 https://mirrors.cloud.tencent.com/npm/is-map 566ms (cache updated)
npm http fetch GET 200 https://mirrors.cloud.tencent.com/npm/is-map 604ms (cache updated)
npm http fetch GET 200 https://mirrors.cloud.tencent.com/npm/is-weakset 434ms (cache updated)
npm http fetch GET 200 https://mirrors.cloud.tencent.com/npm/reflect.getprototypeof 424ms (cache updated)
npm http fetch GET 200 https://mirrors.cloud.tencent.com/npm/set-function-name 5ms (cache hit)
npm http fetch GET 200 https://mirrors.cloud.tencent.com/npm/loose-envify 8ms (cache hit)
npm http fetch GET 200 https://mirrors.cloud.tencent.com/npm/object-assign 156ms (cache updated)
npm http fetch GET 200 https://mirrors.cloud.tencent.com/npm/react-is 1076ms (cache updated)
npm http fetch GET 200 https://mirrors.cloud.tencent.com/npm/picomatch 242ms (cache updated)
npm http fetch GET 200 https://mirrors.cloud.tencent.com/npm/braces 404ms (cache updated)
npm http fetch GET 200 https://mirrors.cloud.tencent.com/npm/rimraf 287ms (cache updated)
npm http fetch GET 200 https://mirrors.cloud.tencent.com/npm/keyv 422ms (cache updated)
npm http fetch GET 200 https://mirrors.cloud.tencent.com/npm/flatted 709ms (cache updated)
npm http fetch GET 200 https://mirrors.cloud.tencent.com/npm/p-locate 430ms (cache updated)
npm http fetch GET 200 https://mirrors.cloud.tencent.com/npm/glob 8ms (cache hit)
npm http fetch GET 200 https://mirrors.cloud.tencent.com/npm/json-buffer 406ms (cache updated)
npm http fetch GET 200 https://mirrors.cloud.tencent.com/npm/signal-exit 220ms (cache updated)
npm http fetch GET 200 https://mirrors.cloud.tencent.com/npm/lru-cache 234ms (cache updated)
npm http fetch GET 200 https://mirrors.cloud.tencent.com/npm/@pkgjs%2fparseargs 296ms (cache updated)
npm http fetch GET 200 https://mirrors.cloud.tencent.com/npm/@isaacs%2fcliui 367ms (cache updated)
npm http fetch GET 200 https://mirrors.cloud.tencent.com/npm/callsites 198ms (cache updated)
npm http fetch GET 200 https://mirrors.cloud.tencent.com/npm/which-builtin-type 496ms (cache updated)
npm http fetch GET 200 https://mirrors.cloud.tencent.com/npm/strip-ansi 13ms (cache hit)
npm http fetch GET 200 https://mirrors.cloud.tencent.com/npm/wrap-ansi 188ms (cache updated)
npm http fetch GET 200 https://mirrors.cloud.tencent.com/npm/wrap-ansi 261ms (cache updated)
npm http fetch GET 200 https://mirrors.cloud.tencent.com/npm/string-width 387ms (cache updated)
npm http fetch GET 200 https://mirrors.cloud.tencent.com/npm/string-width 518ms (cache updated)
npm http fetch GET 200 https://mirrors.cloud.tencent.com/npm/ansi-regex 23ms (cache hit)
npm http fetch GET 200 https://mirrors.cloud.tencent.com/npm/string-width 22ms (cache hit)
npm http fetch GET 200 https://mirrors.cloud.tencent.com/npm/ansi-styles 25ms (cache hit)
npm http fetch GET 200 https://mirrors.cloud.tencent.com/npm/emoji-regex 28ms (cache hit)
npm http fetch GET 200 https://mirrors.cloud.tencent.com/npm/is-fullwidth-code-point 235ms (cache updated)
npm http fetch GET 200 https://mirrors.cloud.tencent.com/npm/eastasianwidth 381ms (cache updated)
npm http fetch GET 200 https://mirrors.cloud.tencent.com/npm/p-limit 321ms (cache updated)
npm http fetch GET 200 https://mirrors.cloud.tencent.com/npm/fill-range 488ms (cache updated)
npm http fetch GET 200 https://mirrors.cloud.tencent.com/npm/to-regex-range 357ms (cache updated)
npm http fetch GET 200 https://mirrors.cloud.tencent.com/npm/is-number 380ms (cache updated)
npm http fetch GET 200 https://mirrors.cloud.tencent.com/npm/concat-map 382ms (cache updated)
npm http fetch GET 200 https://mirrors.cloud.tencent.com/npm/balanced-match 385ms (cache updated)
npm http fetch GET 200 https://mirrors.cloud.tencent.com/npm/react 17ms (cache hit)
npm http fetch GET 200 https://mirrors.cloud.tencent.com/npm/source-map-js 10ms (cache hit)
npm http fetch GET 200 https://mirrors.cloud.tencent.com/npm/nanoid 10ms (cache hit)
npm http fetch GET 200 https://mirrors.cloud.tencent.com/npm/streamsearch 310ms (cache updated)
npm http fetch GET 200 https://mirrors.cloud.tencent.com/npm/@swc%2fcounter 441ms (cache updated)
npm http fetch GET 200 https://mirrors.cloud.tencent.com/npm/tslib 499ms (cache updated)
npm http fetch GET 200 https://mirrors.cloud.tencent.com/npm/client-only 1119ms (cache updated)
npm http fetch GET 200 https://mirrors.cloud.tencent.com/npm/yocto-queue 300ms (cache updated)
npm http fetch GET 200 https://mirrors.cloud.tencent.com/npm/js-tokens 222ms (cache updated)
npm http fetch GET 200 https://mirrors.cloud.tencent.com/npm/is-generator-function 602ms (cache updated)
npm http fetch GET 200 https://mirrors.cloud.tencent.com/npm/is-async-function 812ms (cache updated)
npm http fetch GET 200 https://mirrors.cloud.tencent.com/npm/is-finalizationregistry 844ms (cache updated)
npm http fetch GET 200 https://mirrors.cloud.tencent.com/npm/inherits 249ms (cache updated)
npm http fetch GET 200 https://mirrors.cloud.tencent.com/npm/once 407ms (cache updated)
npm http fetch GET 200 https://mirrors.cloud.tencent.com/npm/path-is-absolute 410ms (cache updated)
npm http fetch GET 200 https://mirrors.cloud.tencent.com/npm/inflight 467ms (cache updated)
npm http fetch GET 200 https://mirrors.cloud.tencent.com/npm/fs.realpath 522ms (cache updated)
npm http fetch GET 200 https://mirrors.cloud.tencent.com/npm/ts-node 1383ms (cache updated)
npm http fetch GET 200 https://mirrors.cloud.tencent.com/npm/@swc%2fcore 659ms (cache updated)
npm http fetch GET 200 https://mirrors.cloud.tencent.com/npm/@swc%2fhelpers 4ms (cache hit)
npm http fetch GET 200 https://mirrors.cloud.tencent.com/npm/@swc%2fwasm 707ms (cache updated)
npm http fetch GET 200 https://mirrors.cloud.tencent.com/npm/@types%2fnode 24ms (cache hit)
npm http fetch GET 200 https://mirrors.cloud.tencent.com/npm/typescript 19ms (cache hit)
npm http fetch GET 200 https://mirrors.cloud.tencent.com/npm/normalize-path 10ms (cache hit)
npm http fetch GET 200 https://mirrors.cloud.tencent.com/npm/postcss-value-parser 243ms (cache updated)
npm http fetch GET 200 https://mirrors.cloud.tencent.com/npm/lilconfig 5ms (cache hit)
npm http fetch GET 200 https://mirrors.cloud.tencent.com/npm/is-binary-path 304ms (cache updated)
npm http fetch GET 200 https://mirrors.cloud.tencent.com/npm/anymatch 308ms (cache updated)
npm http fetch GET 200 https://mirrors.cloud.tencent.com/npm/postcss-selector-parser 6ms (cache hit)
npm http fetch GET 200 https://mirrors.cloud.tencent.com/npm/read-cache 419ms (cache updated)
npm http fetch GET 200 https://mirrors.cloud.tencent.com/npm/camelcase-css 422ms (cache updated)
npm http fetch GET 200 https://mirrors.cloud.tencent.com/npm/cssesc 188ms (cache updated)
npm http fetch GET 200 https://mirrors.cloud.tencent.com/npm/readdirp 554ms (cache updated)
npm http fetch GET 200 https://mirrors.cloud.tencent.com/npm/util-deprecate 276ms (cache updated)
npm http fetch GET 200 https://mirrors.cloud.tencent.com/npm/mz 166ms (cache updated)
npm http fetch GET 200 https://mirrors.cloud.tencent.com/npm/fsevents 745ms (cache updated)
npm http fetch GET 200 https://mirrors.cloud.tencent.com/npm/yaml 523ms (cache updated)
npm http fetch GET 200 https://mirrors.cloud.tencent.com/npm/commander 377ms (cache updated)
npm http fetch GET 200 https://mirrors.cloud.tencent.com/npm/lines-and-columns 322ms (cache updated)
npm http fetch GET 200 https://mirrors.cloud.tencent.com/npm/@jridgewell%2fgen-mapping 449ms (cache updated)
npm http fetch GET 200 https://mirrors.cloud.tencent.com/npm/pirates 463ms (cache updated)
npm http fetch GET 200 https://mirrors.cloud.tencent.com/npm/ts-interface-checker 656ms (cache updated)
npm http fetch GET 200 https://mirrors.cloud.tencent.com/npm/binary-extensions 268ms (cache updated)
npm http fetch GET 200 https://mirrors.cloud.tencent.com/npm/pify 159ms (cache updated)
npm http fetch GET 200 https://mirrors.cloud.tencent.com/npm/@jridgewell%2fsourcemap-codec 256ms (cache updated)
npm http fetch GET 200 https://mirrors.cloud.tencent.com/npm/any-promise 312ms (cache updated)
npm http fetch GET 200 https://mirrors.cloud.tencent.com/npm/@jridgewell%2fset-array 315ms (cache updated)
npm http fetch GET 200 https://mirrors.cloud.tencent.com/npm/thenify-all 467ms (cache updated)
npm http fetch GET 200 https://mirrors.cloud.tencent.com/npm/@jridgewell%2ftrace-mapping 684ms (cache updated)
npm http fetch GET 200 https://mirrors.cloud.tencent.com/npm/@jridgewell%2fresolve-uri 320ms (cache updated)
npm http fetch GET 200 https://mirrors.cloud.tencent.com/npm/thenify 341ms (cache updated)
npm http fetch GET 200 https://mirrors.cloud.tencent.com/npm/minimist 4ms (cache hit)
npm http fetch GET 200 https://mirrors.cloud.tencent.com/npm/wrappy 294ms (cache updated)
npm http fetch GET 200 https://mirrors.cloud.tencent.com/npm/wrappy 345ms (cache updated)
npm http fetch GET 200 https://mirrors.cloud.tencent.com/npm/@next/env/-/env-14.2.13.tgz 411ms (cache miss)
npm http fetch GET 200 https://mirrors.cloud.tencent.com/npm/get-tsconfig/-/get-tsconfig-4.8.1.tgz 412ms (cache miss)
npm http fetch GET 200 https://mirrors.cloud.tencent.com/npm/@nolyfill/is-core-module/-/is-core-module-1.0.39.tgz 428ms (cache miss)
npm http fetch GET 200 https://mirrors.cloud.tencent.com/npm/eslint-config-next/-/eslint-config-next-14.2.13.tgz 462ms (cache miss)
npm http fetch GET 200 https://mirrors.cloud.tencent.com/npm/eslint-import-resolver-typescript/-/eslint-import-resolver-typescript-3.6.3.tgz 520ms (cache miss)
npm http fetch GET 200 https://mirrors.cloud.tencent.com/npm/@typescript-eslint/types/-/types-8.7.0.tgz 522ms (cache miss)
npm http fetch GET 200 https://mirrors.cloud.tencent.com/npm/@next/eslint-plugin-next/-/eslint-plugin-next-14.2.13.tgz 542ms (cache miss)
npm http fetch GET 200 https://mirrors.cloud.tencent.com/npm/@typescript-eslint/parser/-/parser-8.7.0.tgz 564ms (cache miss)
npm http fetch GET 200 https://mirrors.cloud.tencent.com/npm/@typescript-eslint/utils/-/utils-8.7.0.tgz 573ms (cache miss)
npm http fetch GET 200 https://mirrors.cloud.tencent.com/npm/@typescript-eslint/visitor-keys/-/visitor-keys-8.7.0.tgz 581ms (cache miss)
npm http fetch POST 200 https://mirrors.cloud.tencent.com/npm/-/npm/v1/security/advisories/bulk 712ms
npm http fetch GET 200 https://mirrors.cloud.tencent.com/npm/@typescript-eslint/typescript-estree/-/typescript-estree-8.7.0.tgz 676ms (cache miss)
npm http fetch GET 200 https://mirrors.cloud.tencent.com/npm/@types/prop-types/-/prop-types-15.7.13.tgz 675ms (cache miss)
npm http fetch GET 200 https://mirrors.cloud.tencent.com/npm/is-bun-module/-/is-bun-module-1.2.1.tgz 679ms (cache miss)
npm http fetch GET 200 https://mirrors.cloud.tencent.com/npm/@typescript-eslint/type-utils/-/type-utils-8.7.0.tgz 698ms (cache miss)
npm http fetch GET 200 https://mirrors.cloud.tencent.com/npm/@types/react/-/react-18.3.9.tgz 807ms (cache miss)
npm http fetch GET 200 https://mirrors.cloud.tencent.com/npm/@typescript-eslint/eslint-plugin/-/eslint-plugin-8.7.0.tgz 918ms (cache miss)
npm http fetch GET 200 https://mirrors.cloud.tencent.com/npm/@typescript-eslint/scope-manager/-/scope-manager-8.7.0.tgz 927ms (cache miss)
npm http fetch GET 200 https://mirrors.cloud.tencent.com/npm/@types/node/-/node-20.16.7.tgz 1032ms (cache miss)
npm http fetch GET 200 https://mirrors.cloud.tencent.com/npm/next/-/next-14.2.13.tgz 3489ms (cache miss)
added 360 packages, and audited 361 packages in 1m
137 packages are looking for funding
  run `npm fund` for details
found 0 vulnerabilities
Initialized a git repository.
Success! Created nextjs-easy-peasy-template at /Users/pe7er/Developer/github/nextjs-easy-peasy-template


项目创建完成后,应该启动一次项目,确保项目运行无误。

安装easy-peasy

首先,你需要安装easy-Peasy。可以使用 npm

npm install easy-peasy

创建一个简单的状态管理模型

接下来,我们来创建一个简单的状态管理模型。假设我们要管理一个计数器的状态:

import { createStore, action } from 'easy-peasy';

// 定义模型
const model = {
  count: 0,
  increment: action((state) => {
    state.count += 1;
  }),
  decrement: action((state) => {
    state.count -= 1;
  }),
};

// 创建 store
const store = createStore(model);

在组件中使用 Easy-Peasy

接下来,我们可以在 React 组件中使用这个 store:

import React from 'react';
import { StoreProvider, useStoreState, useStoreActions } from 'easy-peasy';

const Counter = () => {
  const count = useStoreState((state) => state.count);
  const { increment, decrement } = useStoreActions((actions) => ({
    increment: actions.increment,
    decrement: actions.decrement,
  }));

  return (
    <div>
      <h1>{count}</h1>
      <button onClick={increment}>增加</button>
      <button onClick={decrement}>减少</button>
    </div>
  );
};

const App = () => {
  return (
    <StoreProvider store={store}>
      <Counter />
    </StoreProvider>
  );
};

export default App;

总结

通过以上步骤,我们实现了一个简单的计数器应用。Easy-Peasy 的使用极其简单,并且能够有效地管理组件间的状态。如果你正在寻找一个轻量级且易于使用的状态管理解决方案,不妨试试 Easy-Peasy!

希望这篇博客能帮助你更好地理解 Easy-Peasy 的使用。如果你有任何问题或想法,欢迎在评论区分享!

journalctl Command in Linux: Query and Filter System Logs

journalctl is a command-line utility for querying and displaying logs collected by systemd-journald, the systemd logging daemon. It gives you structured access to all system logs — kernel messages, service output, authentication events, and more — from a single interface.

This guide explains how to use journalctl to view, filter, and manage system logs.

journalctl Command Syntax

The general syntax for the journalctl command is:

txt
journalctl [OPTIONS] [MATCHES]

When invoked without any options, journalctl displays all collected logs starting from the oldest entry, piped through a pager (usually less). Press q to exit.

Only the root user or members of the adm or systemd-journal groups can read system logs. Regular users can view their own user journal with the --user flag.

Quick Reference

Command Description
journalctl Show all logs
journalctl -f Follow new log entries in real time
journalctl -n 50 Show last 50 lines
journalctl -r Show logs newest first
journalctl -e Jump to end of logs
journalctl -u nginx Logs for a specific unit
journalctl -u nginx -f Follow unit logs in real time
journalctl -b Current boot logs
journalctl -b -1 Previous boot logs
journalctl --list-boots List all boots
journalctl -p err Errors and above
journalctl -p warning --since "1 hour ago" Recent warnings
journalctl -k Kernel messages
journalctl --since "yesterday" Logs since yesterday
journalctl --since "2026-02-01" --until "2026-02-02" Logs in a time window
journalctl -g "failed" Search by pattern
journalctl -o json-pretty JSON output
journalctl --disk-usage Show journal disk usage
journalctl --vacuum-size=500M Reduce journal to 500 MB

For a printable quick reference, see the journalctl cheatsheet .

Viewing System Logs

To view all system logs, run journalctl without any options:

Terminal
journalctl

To show the most recent entries first, use the -r flag:

Terminal
journalctl -r

To jump directly to the end of the log, use -e:

Terminal
journalctl -e

To show the last N lines (similar to tail ), use the -n flag:

Terminal
journalctl -n 50

To disable the pager and print directly to the terminal, use --no-pager:

Terminal
journalctl --no-pager

Following Logs in Real Time

To stream new log entries as they arrive (similar to tail -f), use the -f flag:

Terminal
journalctl -f

This is one of the most useful options for monitoring a running service or troubleshooting an active issue. Press Ctrl+C to stop.

Filtering by Systemd Unit

To view logs for a specific systemd service, use the -u flag followed by the unit name:

Terminal
journalctl -u nginx

You can combine -u with other filters. For example, to follow nginx logs in real time:

Terminal
journalctl -u nginx -f

To view logs for multiple units at once, specify -u more than once:

Terminal
journalctl -u nginx -u php-fpm

To print the last 100 lines for a service without the pager:

Terminal
journalctl -u nginx -n 100 --no-pager

For more on starting and stopping services, see how to start, stop, and restart Nginx and Apache .

Filtering by Time

Use --since and --until to limit log output to a specific time range.

To show logs since a specific date and time:

Terminal
journalctl --since "2026-02-01 10:00"

To show logs within a window:

Terminal
journalctl --since "2026-02-01 10:00" --until "2026-02-01 12:00"

journalctl accepts many natural time expressions:

Terminal
journalctl --since "1 hour ago"
journalctl --since "yesterday"
journalctl --since today

You can combine time filters with unit filters. For example, to view nginx logs from the past hour:

Terminal
journalctl -u nginx --since "1 hour ago"

Filtering by Priority

systemd uses the standard syslog priority levels. Use the -p flag to filter by severity:

Terminal
journalctl -p err

The output will include the specified priority and all higher-severity levels. The available priority levels from highest to lowest are:

Level Name Description
0 emerg System is unusable
1 alert Immediate action required
2 crit Critical conditions
3 err Error conditions
4 warning Warning conditions
5 notice Normal but significant events
6 info Informational messages
7 debug Debug-level messages

To view only warnings and above from the last hour:

Terminal
journalctl -p warning --since "1 hour ago"

Filtering by Boot

The journal stores logs from multiple boots. Use -b to filter by boot session.

To view logs from the current boot:

Terminal
journalctl -b

To view logs from the previous boot:

Terminal
journalctl -b -1

To list all available boot sessions with their IDs and timestamps:

Terminal
journalctl --list-boots

The output will look something like this:

output
-2 abc123def456 Mon 2026-02-24 08:12:01 CET—Mon 2026-02-24 18:43:22 CET
-1 def456abc789 Tue 2026-02-25 09:05:14 CET—Tue 2026-02-25 21:11:03 CET
0 789abcdef012 Wed 2026-02-26 08:30:41 CET—Wed 2026-02-26 14:00:00 CET

To view logs for a specific boot ID:

Terminal
journalctl -b abc123def456

To view errors from the previous boot:

Terminal
journalctl -b -1 -p err

Kernel Messages

To view kernel messages only (equivalent to dmesg ), use the -k flag:

Terminal
journalctl -k

To view kernel messages from the current boot:

Terminal
journalctl -k -b

To view kernel errors from the previous boot:

Terminal
journalctl -k -p err -b -1

Filtering by Process

In addition to filtering by unit, you can filter logs by process name, executable path, PID, or user ID using journal fields.

To filter by process name:

Terminal
journalctl _COMM=sshd

To filter by executable path:

Terminal
journalctl _EXE=/usr/sbin/sshd

To filter by PID:

Terminal
journalctl _PID=1234

To filter by user ID:

Terminal
journalctl _UID=1000

Multiple fields can be combined to narrow the results further.

Searching Log Messages

To search log messages by a pattern, use the -g flag followed by a regular expression:

Terminal
journalctl -g "failed"

To search within a specific unit:

Terminal
journalctl -u ssh -g "invalid user"

You can also pipe journalctl output to grep for more complex matching:

Terminal
journalctl -u nginx -n 500 --no-pager | grep -i "upstream"

Output Formats

By default, journalctl displays logs in a human-readable format. Use the -o flag to change the output format.

To display logs with ISO 8601 timestamps:

Terminal
journalctl -o short-iso

To display logs as JSON (useful for scripting and log shipping):

Terminal
journalctl -o json-pretty

To display message text only, without metadata:

Terminal
journalctl -o cat

The most commonly used output formats are:

Format Description
short Default human-readable format
short-iso ISO 8601 timestamps
short-precise Microsecond-precision timestamps
json One JSON object per line
json-pretty Formatted JSON
cat Message text only

Managing Journal Size

The journal stores logs on disk under /var/log/journal/. To check how much disk space the journal is using:

Terminal
journalctl --disk-usage
output
Archived and active journals take up 512.0M in the file system.

To reduce the journal size, use the --vacuum-size, --vacuum-time, or --vacuum-files options:

Terminal
journalctl --vacuum-size=500M
Terminal
journalctl --vacuum-time=30d
Terminal
journalctl --vacuum-files=5

These commands remove old archived journal files until the specified limit is met. To configure a permanent size limit, edit /etc/systemd/journald.conf and set SystemMaxUse=.

Practical Troubleshooting Workflow

When a service fails, we can use a short sequence to isolate the issue quickly. First, check service state with systemctl :

Terminal
sudo systemctl status nginx

Then inspect recent error-level logs for that unit:

Terminal
sudo journalctl -u nginx -p err -n 100 --no-pager

If the problem started after reboot, inspect previous boot logs:

Terminal
sudo journalctl -u nginx -b -1 -p err --no-pager

To narrow the time window around the incident:

Terminal
sudo journalctl -u nginx --since "30 minutes ago" --no-pager

If you need pattern matching across many lines, pipe to grep :

Terminal
sudo journalctl -u nginx -n 500 --no-pager | grep -Ei "error|failed|timeout"

Troubleshooting

“No journal files were found”
The systemd journal may not be persistent on your system. Check if /var/log/journal/ exists. If it does not, create it with mkdir -p /var/log/journal and restart systemd-journald. Alternatively, set Storage=persistent in /etc/systemd/journald.conf.

“Permission denied” reading logs
Regular users can only access their own user journal. To read system logs, run journalctl with sudo, or add your user to the adm or systemd-journal group: usermod -aG systemd-journal USERNAME.

-g pattern search returns no results
The -g flag uses PCRE2 regular expressions. Make sure the pattern is correct and that your journalctl version supports -g (available on modern systemd releases). As an alternative, pipe the output to grep.

Logs missing after reboot
The journal is stored in memory by default on some distributions. To enable persistent storage across reboots, set Storage=persistent in /etc/systemd/journald.conf and restart systemd-journald.

Journal consuming too much disk space
Use journalctl --disk-usage to check the current size, then journalctl --vacuum-size=500M to trim old entries. For a permanent limit, configure SystemMaxUse= in /etc/systemd/journald.conf.

FAQ

What is the difference between journalctl and /var/log/syslog?
/var/log/syslog is a plain text file written by rsyslog or syslog-ng. journalctl reads the binary systemd journal, which stores structured metadata alongside each message. The journal offers better filtering, field-based queries, and persistent boot tracking.

How do I view logs for a service that keeps restarting?
Use journalctl -u servicename -f to follow logs in real time, or journalctl -u servicename -n 200 to view the most recent entries. Adding -p err will surface only error-level messages.

How do I check logs from before the current boot?
Use journalctl -b -1 for the previous boot, or journalctl --list-boots to see all available boot sessions and then journalctl -b BOOTID to query a specific one.

Can I export logs to a file?
Yes. Use journalctl --no-pager > output.log for plain text, or journalctl -o json-pretty > output.json for structured JSON. You can combine this with any filter flags.

How do I reduce the amount of disk space used by the journal?
Run journalctl --vacuum-size=500M to immediately trim archived logs to 500 MB. For a persistent limit, set SystemMaxUse=500M in /etc/systemd/journald.conf and restart the journal daemon with systemctl restart systemd-journald.

Conclusion

journalctl is a powerful and flexible tool for querying the systemd journal. Whether you are troubleshooting a failing service, reviewing kernel messages, or auditing authentication events, mastering its filter options saves significant time. If you have any questions, feel free to leave a comment below.

LeetCode 530. 二叉搜索树的最小绝对差:两种解法详解(迭代+递归)

LeetCode 上一道经典的二叉搜索树(BST)题目——530. 二叉搜索树的最小绝对差,这道题看似简单,却能很好地考察我们对 BST 特性的理解,以及二叉树遍历方式的灵活运用。下面我会从题目分析、核心思路、两种解法拆解,到代码细节注释,一步步帮大家搞懂这道题,新手也能轻松跟上。

一、题目解读

题目很直白:给一个二叉搜索树的根节点 root,返回树中任意两个不同节点值之间的最小差值,差值是正数(即两值之差的绝对值)。

这里有个关键前提——二叉搜索树的特性:中序遍历二叉搜索树,得到的序列是严格递增的(假设树中没有重复值,题目未明确说明,但测试用例均满足此条件)。

这个特性是解题的核心!因为递增序列中,任意两个元素的最小差值,一定出现在相邻的两个元素之间。比如序列 [1,3,6,8],最小差值是 3-1=2,而不是 8-1=7 或 6-3=3。所以我们不需要暴力枚举所有两两组合,只需要在中序遍历的过程中,记录前一个节点的值,与当前节点值计算差值,不断更新最小差值即可。

二、核心解题思路

  1. 利用 BST 中序遍历为递增序列的特性,将“任意两节点的最小差值”转化为“中序序列中相邻节点的最小差值”;

  2. 遍历过程中,维护两个变量:min(记录当前最小差值,初始值设为无穷大)、pre(记录前一个节点的值,初始值设为负无穷大,避免初始值影响第一次差值计算);

  3. 遍历每个节点时,用当前节点值与pre 计算绝对值差值,更新 min,再将 pre 更新为当前节点值;

  4. 遍历结束后,min 即为答案。

接下来,我们用两种最常用的遍历方式实现这个思路:迭代中序遍历(解法1)和递归中序遍历(解法2)。

三、解法一:迭代中序遍历(非递归)

迭代遍历的核心是用“栈”模拟递归的调用过程,避免递归深度过深导致的栈溢出(虽然这道题的测试用例大概率不会出现,但迭代写法更通用,适合处理大型树)。

3.1 代码实现(带详细注释)

// 先定义 TreeNode 类(题目已给出,此处复用)
class TreeNode {
  val: number
  left: TreeNode | null
  right: TreeNode | null
  constructor(val?: number, left?: TreeNode | null, right?: TreeNode | null) {
    this.val = (val === undefined ? 0 : val)
    this.left = (left === undefined ? null : left)
    this.right = (right === undefined ? null : right)
  }
}

// 解法1:迭代中序遍历
function getMinimumDifference_1(root: TreeNode | null): number {
  // 边界处理:空树返回0(题目中树至少有一个节点?但严谨起见还是判断)
  if (!root) return 0;
  let min = Infinity; // 最小差值,初始为无穷大
  let pre = -Infinity; // 前一个节点的值,初始为负无穷大
  const stack: TreeNode[] = []; // 用于模拟中序遍历的栈
  let curr: TreeNode | null = root; // 当前遍历的节点

  // 第一步:将左子树所有节点压入栈(中序遍历:左 -> 根 -> 右)
  while (curr) {
    stack.push(curr);
    curr = curr.left; // 一直向左走,直到最左节点
  }

  // 第二步:弹出栈顶节点,处理根节点,再遍历右子树
  while (stack.length) {
    const node = stack.pop(); // 弹出栈顶(当前要处理的根节点)
    if (!node) continue; // 防止空节点(理论上不会出现)

    // 处理右子树:将右子树的所有左节点压入栈
    if (node.right) {
      let right: TreeNode | null = node.right;
      while (right) {
        stack.push(right);
        right = right.left;
      }
    }

    // 计算当前节点与前一个节点的差值,更新最小差值
    min = Math.min(min, Math.abs(pre - node.val));
    // 更新pre为当前节点值,为下一个节点做准备
    pre = node.val;
  }

  return min;
};

3.2 思路拆解

  1. 初始化:栈用于存储待处理的节点,curr指向根节点,先将根节点的所有左子节点压入栈(因为中序遍历要先访问左子树);

  2. 弹出栈顶节点(此时该节点的左子树已处理完毕),先处理其右子树(将右子树的所有左节点压入栈,保证下一次弹出的是右子树的最左节点);

  3. 计算当前节点与pre的差值,更新min,再将pre更新为当前节点值;

  4. 重复上述过程,直到栈为空,遍历结束。

优势:不依赖递归栈,避免递归深度过大导致的栈溢出,空间复杂度由递归的 O(h)(h为树高)优化为 O(h)(栈的最大深度也是树高),实际运行更稳定。

四、解法二:递归中序遍历

递归写法更简洁,代码量少,思路也更直观,适合树的深度不大的场景。核心是用递归函数实现中序遍历的“左 -> 根 -> 右”顺序。

4.1 代码实现(带详细注释)

// 解法2:递归中序遍历
function getMinimumDifference_2(root: TreeNode | null): number {
  if (!root) return 0;
  let min = Infinity; // 最小差值
  let pre = -Infinity; // 前一个节点的值

  // 递归函数:实现中序遍历
  const dfs = (node: TreeNode) => {
    if (!node) return; // 递归终止条件:节点为空

    // 1. 遍历左子树(左)
    if (node.left) dfs(node.left);

    // 2. 处理当前节点(根):计算差值,更新min和pre
    min = Math.min(min, Math.abs(pre - node.val));
    pre = node.val;

    // 3. 遍历右子树(右)
    if (node.right) dfs(node.right);
  }

  // 从根节点开始递归
  dfs(root);
  return min;
};

4.2 思路拆解

  1. 定义递归函数 dfs,参数为当前节点,负责遍历以该节点为根的子树;

  2. 递归终止条件:当前节点为空,直接返回;

  3. 先递归遍历左子树(保证左子树先被处理);

  4. 处理当前节点:计算当前节点与pre的差值,更新min,再将pre更新为当前节点值;

  5. 最后递归遍历右子树;

  6. 从根节点调用dfs,完成整个树的遍历,返回min。

优势:代码简洁,思路直观,容易理解和编写;劣势:当树的深度很大时(如链式树),会出现递归栈溢出,此时迭代写法更合适。

五、两种解法对比与总结

解法 遍历方式 时间复杂度 空间复杂度 优势 劣势
解法1 迭代中序 O(n)(每个节点遍历一次) O(h)(h为树高,栈的最大深度) 稳定,无栈溢出风险,通用 代码稍长,需要手动维护栈
解法2 递归中序 O(n)(每个节点遍历一次) O(h)(递归栈深度) 代码简洁,思路直观,易编写 深度过大时会栈溢出

关键总结

  1. 这道题的核心是利用 BST 中序遍历为递增序列,将“任意两节点最小差值”转化为“相邻节点最小差值”,避免暴力枚举;

  2. 两种解法的核心逻辑一致,只是遍历方式不同,可根据树的深度选择:树深较小时用递归,树深较大时用迭代;

  3. 注意初始值的设置:min设为无穷大(保证第一次差值能更新min),pre设为负无穷大(避免初始值与第一个节点值计算出不合理的差值);

  4. 边界处理:空树返回0(题目中树至少有一个节点,但严谨起见必须判断)。

六、拓展思考

如果这道题不是 BST,而是普通二叉树,该怎么解?

答案:先遍历所有节点,将节点值存入数组,再对数组排序,计算相邻元素的最小差值。时间复杂度 O(n log n)(排序耗时),空间复杂度 O(n)(存储所有节点值),效率低于本题的解法,由此可见利用数据结构特性解题的重要性。

好了,这道题的两种解法就讲解完毕了。希望大家能通过这道题,加深对 BST 特性和二叉树中序遍历的理解,下次遇到类似题目能快速想到解题思路。

Windows判断是笔记本还是台式

前言

在开发桌面应用程序时,我们经常需要根据设备类型来调整功能或界面。例如,触摸板管理功能只对笔记本电脑有意义,而对台式机用户来说完全不需要。本文将介绍一种基于系统机箱类型(Chassis Type)的可靠检测方法。

正文

Windows系统通过WMI(Windows Management Instrumentation)提供了丰富的硬件信息查询接口。其中,Win32_SystemEnclosure 类包含了系统机箱的详细信息,包括一个关键属性:ChassisTypes

ChassisTypes 不同的数值代表不同的设备形态:

笔记本电脑相关类型:

  • 8: Portable(便携式)
  • 9: Laptop(笔记本)
  • 10: Notebook(笔记本)
  • 14: Sub Notebook(子笔记本)
  • 30: Tablet(平板电脑)
  • 31: Convertible(可转换)
  • 32: Detachable(可拆卸)

台式机相关类型:

  • 3: Desktop(桌面)
  • 4: Low Profile Desktop(低姿态桌面)
  • 5: Pizza Box(披萨盒式)
  • 6: Mini Tower(迷你塔式)
  • 7: Tower(塔式)
  • 13: All in One(一体机)
  • 15: Space-Saving(节省空间型)
  • 16: Lunch Box(午餐盒式)

详细文档可以看 :learn.microsoft.com/en-us/windo…

Power Shell可以直接运行命令查看

(Get-CimInstance -ClassName Win32_SystemEnclosure).ChassisTypes

image.png

结尾

感兴趣的可以去试试

Electron 无边框窗口拖拽实现

Electron 无边框窗口拖拽实现详解:从问题到完美解决方案

技术栈: Electron 40+, Vue 3.5+, TypeScript 5.9+

🎯 问题背景

在开发 Electron 无边框应用时,遇到一个经典问题:如何让用户能够拖拽移动整个窗口?

传统的 Web 应用有浏览器标题栏可以拖拽,但 Electron 的无边框窗口 (frame: false) 完全去除了系统原生的标题栏,这就需要我们自己实现拖拽功能。

挑战

  1. 右键误触发: 用户右键点击时窗口也会跟着移动
  2. 定时器泄漏: 鼠标抬起后窗口仍在跟随鼠标
  3. 事件覆盖不全: 忘记处理鼠标离开窗口等边界情况
  4. 性能问题: 频繁的位置计算导致卡顿
  5. 安全考虑: 如何在保持功能的同时确保 IPC 通信安全

本文将从零开始,实现一个 Electron 窗口拖拽解决方案。

🛠️ 技术方案概览

我们采用 渲染进程 + IPC + 主进程 的三层架构:

[Vue 组件][IPC 安全通道][Electron 主进程][窗口控制]

核心优势:

  • ✅ 精确区分鼠标左/右键
  • ✅ 完整的事件生命周期管理
  • ✅ 内存安全(无定时器泄漏)
  • ✅ 安全的 IPC 通信
  • ✅ 流畅的用户体验(60fps)

🔧 详细实现步骤

第一步:主进程窗口配置

首先确保你的 Electron 窗口正确配置为无边框模式:

// electron/main/index.ts
const win = new BrowserWindow({
  title: 'Main window',
  frame: false,           // 关键:禁用系统标题栏
  transparent: true,      // 透明窗口(可选)
  backgroundColor: '#00000000', // 完全透明
  width: 288,
  height: 364,
  webPreferences: {
    preload: path.join(__dirname, '../preload/index.mjs'),
  }
})

第二步:预加载脚本 - 安全的 IPC 桥梁

使用 contextBridge 安全地暴露 API 给渲染进程:

// electron/preload/index.ts
import { ipcRenderer, contextBridge } from 'electron'

contextBridge.exposeInMainWorld('ipcRenderer', {
  // ... 其他 IPC 方法
  
  // 暴露窗口拖拽控制方法
  windowMove(canMoving: boolean) {
    ipcRenderer.invoke('windowMove', canMoving)
  }
})

为什么这样做?

  • 避免直接暴露完整的 ipcRenderer
  • 限制可调用的方法范围
  • 符合 Electron 安全最佳实践

第三步:主进程拖拽逻辑

创建专门的拖拽工具函数:

// electron/main/utils/windowMove.ts
import { screen } from "electron";

// 全局定时器引用 - 关键!
let movingInterval: NodeJS.Timeout | null = null;

export default function windowMove(
  win: Electron.BrowserWindow | null, 
  canMoving: boolean
) {
  let winStartPosition = { x: 0, y: 0 };
  let mouseStartPosition = { x: 0, y: 0 };

  if (canMoving && win) {
    // === 启动拖拽 ===
    console.log("main start moving");
    
    // 记录起始位置
    const winPosition = win.getPosition();
    winStartPosition = { x: winPosition[0], y: winPosition[1] };
    mouseStartPosition = screen.getCursorScreenPoint();
    
    // 清理已存在的定时器 - 防止重复
    if (movingInterval) {
      clearInterval(movingInterval);
      movingInterval = null;
    }
    
    // 启动位置更新定时器 (20ms ≈ 50fps)
    movingInterval = setInterval(() => {
      const cursorPosition = screen.getCursorScreenPoint();
      
      // 相对位移算法
      const x = winStartPosition.x + cursorPosition.x - mouseStartPosition.x;
      const y = winStartPosition.y + cursorPosition.y - mouseStartPosition.y;
      
      // 更新窗口位置
      win.setResizable(false); // 拖拽时禁止调整大小
      win.setBounds({ x, y, width: 288, height: 364 }); // 使用setBounds 同时设置位置和宽高防止拖动过程窗口变大,宽高可动态获取
    }, 20);
    
  } else {
    // === 停止拖拽 ===
    console.log("main stop moving");
    
    // 清理定时器
    if (movingInterval) {
      clearInterval(movingInterval);
      movingInterval = null;
    }
    
    // 恢复窗口状态
    if (win) {
      win.setResizable(true);
    }
  }
}

关键设计点:

  1. 全局定时器: movingInterval 声明在模块级别,确保能被正确清理
  2. 相对位移算法: 基于起始位置的相对移动,避免累积误差
  3. 防重复机制: 每次启动前清理已有定时器
  4. 窗口状态管理: 拖拽时禁用调整大小,结束后恢复

第四步:渲染进程事件处理

在 Vue 组件中精确处理鼠标事件:

<!-- src/App.vue -->
<script setup lang="ts">
import Camera from './components/Camera.vue'

// 调用主进程拖拽方法
const windowMove = (canMoving: boolean): void => {
  window?.ipcRenderer?.windowMove(canMoving);
}

// 只有左键按下时才开始移动
const handleMouseDown = (e: MouseEvent) => {
  if (e.button === 0) { // 0 = 左键, 1 = 中键, 2 = 右键
    windowMove(true);
  }
}

// 鼠标抬起时停止移动(任何按键)
const handleMouseUp = () => {
  windowMove(false);
}

// 鼠标离开容器时停止移动
const handleMouseLeave = () => {
  windowMove(false);
}

// 右键菜单处理 - 关键!
const handleContextMenu = (e: MouseEvent) => {
  e.preventDefault(); // 阻止默认右键菜单
  windowMove(false);  // 确保停止拖拽
}
</script>

<template>
  <div class="app-container" 
       @mousedown="handleMouseDown" 
       @mouseleave="handleMouseLeave"
       @mouseup="handleMouseUp" 
       @contextmenu="handleContextMenu">
    <Camera />
  </div>
</template>

鼠标按键值参考:

  • e.button === 0: 左键 (Left click)
  • e.button === 1: 中键 (Middle click)
  • e.button === 2: 右键 (Right click)

第五步:主进程 IPC 处理器

注册 IPC 处理器并集成拖拽逻辑:

// electron/main/index.ts
import windowMove from './utils/windowMove'

// ... 其他代码 ...

// 注册 IPC 处理器
ipcMain.handle("windowMove", (_, canMoving) => {
  console.log('ipcMain.handle windowMove', canMoving)
  windowMove(win, canMoving)
})

🔒 安全最佳实践

1. IPC 方法限制

// 好的做法:只暴露必要方法
contextBridge.exposeInMainWorld('ipcRenderer', {
  windowMove: (canMoving) => ipcRenderer.invoke('windowMove', canMoving)
})

// 避免:暴露完整 ipcRenderer
// contextBridge.exposeInMainWorld('ipcRenderer', ipcRenderer)

2. 输入验证

// 在主进程中验证输入
if (typeof canMoving !== 'boolean') {
  throw new Error('Invalid parameter');
}

3. 窗口引用安全

// 始终检查窗口是否存在
if (!win || win.isDestroyed()) {
  return;
}

🔄 替代方案对比

方案 A: CSS -webkit-app-region: drag (推荐用于简单场景)

.drag-area {
  -webkit-app-region: drag;
}

优点: 零 JavaScript,硬件加速,无 IPC 开销
缺点: 无法区分鼠标按键,会阻止所有鼠标事件

方案 B: 完整的自定义拖拽 (本文方案)

优点: 完全可控,支持复杂交互,可区分按键
缺点: 需要 IPC 通信,代码量较大

选择建议

  • 简单应用: 使用 CSS 方案
  • 复杂交互: 使用本文的自定义方案
  • 混合方案: 在非交互区域使用 CSS,在需要精确控制的区域使用自定义方案

💡 扩展功能思路

1. 拖拽区域限制

// 限制窗口不能拖出屏幕
const bounds = screen.getDisplayNearestPoint(cursorPosition).bounds;
const newX = Math.max(bounds.x, Math.min(x, bounds.x + bounds.width - windowWidth));
const newY = Math.max(bounds.y, Math.min(y, bounds.y + bounds.height - windowHeight));

2. 拖拽动画效果

// 拖拽开始时添加阴影
win.webContents.executeJavaScript(`
  document.body.style.boxShadow = '0 4px 12px rgba(0,0,0,0.3)';
`);

// 拖拽结束时移除
win.webContents.executeJavaScript(`
  document.body.style.boxShadow = 'none';
`);

3. 多显示器支持

// 获取所有显示器信息
const displays = screen.getAllDisplays();
// 根据当前显示器调整拖拽行为

📚 完整项目结构

electron-camera/
├── electron/
│   ├── main/
│   │   ├── utils/windowMove.ts    # 拖拽核心逻辑
│   │   └── index.ts               # 主进程入口
│   └── preload/index.ts           # IPC 安全桥梁
└── src/
    └── App.vue                    # 渲染进程事件处理

🤝 总结

通过本文的完整实现,你将获得一个:

  • 功能完整 的窗口拖拽解决方案
  • 安全可靠 的 IPC 通信架构
  • 性能优秀 的用户体验
  • 易于维护 的代码结构

这个方案已经在实际项目中经过充分测试,可以直接用于你的 Electron 应用开发。

在实现过程中发现还有一个好的库,github.com/Wargraphs/e… 有空可以试试。

如果你觉得这篇文章对你有帮助,请点赞、收藏或分享给其他开发者!

有任何问题或改进建议,欢迎在评论区讨论! 🚀

HTML&CSS:高颜值产品卡片页面,支持主题切换

这是一个产品卡片页面,无 JS 实现图片切换主题切换、全设备响应式适配,兼顾美观与实用性,值得大家学习。


大家复制代码时,可能会因格式转换出现错乱,导致样式失效。建议先少量复制代码进行测试,若未能解决问题,私信回复源码两字,我会发送完整的压缩包给你。

演示效果

演示效果

演示效果

HTML&CSS

<!DOCTYPE html>
<html lang="zh-CN">

<head>
    <meta charset="UTF-8">
    <meta name="viewport" content="width=device-width, initial-scale=1.0">
    <title>现代极简卧室套装</title>
    <style>
        body {
            font-family: "Roboto Serif", serif;
            display: flex;
            justify-content: center;
            align-items: center;
            margin: 0;
            min-height: 100vh;
            background-color: #f6f1ea;
            background-image: radial-gradient(circle at 15% 20%, rgba(232, 186, 142, 0.35) 0%, rgba(232, 186, 142, 0.18) 20%, rgba(232, 186, 142, 0.08) 35%, transparent 60%), radial-gradient(circle at 85% 75%, rgba(220, 160, 110, 0.35) 0%, rgba(220, 160, 110, 0.15) 25%, transparent 55%), radial-gradient(circle at 60% 10%, rgba(255, 210, 170, 0.25) 0%, transparent 50%);
            background-repeat: no-repeat;
            background-attachment: fixed;
        }

        body::after {
            content: "";
            position: fixed;
            inset: 0;
            pointer-events: none;
            z-index: 10;
            mix-blend-mode: saturation;
            background: radial-gradient(circle at 20% 25%, rgba(255, 200, 150, 0.35), rgba(255, 200, 150, 0.15) 30%, transparent 60%), radial-gradient(circle at 80% 70%, rgba(255, 170, 110, 0.3), transparent 60%);
            filter: blur(80px);
        }

        .product-card {
            border-radius: 12rem;
            corner-shape: squircle;
            padding: 1rem 1.5rem 1rem 1rem;
            max-width: 800px;
            background: linear-gradient(145deg, rgba(255, 255, 255, 0.75), rgba(255, 255, 255, 0.55));
            backdrop-filter: blur(20px);
            border: 1px solid rgba(255, 255, 255, 0.4);
            box-shadow: 0 40px 80px rgba(206, 168, 132, 0.1), 0 20px 40px rgba(0, 0, 0, 0.1), 0 0 120px rgba(198, 169, 126, 0.25), inset 0 1px 0 rgba(255, 255, 255, 0.6), -5px -5px 10px 0 #fffce9;
        }

        @media (max-width: 768px) {
            .product-card {
                border-radius: 5rem;
            }
        }

        .product-card .card-content {
            display: flex;
            justify-content: center;
            gap: 32px;
        }

        @media (max-width: 768px) {
            .product-card .card-content {
                flex-direction: column;
            }
        }

        .product-card .image-container {
            position: relative;
            border-radius: 12rem;
            width: 45vw;
            max-width: 450px;
            corner-shape: squircle;
            aspect-ratio: 1/1;
            overflow: hidden;
        }

        @media (max-width: 768px) {
            .product-card .image-container {
                width: 100%;
                border-radius: 5rem;
            }
        }

        .product-card .info-container {
            display: flex;
            flex-direction: column;
            justify-content: center;
            color: #5f5a55;
        }

        .product-card .info-container .brand {
            display: block;
            padding-bottom: 3rem;
            font-size: 0.85rem;
        }

        .product-card .info-container h1 {
            line-height: 100%;
            font-size: 2rem;
            font-weight: 600;
            letter-spacing: -0.1rem;
            margin: 0;
            padding: 0;
            transform: scaleY(2);
        }

        .product-card .info-container .price {
            font-size: 1.3rem;
            font-weight: 400;
            margin: 0;
            padding: 2.5rem 0 0;
            color: #c89b5e;
        }

        .product-card .info-container .description {
            max-width: 280px;
            font-size: 0.85rem;
            font-weight: 200;
            line-height: 150%;
            margin: 0;
            padding: 1rem 0;
        }

        .product-card .info-container .btn-primary {
            margin-top: 1rem;
            padding: 1rem 2rem;
            max-width: 200px;
            font-size: 1rem;
            letter-spacing: 1px;
            color: #ffffff;
            background: linear-gradient(145deg, #d8a45c, #b97a2f);
            border: none;
            border-radius: 40px;
            cursor: pointer;
            box-shadow: 0 8px 20px rgba(201, 155, 94, 0.35), 0 0 25px rgba(201, 155, 94, 0.15), inset 0 2px 6px rgba(255, 255, 255, 0.3);
            transition: 0.3s ease;
        }

        @media (max-width: 768px) {
            .product-card .info-container .btn-primary {
                max-width: none;
            }
        }

        .product-card .info-container .btn-primary:hover {
            transform: translateY(-2px);
            filter: brightness(1.05);
            box-shadow: 0 10px 25px rgba(185, 122, 47, 0.45), inset 0 2px 6px rgba(255, 255, 255, 0.3);
        }

        .product-card .info-container .btn-primary:active {
            transform: translateY(1px);
            box-shadow: 0 5px 15px rgba(185, 122, 47, 0.3), inset 0 3px 6px rgba(0, 0, 0, 0.15);
        }

        .image {
            aspect-ratio: 1/1;
            width: 100%;
            background: url("https://assets.codepen.io/662051/Gemini_Generated_Image_j4wi73j4wi73j4wi.png") center;
            background-size: cover;
            transition: 0.4s ease;
        }

        .theme-switch__input:checked~.image {
            background-image: url("https://assets.codepen.io/662051/Gemini_Generated_Image_2q32sc2q32sc2q32.png");
        }

        .theme-switch {
            position: absolute;
            left: 50%;
            bottom: 20px;
            transform: translateX(-50%);
            cursor: pointer;
        }

        .theme-switch__input {
            display: none;
        }

        .theme-switch__container {
            position: relative;
            width: 60px;
            height: 32px;
            padding: 5px;
            background-color: #e2e2e2;
            border-radius: 32px;
            display: flex;
            align-items: center;
            box-shadow: inset 0 2px 5px rgba(0, 0, 0, 0.1);
            transition: all 0.4s cubic-bezier(0.175, 0.885, 0.32, 1.275);
        }

        .theme-switch__circle {
            width: 30px;
            height: 30px;
            background-color: #333;
            border-radius: 50%;
            z-index: 2;
            box-shadow: 0 2px 10px rgba(0, 0, 0, 0.2);
            transition: all 0.4s cubic-bezier(0.175, 0.885, 0.32, 1.275);
        }

        .theme-switch__icons {
            position: absolute;
            width: 100%;
            box-sizing: border-box;
            z-index: 2;
        }

        .theme-switch .icon {
            width: 18px;
            height: 18px;
            transition: opacity 0.3s ease;
        }

        .theme-switch .icon--sun {
            opacity: 1;
            color: #fff;
            transform: translate(6px, 2px);
        }

        .theme-switch .icon--moon {
            opacity: 0;
            color: #333;
            transform: translate(15px, 2px);
        }

        .theme-switch__input:checked+.image+.theme-switch .theme-switch__container {
            background-color: #222;
        }

        .theme-switch__input:checked+.image+.theme-switch .theme-switch__circle {
            transform: translateX(30px);
            background-color: #fff;
        }

        .theme-switch__input:checked+.image+.theme-switch .icon--sun {
            opacity: 0;
        }

        .theme-switch__input:checked+.image+.theme-switch .icon--moon {
            opacity: 1;
            color: #333;
        }

        #dev {
            font-family: "Montserrat", sans-serif;
            position: fixed;
            top: 10px;
            left: 10px;
            padding: 1em;
            font-size: 14px;
            color: #333;
            background-color: white;
            border-radius: 25px;
            cursor: pointer;
        }

        #dev a {
            text-decoration: none;
            font-weight: bold;
            color: #333;
            transition: all 0.4s ease;
        }

        #dev a:hover {
            color: #ef5350;
            text-decoration: underline;
        }

        #dev span {
            display: inline-block;
            color: pink;
            transition: all 0.4s ease;
        }

        #dev span:hover {
            transform: scale(1.2);
        }
    </style>
</head>

<body>
    <div class="product-card">
        <div class="card-content">
            <div class="image-container">
                <input type="checkbox" id="theme-toggle" class="theme-switch__input">
                <div class="image"></div>
                <label for="theme-toggle" class="theme-switch">
                    <div class="theme-switch__container">
                        <div class="theme-switch__circle"></div>
                        <div class="theme-switch__icons">
                            <svg class="icon icon--sun" xmlns="http://www.w3.org/2000/svg" viewBox="0 0 24 24"
                                fill="none" stroke="currentColor" stroke-width="2" stroke-linecap="round"
                                stroke-linejoin="round">
                                <circle cx="12" cy="12" r="5"></circle>
                                <line x1="12" y1="1" x2="12" y2="3"></line>
                                <line x1="12" y1="21" x2="12" y2="23"></line>
                                <line x1="4.22" y1="4.22" x2="5.64" y2="5.64"></line>
                                <line x1="18.36" y1="18.36" x2="19.78" y2="19.78"></line>
                                <line x1="1" y1="12" x2="3" y2="12"></line>
                                <line x1="21" y1="12" x2="23" y2="12"></line>
                                <line x1="4.22" y1="19.78" x2="5.64" y2="18.36"></line>
                                <line x1="18.36" y1="5.64" x2="19.78" y2="4.22"></line>
                            </svg>
                            <svg class="icon icon--moon" xmlns="http://www.w3.org/2000/svg" viewBox="0 0 24 24"
                                fill="none" stroke="currentColor" stroke-width="2" stroke-linecap="round"
                                stroke-linejoin="round">
                                <path d="M21 12.79A9 9 0 1 1 11.21 3
                       7 7 0 0 0 21 12.79z"></path>
                            </svg>
                        </div>
                    </div>
                </label>
            </div>
            <div class="info-container">
                <header>
                    <span class="brand">HOLIME</span>
                    <h1 class="title">现代极简<br />卧室套装</h1>
                    <p class="price">$50.00 <span></span></p>
                    <p class="description">
                        打造宁静休憩空间,这套现代极简卧室套装融合永恒设计与舒适体验,为您的家注入优雅与安宁。
                    </p>
                </header>
                <button class="btn-primary">加入购物车</button>
            </div>
        </div>
    </div>
</body>

</html>

HTML

  • prouct-card:产品卡片容器。核心视觉容器,用毛玻璃效果、圆角、渐变背景打造高级感
  • card-content:卡片内容区。弹性布局,分「图片区 + 信息区」,移动端自动改为垂直布局
  • image-container:产品图片容器。固定宽高比(1:1);② 包含切换图片的复选框、图片、切换按钮;圆角适配移动端
  • info-container:产品信息区。垂直布局,包含品牌、标题、价格、描述、加入购物车按钮
  • theme-toggle:图片切换复选框。隐藏的核心交互控件,通过「选中 / 未选中」切换产品图片
  • theme-switch:切换按钮(夜间/白天)。视觉化的切换控件,绑定到隐藏的复选框,实现交互反馈

CSS

全局样式 & 背景

body {
  font-family: "Roboto Serif", serif;
  display: flex;
  justify-content: center;
  align-items: center;
  min-height: 100vh;
  /* 背景层:暖色调径向渐变,营造温馨的卧室氛围 */
  background-color: #f6f1ea;
  background-image: radial-gradient(...), radial-gradient(...), radial-gradient(...);
  background-repeat: no-repeat;
  background-attachment: fixed;
}
body::after {
  /* 叠加模糊渐变层,增强层次感,mix-blend-mode 提升饱和度 */
  content: "";
  position: fixed;
  inset: 0;
  pointer-events: none; /* 不遮挡交互 */
  mix-blend-mode: saturation;
  background: radial-gradient(...);
  filter: blur(80px);
}

核心:flex 实现页面居中 + 多层径向渐变背景 + 伪元素叠加模糊层,打造「柔和、有呼吸感」的视觉基底。

产品卡片核心样式

.product-card {
  border-radius: 12rem; /* 超大圆角,接近胶囊/圆角矩形 */
  corner-shape: squircle; /* 松鼠角(非标准但现代浏览器支持,更圆润的圆角) */
  padding: 1rem 1.5rem 1rem 1rem;
  max-width: 800px;
  /* 毛玻璃核心:半透明背景 + backdrop-filter */
  background: linear-gradient(145deg, rgba(255, 255, 255, 0.75), rgba(255, 255, 255, 0.55));
  backdrop-filter: blur(20px);
  border: 1px solid rgba(255, 255, 255, 0.4);
}

核心:backdrop-filter: blur(20px) 实现毛玻璃效果,linear-gradient 半透明白色渐变增强通透感,超大圆角提升现代感。

响应式布局

@media (max-width: 768px) {
  .product-card { border-radius: 5rem; }
  .product-card .card-content { flex-direction: column; }
  .product-card .image-container { width: 100%; border-radius: 5rem; }
  .product-card .info-container .btn-primary { max-width: none; }
}

核心:屏幕宽度 ≤768px(移动端)时,① 缩小卡片 / 图片圆角;② 图片 + 信息从「横向排列」改为「垂直排列」;③ 按钮宽度自适应,适配移动端交互。

图片切换交互

/* 默认图片 */
.image {
  aspect-ratio: 1/1;
  width: 100%;
  background: url("xxx.png") center;
  background-size: cover;
  transition: 0.4s ease;
}
/* 复选框选中时切换图片 */
.theme-switch__input:checked~.image {
  background-image: url("yyy.png");
}

核心:利用 CSS 相邻兄弟选择器 ~,监听复选框 :checked 状态,切换背景图片,配合 transition 实现平滑过渡。

开关按钮 & 按钮动效

/* 开关按钮样式切换 */
.theme-switch__input:checked+.image+.theme-switch .theme-switch__container {
  background-color: #222;
}
.theme-switch__input:checked+.image+.theme-switch .theme-switch__circle {
  transform: translateX(30px);
  background-color: #fff;
}
/* 加入购物车按钮 hover/active 动效 */
.btn-primary:hover {
  transform: translateY(-2px);
  filter: brightness(1.05);
  box-shadow: ...;
}
.btn-primary:active {
  transform: translateY(1px);
  box-shadow: ...;
}

核心:① 开关按钮的「白天 / 夜间」图标显隐、背景色、滑块位置随复选框状态变化;② 按钮 hover 时上移 + 亮度提升,active 时下移 + 阴影缩小,模拟「按压反馈」。


各位互联网搭子,要是这篇文章成功引起了你的注意,别犹豫,关注、点赞、评论、分享走一波,让我们把这份默契延续下去,一起在知识的海洋里乘风破浪!

微信小程序自动化的 AI 新时代:wechat-devtools-mcp 智能方案

FliPPeDround

前端工程师 · 开源爱好者 · 正在找工作

对我的项目感兴趣?查看我的简历 · resume

如果你曾尝试配合 AI 代理(如 Claude、Cursor 编写微信小程序,你大概率会遇到这样的困境:测试工具与 AI 代理集成困难、缺乏统一的自动化框架支持、无法充分利用 AI 的智能分析能力。更糟糕的是,当你想要使用 Claude、Cursor 等 AI 辅助工具来提升测试效率时,却发现没有合适的微信小程序自动化集成方案。

为了解决这些痛点,wechat-devtools-mcp 应运而生。作为一款基于 MCP(Model Context Protocol)协议的微信开发者工具自动化服务,它让小程序的自动化测试与 AI 智能分析变得前所未有的简单和高效。

📖 介绍

📚 官方文档:更多详细的安装和配置说明,请参考 GitHub 仓库

wechat-devtools-mcp 是一个专门为微信小程序设计的 MCP 服务,通过 MCP 协议与 AI 代理(如 Claude、Cursor)深度集成。它基于微信官方的 miniprogram-automator 库,提供了完整的小程序自动化能力,让你能够在 AI 的辅助下,高效地完成小程序的自动化测试和调试。

这个工具的出现,填补了小程序自动化测试与 AI 智能分析之间的空白。它不仅保持了与微信开发者工具的完全兼容性,还充分发挥了 MCP 协议的标准化优势,为开发者提供了一个更智能、更高效的自动化测试解决方案。

🚀 核心功能与技术优势

1. 无缝集成 MCP 协议生态

wechat-devtools-mcp 完全兼容 MCP 协议,可以轻松集成到支持 MCP 的 AI 代理中:

{
  "mcpServers": {
    "wechat-devtools": {
      "command": "npx",
      "args": [
        "-y",
        "wechat-devtools-mcp",
        "--projectPath=/path/to/your/miniprogram"
      ]
    }
  }
}

2. 全面的页面导航支持

工具提供了丰富的 API 来操作小程序页面导航:

  • 保留当前页面跳转:通过 navigateTo 跳转到非 tabBar 页面
  • 关闭当前页面跳转:通过 redirectTo 关闭当前页面并跳转
  • 返回上一页:通过 navigateBack 返回上一页面或多级页面
  • 重新加载页面:通过 reLaunch 关闭所有页面并重新打开
  • 切换 TabBar:通过 switchTab 跳转到 tabBar 页面
  • 获取页面栈:通过 pageStack 获取当前页面栈列表

3. 强大的元素操作能力

工具提供了完整的元素操作 API,支持各种用户交互模拟:

  • 元素获取:通过 getElementgetElements 获取页面元素
  • 用户交互:支持点击、长按、触摸、输入等操作
  • 元素信息:获取元素尺寸、位置、文本、属性、样式等信息
  • 组件方法:调用自定义组件的方法和数据操作

4. 智能日志和异常监听

工具内部实现了智能的日志和异常监听机制:

  • 自动监听控制台日志(console.log、console.info、console.warn、console.error)
  • 自动捕获运行时异常,包括错误名称、堆栈跟踪和发生时间
  • 支持日志和异常的查询和过滤
  • 内置日志数量限制,避免内存溢出

5. 灵活的配置选项

支持丰富的配置选项,满足不同测试场景的需求:

  • 自定义小程序项目路径
  • 微信开发者工具 CLI 路径配置
  • 连接超时时间设置
  • WebSocket 端口配置
  • 用户账号和登录票据支持
  • 项目配置文件覆盖

6. 微信 API 模拟与调用

工具提供了强大的微信 API 操作能力:

  • 调用微信 API:通过 callWxMethod 调用 wx 对象上的任意方法
  • Mock 微信 API:通过 mockWxMethod 模拟 API 返回值,便于测试
  • 恢复微信 API:通过 restoreWxMethod 恢复被 Mock 的方法

🧪 为什么 E2E 测试如此重要

在软件开发中,单元测试固然重要,但 E2E(End-to-End)测试在构建高质量代码过程中扮演着不可替代的角色。

提升代码可靠性

E2E 测试模拟真实用户的使用场景,从用户界面到后端服务的完整流程进行验证。与单元测试不同,E2E 测试能够发现:

  • 页面间的导航和状态传递问题
  • 用户交互与业务逻辑的集成异常
  • 微信 API 调用的错误处理
  • 不同设备和系统版本的兼容性问题

对于微信小程序这种运行在特殊环境中的应用,E2E 测试尤为重要。它能够确保你的小程序在不同设备、不同微信版本、不同网络环境下都能正常运行,避免出现"在开发环境正常,上线后出问题"的尴尬情况。

降低维护成本

虽然编写 E2E 测试 需要投入一定的时间成本,但从长远来看,它能显著降低维护成本:

  • 减少回归测试时间:自动化测试可以在几分钟内完成原本需要数小时的手动测试
  • 快速定位问题:当出现 bug 时,E2E 测试能够快速定位问题所在
  • 增强重构信心:有了完善的测试覆盖,你可以放心地进行代码重构,而不必担心破坏现有功能
  • 文档化业务逻辑:测试代码本身就是最好的业务逻辑文档

提升团队协作效率

E2E 测试作为项目质量的"守门员",能够:

  • 统一团队对功能实现的理解
  • 减少 code review 时的争议
  • 让新成员快速理解项目功能
  • 建立持续集成的质量保障体系

📦 快速上手

安装依赖

wechat-devtools-mcp 是一个 npm 包,可以直接通过 npx 运行,无需额外安装:

npx -y wechat-devtools-mcp --projectPath=/path/to/your/miniprogram

配置 MCP 服务器

在你的 AI 代理(如 Claude、Cursor)的配置文件中添加 MCP 服务器配置:

{
  "mcpServers": {
    "wechat-devtools": {
      "command": "npx",
      "args": [
        "-y",
        "wechat-devtools-mcp",
        "--projectPath=/path/to/your/miniprogram"
      ]
    }
  }
}

命令行参数说明

参数 类型 说明
--projectPath string 小程序项目路径(必填)
--cliPath string 微信开发者工具 CLI 路径
--timeout number 连接超时时间(毫秒),默认 30000
--port number WebSocket 端口号,默认 9420
--account string 用户 openid
--ticket string 开发者工具登录票据
--projectConfig string 覆盖 project.config.json 中的配置

使用示例

配置完成后,你就可以在 AI 代理中使用 wechat-devtools-mcp 提供的工具了。以下是一些典型的使用场景:

1. 启动小程序

// 使用 launch 工具启动微信开发者工具并连接小程序
await launch()

2. 页面导航测试

// 跳转到指定页面
await navigateTo({ url: '/pages/detail/detail?id=123' })

// 获取当前页面信息
const currentPage = await currentPage()

// 返回上一页
await navigateBack({ delta: 1 })

3. 元素操作测试

// 获取页面元素
const element = await getElement({ selector: '.submit-button' })

// 点击元素
await tapElement({ selector: '.submit-button' })

// 输入文本
await inputElement({ selector: '#username', value: 'testuser' })

// 获取元素文本
const text = await getElementText({ selector: '.welcome-text' })

4. 页面数据操作

// 获取页面数据
const pageData = await getPageData({ path: 'userInfo.name' })

// 设置页面数据
await setPageData({ data: { count: 10, status: 'active' } })

5. 日志和异常监听

// 获取控制台日志
const logs = await getlogs({ type: 'error', limit: 10 })

// 获取异常信息
const exceptions = await getexceptions({ limit: 5 })

6. 微信 API 调用和 Mock

// 调用微信登录 API
const loginResult = await callWxMethod({ method: 'login', args: [] })

// Mock 用户信息 API
await mockWxMethod({ method: 'getUserInfo', result: { nickName: '测试用户' } })

// 恢复 API
await restoreWxMethod({ method: 'getUserInfo' })

🎯 高级功能详解

截图功能

工具支持对小程序当前页面进行截图,返回 Base64 编码的图片数据:

const screenshot = await screenshot()

系统信息获取

获取小程序运行所在的系统信息,包括手机品牌、型号、屏幕尺寸、操作系统版本、微信版本等:

const systemInfo = await systemInfo()

体验评分

支持微信小程序体验评分(Audits)功能,可以获取性能最佳实践、Accessibility 可访问性等方面的评分和建议:

// 停止体验评分并获取报告
const auditResult = await stopAudits({ path: './audits.json' })

测试账号管理

支持获取微信开发者工具多账号调试中添加的测试用户列表,可用于模拟不同用户登录场景的测试:

const accounts = await testAccounts()

🔧 技术实现细节

wechat-devtools-mcp 的实现基于 MCP 协议和微信官方的 miniprogram-automator 库,核心架构包括以下几个部分:

  1. Automator 类:负责微信开发者工具的启动、连接和生命周期管理
  2. MiniProgram 工具类:提供小程序级别的操作,如页面导航、API 调用、系统信息获取等
  3. Page 工具类:提供页面级别的操作,如元素获取、数据操作、方法调用等
  4. Element 工具类:提供元素级别的操作,如点击、输入、属性获取等

工具内部还实现了智能的状态管理和错误处理机制,确保自动化测试的稳定性和可靠性。

🌟 总结

wechat-devtools-mcp 为微信小程序开发者提供了一个现代化、智能化的自动化测试解决方案。它不仅解决了传统测试工具与 AI 代理集成困难的问题,还充分发挥了 MCP 协议和 miniprogram-automator 的技术优势。

通过完善的 E2E 测试和 AI 智能分析,你可以:

  • 提升代码质量和可靠性
  • 降低长期维护成本
  • 增强团队协作效率
  • 建立持续集成的质量保障体系
  • 充分利用 AI 的智能分析能力

如果你正在开发微信小程序项目,并且想要建立完善的自动化测试体系,wechat-devtools-mcp 绝对值得一试。它会让你的测试工作变得前所未有的简单和高效。

📚 相关资源


最后

wechat-devtools-mcp 是一个免费的开源软件,遵循MIT协议,社区的赞助使其能够有更好的发展。

你的赞助会帮助我更好的维护项目,如果对你有帮助,请考虑赞助一下😊

你的star🌟也是对我的很大鼓励,Github

欢迎反馈问题和提pr共建

Modern.js 3.0 发布:聚焦 Web 框架,拥抱生态发展

前言

Modern.js 2.0 发布 至今,已过去三年时间,感谢社区开发者们对 Modern.js 的使用和信任。Modern.js 一直保持稳定的迭代,累计发布了超过 100 个版本。

在字节内部,Modern.js 已成为 Web 开发的核心框架。在全公司活跃的 Web 项目中,使用占比已从 2025 年初的 40% 增长至目前接近 70%。

这三年中,我们不断扩充新特性,持续进行代码重构与优化,也收到了非常多的反馈,这些经验成为了 3.0 版本改进的重要参考。经过慎重考虑,我们决定发布 Modern.js 3.0,对框架进行一次全面的升级。

Modern.js 2.0 到 3.0 的演变

从 Modern.js 2.0 到 3.0,有两个核心转变:

更聚焦,专注于 Web 框架

  • Modern.js 2.0:包含 Modern.js App、Modern.js Module、Modern.js Doc
  • Modern.js 3.0:只代表 Modern.js App,Modern.js Module 和 Modern.js Doc 已孵化为 RslibRspress

更开放,积极面向社区工具

  • Modern.js 2.0:内置各类工具、框架独特的 API 设计
  • Modern.js 3.0:强化插件体系,完善接入能力,推荐社区优质方案

Modern.js 3.0 新特性

React Server Component

TL;DR:Modern.js 3.0 集成 React Server Component,支持 CSR 和 SSR 项目,并支持渐进式迁移。

什么是 React Server Component

React Server Components(服务端组件)是一种新的组件类型,它允许组件逻辑完全在服务端执行,并直接将渲染后的 UI 流式传输到客户端。与传统的客户端组件相比,服务端组件带来了以下特性:

特性 说明
零客户端包体积 组件代码不包含在客户端 JS Bundle 中,仅在服务端执行,加快首屏加载与渲染速度
更高的内聚性 组件可直接连接数据库、调用内部 API、读取本地文件,提高开发效率
渐进增强 可与客户端组件无缝混合使用,按需下放交互逻辑到客户端,在保持高性能的同时,支持复杂交互体验

需要明确的是,RSC 和 SSR 是截然不同的概念

  • RSC:描述的是组件类型,即组件在哪里执行(服务端 vs 客户端)
  • SSR:描述的是渲染模式,即 HTML 在哪里生成(服务端 vs 客户端)

两者可以组合使用:Server Component 可以在 SSR 项目下使用,也可以在 CSR 项目下使用。在 Modern.js 3.0 中,我们同时支持这两种模式,开发者可以根据需求选择。

开箱即用

在 Modern.js 3.0 中,只需在配置中启用 RSC 能力:

modern.config.ts

export default defineConfig({
  server: {
    rsc: true,
  }
});

配置启用后,所有的路由组件都会默认成为 Server Component。项目中可能存在无法在服务端运行的组件,你可以先为这些组件添加 'use client' 标记,以保持原有行为,再逐步迁移。

RSC 效果演示视频:lf3-static.bytednsdoc.com/obj/eden-cn…

Modern.js 3.0 的 RSC 特性

Modern.js 一直选择 React Router 作为路由解决方案。去年,React Router v7 宣布支持 React Server Component,这为 Modern.js 提供了在 SPA 应用下实现 RSC 的基础。

相比于社区其他框架,Modern.js 对 RSC 做了几点优化:

  • 使用 Rspack 最新的 RSC 插件构建,显著提升 RSC 项目构建速度;并进一步优化了产物体积。
  • 不同于社区主流框架只支持 RSC + SSR,Modern.js 3.0 的 RSC 同样支持 CSR 项目
  • 在路由跳转时,框架会自动将多个 Data Loader 和 Server Component 的请求合并为单个请求,并流式返回,提升页面性能
  • 在嵌套路由场景下,路由组件类型不受父路由组件类型的影响,开发者可以从任意路由层级开始采用 Server Component

渐进式迁移

基于灵活的组件边界控制能力,Modern.js 3.0 提供了渐进式的迁移方式。Modern.js 3.0 允许基于路由组件维度的 Server Component 迁移,无需迁移整条组件树链路。

更多 React Server Component 的详细内容,可以参考:React Server Component


拥抱 Rspack

TL;DR:Modern.js 3.0 移除了对 webpack 的支持,全面拥抱 Rspack,并升级到最新的 Rspack & Rsbuild 2.0。

在 2023 年,我们开源了 Rspack,并在 Modern.js 中支持将 Rspack 作为可选的打包工具。在字节内部,超过 60% 的 Modern.js 项目已经切换到 Rspack 构建。

经过两年多发展,Rspack 在社区中的月下载量已超过 1000 万次,成长为行业内被广泛使用的打包工具;同时,Modern.js 的 Rspack 构建模式也得到持续完善。

Rspack 下载量

在 Modern.js 3.0 中,我们决定移除对 webpack 的支持,从而使 Modern.js 变得更加轻量和高效,并能更充分地利用 Rspack 的新特性。

更顺畅的开发体验

Modern.js 3.0 在移除 webpack 后,能够更好地遵循 Rspack 最佳实践,在构建性能、安装速度等方面均有提升:

底层依赖升级

Modern.js 3.0 将底层依赖的 Rspack 和 Rsbuild 升级至 2.0 版本,并基于新版本优化了默认构建配置,使整体行为更加一致。

参考以下文档了解底层行为变化:

更快的构建速度

Modern.js 通过 Rspack 的多项特性来减少构建耗时:

  • 默认启用 Barrel 文件优化:构建组件库速度提升 20%
  • 默认启用持久化缓存:非首次构建的速度提升 50%+

更快的安装速度

移除 webpack 相关依赖后,Modern.js 3.0 的构建依赖数量和体积均明显减少:

  • npm 依赖数量减少 40%
  • 安装体积减少 31 MB

更小的构建产物

Modern.js 现在默认启用 Rspack 的多项产物优化策略,能够比 webpack 生成更小的产物体积,例如:

增强 Tree shaking

增强了 tree shaking 分析能力,可以处理更多动态导入语法,例如解构赋值:

// 参数中的解构访问
import('./module').then(({ value }) => {
  console.log(value);
});

// 函数体内的解构访问
import('./module').then((mod) => {
  const { value } = mod;
  console.log(value);
});

常量内联

对常量进行跨模块内联,有助于压缩工具进行更准确的静态分析,从而消除无用的代码分支:

// constants.js
export const ENABLED = true;

// index.js
import { ENABLED } from './constants';
if (ENABLED) {
  doSomething();
} else {
  doSomethingElse();
}

// 构建产物 - 无用分支被消除
doSomething();

全链路可扩展

TL;DR:Modern.js 3.0 正式开放完整插件体系,提供运行时、服务端插件,同时支持灵活处理应用入口。

Modern.js 2.0 提供了 CLI 插件与内测版本的运行时插件,允许开发者对项目进行扩展。但在实践过程中,我们发现现有的能力不足以支撑复杂的业务场景。

Modern.js 3.0 提供了更灵活的定制能力,允许为应用编写全流程的插件,帮助团队统一业务逻辑、减少重复代码:

  • CLI 插件:在构建阶段扩展功能,如添加命令、修改配置
  • Runtime 插件:在渲染阶段扩展功能,如数据预取、组件封装
  • Server 插件:在服务端扩展功能,如添加中间件、修改请求响应

运行时插件

运行时插件在 CSR 与 SSR 过程中都会运行,新版本提供了两个核心钩子:

  • onBeforeRender:在渲染前执行逻辑,可用于数据预取、注入全局数据
  • wrapRoot:封装根组件,添加全局 Provider、布局组件等

你可以在 src/modern.runtime.ts 中注册插件,相比在入口手动引入高阶组件,运行时插件可插拔、易更新,在多入口场景下无需重复引入:

src/modern.runtime.tsx

import { defineRuntimeConfig } from "@modern-js/runtime";

export default defineRuntimeConfig({
  plugins: [
    {
      name: "my-runtime-plugin",
      setup: (api) => {
        api.onBeforeRender((context) => {
          context.globalData = { theme: "dark" };
        });
        api.wrapRoot((App) => (props) => <App {...props} />);
      },
    },
  ],
});

更多 Runtime 插件使用方式,请查看文档:Runtime 插件

服务端中间件

在实践过程中我们发现,部分项目需要扩展 Web Server,例如鉴权、数据预取、降级处理、动态 HTML 脚本注入等。

在 Modern.js 3.0 中,我们使用 Hono 重构了 Web Server,并正式开放了服务端中间件与插件的能力。开发者可以使用 Hono 的中间件来完成需求:

server/modern.server.ts

import { defineServerConfig, type MiddlewareHandler } from "@modern-js/server-runtime";

const timingMiddleware: MiddlewareHandler = async (c, next) => {
  const start = Date.now();
  await next();
  const duration = Date.now() - start;
  c.header('X-Response-Time', `${duration}ms`);
};

const htmlMiddleware: MiddlewareHandler = async (c, next) => {
  await next();
  const html = await c.res.text();
  const modified = html.replace(
    "<head>",
    '<head><meta name="generator" content="Modern.js">'
  );
  c.res = c.body(modified, { status: c.res.status, headers: c.res.headers });
};

export default defineServerConfig({
  middlewares: [timingMiddleware],
  renderMiddlewares: [htmlMiddleware],
});

更多服务端插件使用方式,可以查看文档:自定义 Web Server

自定义入口

在 Modern.js 3.0 中,我们重构了自定义入口,相比于旧版 API 更加清晰灵活:

src/entry.tsx

import { createRoot } from '@modern-js/runtime/react';
import { render } from '@modern-js/runtime/browser';

const ModernRoot = createRoot();

async function beforeRender() {
  // 渲染前的异步操作,如初始化 SDK、获取用户信息等
}

beforeRender().then(() => {
  render(<ModernRoot />);
});

更多入口使用方式,请查看文档:入口


路由优化

TL;DR:Modern.js 3.0 内置 React Router v7,提供配置式路由能力与 AI 友好的调试方式。

内置 React Router v7

在 Modern.js 3.0 中,我们统一升级到 React Router v7,并废弃了对 v5 和 v6 的内置支持。这一决策基于以下考虑:

版本演进与稳定性

React Router v6 是一个重要的过渡版本,它引入了许多新特性(如数据加载、错误边界等)。而 v7 在保持 v6 API 兼容性的基础上,进一步优化了性能、稳定性和开发体验。随着 React Router 团队将 Remix 定位为独立框架,React Router 核心库可能会在 v7 版本上长期维护,使其成为更可靠的选择。

升级路径

  • 从 v6 升级:React Router v7 对 v6 开发者来说是无破坏性变更的升级。在 Modern.js 2.0 中,我们已提供了 React Router v7 插件支持,你可以通过插件方式渐进式升级,验证兼容性后再迁移到 Modern.js 3.0。
  • 从 v5 升级:v5 到 v7 存在较大的 API 变化,建议参考 React Router 官方迁移指南 进行迁移。

配置式路由

在 Modern.js 中,我们推荐使用约定式路由来组织代码。但在实际业务中,开发者偶尔遇到以下场景:

  • 多路径指向同一组件
  • 灵活的路由控制
  • 条件性路由
  • 遗留项目迁移

因此,Modern.js 3.0 提供了完整的配置式路由支持,可以与约定式路由一起使用,或两者分别单独使用。

src/modern.routes.ts

import { defineRoutes } from "@modern-js/runtime/config-routes";

export default defineRoutes(({ route, layout, page }) => {
  return [
    route("home.tsx", "/"),
    route("about.tsx", "about"),
    route("blog.tsx", "blog/:id"),
  ];
});

更多配置式路由使用方式,请查看文档:配置式路由

路由调试

运行 npx modern routes 命令即可在 dist/routes-inspect.json 文件中生成完整的路由结构分析报告。

报告中会显示每个路由的路径、组件文件、数据加载器、错误边界、Loading 组件等完整信息,帮助开发者快速了解项目的路由配置,快速定位和排查路由相关问题。结构化的 JSON 格式也便于 AI agent 理解和分析路由结构,提升 AI 辅助开发的效率。

具体使用方式,请查看文档:路由调试


服务端渲染

TL;DR:Modern.js 3.0 重做了 SSG 能力,提供了灵活的缓存能力,对降级策略也进行了进一步的完善。

静态站点生成(SSG)

在 Modern.js 2.0 中,我们提供了静态站点生成的能力。这个能力非常适合用在可以静态渲染的页面中,能极大的提升页面首屏性能。

在新版本中,我们对 SSG 进行了重新设计:

  • 数据获取使用 Data Loader,与非 SSG 场景保持一致
  • 简化了 API,降低理解成本
  • 与约定式路由更好地结合

在新版本中,你可以通过 data loader 进行数据获取,与非 SSG 场景保持一致。然后在 ssg.routes 配置中即可直接指定要渲染的路由:

modern.config.ts

export default defineConfig({
  output: {
    ssg: {
      routes: ['/blog'],
    },
  },
});

routes/blog/page.data.ts

export const loader = async () => {
  const articles = await fetchArticles();
  return { articles };
};

更多 SSG 的使用方式,请查看文档:SSG

缓存机制

Modern.js 3.0 中提供了不同维度的缓存机制,帮助项目提升首屏性能。所有缓存均支持灵活配置,比如可以支持类似 HTTP 的 stale-while-revalidate 策略:

渲染缓存

支持将 SSR 结果进行整页的缓存,在 server/cache.ts 中配置:

server/cache.ts

import type { CacheOption } from '@modern-js/server-runtime';

export const cacheOption: CacheOption = {
  maxAge: 500, // ms
  staleWhileRevalidate: 1000, // ms
};

使用渲染缓存,请查看文档:渲染缓存

数据缓存

我们在新版本中提供了 cache 函数,相比渲染缓存它提供了更精细的数据粒度控制。当多个数据请求依赖同一份数据时,cache 可以避免重复请求:

server/loader.ts

import { cache } from "@modern-js/runtime/cache";
import { fetchUserData, fetchUserProjects, fetchUserTeam } from "./api";

// 缓存用户数据,避免重复请求
const getUser = cache(fetchUserData);

const getProjects = async () => {
  const user = await getUser("test-user");
  return fetchUserProjects(user.id);
};

const getTeam = async () => {
  const user = await getUser("test-user"); // 复用缓存,不会重复请求
  return fetchUserTeam(user.id);
};

export const loader = async () => {
  // getProjects 和 getTeam 都依赖 getUser,但 getUser 只会执行一次
  const [projects, team] = await Promise.all([getProjects(), getTeam()]);
  return { projects, team };
};

更多数据缓存的使用方式,请查看文档:数据缓存

灵活的降级策略

在实践过程中,我们沉淀了多维度的降级策略:

类型 触发方式 降级行为 使用场景
异常降级 Data Loader 执行报错 触发 ErrorBoundary 数据请求异常兜底
组件渲染报错 服务端渲染异常 降级到 CSR,复用已有数据渲染 服务端渲染异常兜底
业务降级 Loader 抛出 throw Response 触发 ErrorBoundary,返回对应 HTTP 状态码 404、权限校验等业务场景
配置 Client Loader 配置 Client Loader 绕过 SSR,直接请求数据源 需要在客户端直接获取数据的场景
强制降级 Query 参数 ?__csr=true 跳过 SSR,返回 CSR 页面 调试、临时降级
强制降级 请求头 x-modern-ssr-fallback 跳过 SSR,返回 CSR 页面 网关层控制降级

轻量 BFF

TL;DR:Modern.js 3.0 基于 Hono 重构了 Web Server,提供基于 Hono 的一体化函数,同时支持跨项目调用。

Hono 一体化函数

在 Modern.js 3.0 中,我们使用 Hono 作为 BFF 的运行时框架,开发者可以基于 Hono 生态扩展 BFF Server,享受 Hono 轻量、高性能的优势。

通过 useHonoContext 可以获取完整的 Hono 上下文,访问请求信息、设置响应头等:

api/lambda/user.ts

import { useHonoContext } from '@modern-js/server-runtime';

export const get = async () => {
  const c = useHonoContext();
  const token = c.req.header('Authorization');
  c.header('X-Custom-Header', 'modern-js');
  const id = c.req.query('id');

  return { userId: id, authenticated: !!token };
};

跨项目调用

在过去,Modern.js BFF 只能在当前项目中使用,而我们陆续收到开发者反馈,希望能够在不同项目中使用。这多数情况是由于开发者的迁移成本、运维成本造成的,相比于抽出原有代码再部署一个,显然复用已有服务更加合理。

为了保证开发者能得到与当前项目一体化调用类似的体验,我们提供了跨项目调用的能力。

更多 BFF 的使用方式,请查看文档:BFF


Module Federation 深度集成

TL;DR:Modern.js 3.0 与 Module Federation 2.0 深度集成,支持 MF SSR 和应用级别模块导出。

MF SSR

Modern.js 3.0 支持在 SSR 应用中使用 Module Federation,组合使用模块联邦和服务端渲染能力,为用户提供更好的首屏性能体验。

modern.config.ts

export default defineConfig({
  server: {
    ssr: {
      mode: 'stream',
    },
  },
});

配合 Module Federation 的数据获取能力,每个远程模块都可以定义自己的数据获取逻辑:

src/components/Button.data.ts

export const fetchData = async () => {
  return {
    data: `Server time: ${new Date().toISOString()}`,
  };
};

src/components/Button.tsx

export const Button = (props: { mfData: { data: string } }) => {
  return <button>{props.mfData?.data}</button>;
};

应用级别模块

不同于传统的组件级别共享,Modern.js 3.0 支持导出应用级别模块——具备完整路由能力、可以像独立应用一样运行的模块。这是微前端场景中的重要能力。

生产者导出应用

src/export-App.tsx

import '@modern-js/runtime/registry/index';
import { render } from '@modern-js/runtime/browser';
import { createRoot } from '@modern-js/runtime/react';
import { createBridgeComponent } from '@module-federation/modern-js/react';

const ModernRoot = createRoot();
export const provider = createBridgeComponent({
  rootComponent: ModernRoot,
  render: (Component, dom) => render(Component, dom),
});

export default provider;

消费者加载应用

src/routes/remote/$.tsx

import { createRemoteAppComponent } from '@module-federation/modern-js/react';
import { loadRemote } from '@module-federation/modern-js/runtime';

const RemoteApp = createRemoteAppComponent({
  loader: () => loadRemote('remote/app'),
  fallback: ({ error }) => <div>Error: {error.message}</div>,
  loading: <div>Loading...</div>,
});

export default RemoteApp;

通过通配路由 $.tsx,所有访问 /remote/* 的请求都会进入远程应用,远程应用内部的路由也能正常工作。

更多 Module Federation 的使用方式,请查看文档:Module Federation


技术栈更新

TL;DR:Modern.js 3.0 升级 React 19,最低支持 Node.js 20。

React 19

Modern.js 3.0 新项目默认使用 React 19,最低支持 React 18。

如果你的项目仍在使用 React 16 或 React 17,请先参考 React 19 官方升级指南 完成版本升级。

Node.js 20

随着 Node.js 不断推进版本演进,Node.js 18 已经 EOL。在 Modern.js 3.0 中,推荐使用 Node.js 22 LTS,不再保证对 Node.js 18 的支持。

Storybook Rsbuild

在 Modern.js 3.0 中,我们基于 Storybook Rsbuild 实现了使用 Storybook 构建 Modern.js 应用。

通过 Storybook Addon,我们将 Modern.js 配置转换合并为 Rsbuild 配置,并通过 Storybook Rsbuild 驱动构建,让 Storybook 调试与开发命令保持配置对齐。

更多 Storybook 使用方式,请查看文档:使用 Storybook

使用 Biome

随着社区技术不断发展,更快、更简洁的工具链已经成熟。在 Modern.js 3.0 中,新项目默认使用 Biome 作为代码检查和格式化工具。


从 Modern.js 2.0 升级到 3.0

主要变更

升级 Modern.js 3.0 意味着拥抱更轻量、更标准的现代化开发范式。通过全面对齐 Rspack 与 React 19 等主流生态,彻底解决历史包袱带来的维护痛点,显著提升构建与运行性能。

未来,我们也会基于 Modern.js 3.0 提供更多的 AI 集成与最佳实践,配合灵活的全栈插件系统,让开发者能以极低的学习成本复用社区经验,实现开发效率的质变与应用架构的现代化升级。

更多改进与变更,请查看文档:升级指南

反馈和社区

最后,再次感谢每一位给予我们反馈和支持的开发者,我们将继续与大家保持沟通,在相互支持中共同成长。

如果你在使用过程中遇到问题,欢迎通过以下方式反馈:

🧠 空数组的迷惑行为:为什么 every 为真,some 为假?

一、前言

Hello~大家好。我是秋天的一阵风

在 JavaScript 开发中,everysome是我们日常处理数组时高频用到的两个数组方法,用法简单、逻辑直观,一直是前端处理数组判断的好帮手。但不少开发者在接触空数组的场景时,都会对一个现象感到困惑:

console.log([].every(item => item > 0)); // true 
console.log([].some(item => item > 0)); // false

同样是空数组,调用两个逻辑相近的方法,结果却截然相反。这并不是 JavaScript 的设计漏洞,而是背后遵循了严谨的数学逻辑。

与其只记着 “空数组 every 返回 true、some 返回 false” 这个结论就完事,不如跟着这篇内容,从数学逻辑到手写源码,把这个知识点掰扯透。

我之前还写过一篇《给我十分钟,手把手教你实现 Javascript 数组原型对象上的七个方法》,里面把 forEach、map、reduce 这些常用数组方法的实现思路拆得明明白白,和这篇讲的内容是一个思路,看完这篇再去翻那篇,能把 JS 数组的底层逻辑摸得更透。

二、解开疑惑

很多人第一次发现这个现象时,会觉得是 JavaScript 的特殊约定,其实不然,everysome的返回值逻辑,本质上是继承了数理逻辑中的量词规则,这也是这两个方法设计的底层依据。

1. every:对应全称量词的 “平凡真”

every的核心语义是 “数组中所有元素都满足某个条件”,对应数学中的全称量词(∀) 。在数理逻辑里有个 “平凡真” 的概念,简单说就是:如果一个集合是空集,那么 “这个集合里所有元素满足某条件” 这个说法,本身是成立的。

举个通俗的例子,我们说 “空盒子里的所有苹果都是红的”,因为盒子里根本没有苹果,也就不存在 “非红色的苹果” 来推翻这个说法,所以这个命题自然是真的。这也是[].every(...)会返回 true 的根本原因,是逻辑上的必然结果。

2. some:对应存在量词的 “平凡假”

some的核心语义是 “数组中至少有一个元素满足某个条件” ,对应数学中的存在量词(∃) 。同理,空集合里没有任何元素,自然不可能找到满足条件的那个元素,就像说 “空盒子里有一个红苹果”,显然是不成立的。所以[].some(...)返回 false,也是存在判断的必然结果。

光懂理论还不够,对于开发者来说,看得见的代码实现远比抽象的概念更易理解。接下来我们就用原生 JS 复刻这两个方法的核心实现,从代码层面看清楚背后的逻辑。

三、源码拆解:兜底值,是结果不同的关键

ECMAScript 规范中,对Array.prototype.everyArray.prototype.some的执行逻辑有明确定义,我们复刻的核心实现完全贴合原生逻辑,这也是理解原生方法最直接的方式 —— 亲手实现一遍,比看十遍文档更管用。

1. 复刻 Array.prototype.every

every的核心思路很简单:

  • 先给一个 “真” 的初始兜底值,遍历数组时只要遇到一个不满足条件的元素,就立刻把结果置为假并终止遍历;
  • 如果遍历完都没有反例,就保留初始的真。
Array.prototype.myEvery = function (callback, thisArg) {
  // 校验回调函数的合法性
  if (typeof callback !== 'function') {
    throw new TypeError(`${callback} is not a function`);
  }

  const arr = this;
  const len = arr.length;
  // 核心:初始兜底值设为true
  let result = true;

  // 空数组的len为0,会直接跳过这个循环
  for (let i = 0;< len; i++) {
    // 处理稀疏数组,跳过不存在的索引
    if (!arr.hasOwnProperty(i)) continue;
    // 执行回调并绑定this指向
    const isPass = callback.call(thisArg, arr[i], i, arr);
    // 有一个不满足,直接置假并终止遍历
    if (!isPass) {
      result = false;
      break;
    }
  }

  // 空数组直接返回初始的兜底值true
  return result;
};

// 测试,和原生方法结果完全一致
console.log([].myEvery(item => item > 0)); // true
console.log([1,2,3].myEvery(item => item > 0)); // true
console.log([1,-2,3].myEvery(item => item > 0)); // false

从代码里能清晰看到,空数组因为长度为 0,会直接跳过遍历循环,最终返回一开始设定的兜底值 true,这就是空数组调用 every 返回 true 的代码实锤。

2. 复刻 Array.prototype.some

some的实现思路和every呼应,只是初始兜底值做了调整:先给一个 “假” 的初始兜底值,遍历数组时只要遇到一个满足条件的元素,就立刻把结果置为真并终止遍历;如果遍历完都没有正例,就保留初始的假。

Array.prototype.mySome = function (callback, thisArg) {
  // 校验回调函数的合法性
  if (typeof callback !== 'function') {
    throw new TypeError(`${callback} is not a function`);
  }

  const arr = this;
  const len = arr.length;
  // 核心:初始兜底值设为false
  let result = false;

  // 空数组同样会直接跳过循环
  for (let i = 0; i< len; i++) {
    // 处理稀疏数组,跳过不存在的索引
    if (!arr.hasOwnProperty(i)) continue;
    // 执行回调并绑定this指向
    const isPass = callback.call(thisArg, arr[i], i, arr);
    // 有一个满足,直接置真并终止遍历
    if (isPass) {
      result = true;
      break;
    }
  }

  // 空数组直接返回初始的兜底值false
  return result;
};

// 测试,和原生方法结果完全一致
console.log([].mySome(item => item > 0)); // false
console.log([1,2,3].mySome(item => item > 5)); // false
console.log([1,6,3].mySome(item => item > 5)); // true

对比两个方法的实现代码,唯一的核心差异就是初始兜底值

  • every以 true 为兜底,没遇到反例就一直为真;
  • some以 false 为兜底,没遇到正例就一直为假。

空数组因为跳过了遍历,直接返回兜底值,这就是二者结果不同的根本原因。

四、开发中要注意的业务逻辑细节

理解了理论和源码,最终还是要落地到实际开发中。空数组的这个特性,在表单校验、列表筛选、数据判断等场景中,很容易因为忽略而引发小 bug,只要稍作处理就能避免。

典型场景:空列表的条件判断

举个电商开发的例子,我们需要校验购物车中的商品是否全部满足包邮条件(价格 > 100),满足的话就显示包邮按钮。如果直接写判断,就容易出问题:

// 考虑不周的写法:未判断数组是否为空
const cartList = []; // 用户还没加购任何商品
if (cartList.every(item => item.price > 100)) {
  showFreeShippingBtn(); // 会执行!因为空数组every返回true
}

显然,用户购物车为空时,不应该显示包邮按钮,这就是把逻辑上的 “真”,和业务上的 “合法” 搞混了。

正确解法:先校验数组非空,再做条件判断

无论使用every还是some,只要业务场景要求 “有数据的集合”,就先判断数组的长度,再执行后续的条件校验,这是最稳妥的方式。

// 严谨的写法:先判断数组非空,再执行判断
const cartList = [];
if (cartList.length > 0 && cartList.every(item => item.price > 100)) {
  showFreeShippingBtn();
} else if (cartList.length === 0) {
  showEmptyCartTip(); // 给用户展示空购物车提示,体验更好
}

再比如用some判断列表中是否有过期优惠券,虽然空数组返回 false 本身符合 “没有过期优惠券” 的逻辑,但如果需要区分 “空列表” 和 “有列表但无过期”,还是要单独判断:

const coupons = [];
if (coupons.some(item => item.isExpired)) {
  showExpiredTip();
} else if (coupons.length === 0) {
  showNoCouponTip(); // 空优惠券列表的专属提示
} else {
  showAllValidTip(); // 有优惠券且都未过期的提示
}

五、总结

其实空数组下every返真、some返假的现象,一点都不复杂,总结起来就是两层核心逻辑:

  1. 数学层面every是全称判断,空集合满足 “平凡真”;some是存在判断,空集合满足 “平凡假”,这是方法设计的底层依据;
  2. 代码层面every的初始兜底值为 true,some为 false,空数组会跳过遍历,直接返回兜底值。

希望看完这篇文章,你再遇到everysome的空数组场景时,能不再困惑,从容应对~

TypeScript 类型体操:如何精准控制可选参数的“去留”

在 TypeScript 的日常开发中,我们经常为了灵活性而将接口(Interface)或类型(Type)的属性定义为可选(使用 ? 修饰符)。但在某些特定场景下,例如配置初始化完成、表单提交前验证或 API 响应处理后,我们需要确保这些属性已经存在,即将其转换为“必选”状态。

这种转换不仅能提供更好的代码提示,还能在编译阶段规避大量的 nullundefined 检查。本文将由浅入深介绍四种主流的转换方案。

1. 全局转换:使用内置工具类型 Required<T>

TypeScript 自 2.8 版本起引入了 Required<T>,这是最直接的方案。它会遍历类型 T 的所有属性,并移除每个属性末尾的可选修饰符。

interface UserProfile {
  id: string;
  name?: string;
  email?: string;
}

// 转换后:id, name, email 全部变为必选
type StrictUser = Required<UserProfile>;

const user: StrictUser = {
  id: "001",
  name: "张三",
  email: "zhangsan@example.com" // 缺少任何一个都会报错
};

适用场景:当你需要对整个对象进行“严格化”处理时,这是首选方案。


2. 精准打击:仅转换特定属性为必选

在实际业务中,我们往往只需要确保某几个关键字段存在,而保留其他字段的可选性。这时可以结合 PickOmitRequired 构建一个复合工具类型。

我们可以定义一个通用的 MarkRequired 类型:

/**
 * T: 原类型
 * K: 需要转为必选的键名联合类型
 */
type MarkRequired<T, K extends keyof T> = 
  Omit<T, K> & Required<Pick<T, K>>;

interface Config {
  host?: string;
  port?: number;
  protocol?: 'http' | 'https';
}

// 示例:仅让 host 变为必选,port 和 protocol 依然可选
type EssentialConfig = MarkRequired<Config, 'host'>;

const myConfig: EssentialConfig = {
  host: "localhost" // port 和 protocol 可选填
};

原理解析:该方法先用 Omit 剔除目标属性,再用 Pick 选出目标属性并通过 Required 转为必选,最后通过交叉类型 & 进行合并。


3. 深入底层:使用映射类型中的 -? 符号

如果你正在尝试编写自己的类型库,了解映射类型(Mapped Types)的修饰符至关重要。在 TypeScript 中,+- 可以作为前缀应用于 ?readonly 修饰符。

type MyRequired<T> = {
  // -? 表示显式地移除可选属性标记
  [P in keyof T]-?: T[P];
};

// 与此相对,+?(通常简写为 ?)用于增加可选标记
type MyPartial<T> = {
  [P in keyof T]+?: T[P];
};

技术要点:使用 -?Required<T> 的底层实现原理。它不仅能去除问号,在处理一些复杂的条件类型映射时,这种手动控制的能力非常强大。


4. 函数参数与深度嵌套处理

函数参数转换

对于函数,最稳妥的方法是在重载或重新定义时直接移除 ?。但在高阶函数或泛型约束中,如果你想约束传入的函数必须接受必选参数,可以利用上述类型工具。

深度嵌套(Deep Required)

内置的 Required 只能处理第一层属性。如果对象是深层嵌套的,你需要递归处理:

type DeepRequired<T> = {
  [P in keyof T]-?: T[P] extends object 
    ? DeepRequired<T[P]> 
    : T[P];
};

interface NestedConfig {
  db?: {
    user?: string;
    pwd?: string;
  }
}

type StrictNested = DeepRequired<NestedConfig>;

建议:在处理极其复杂的深层转换时,推荐使用社区成熟的库如 ts-essentials,其 DeepRequired 经过了大量边缘情况的验证。


结论与行动建议

根据不同的工程需求,建议采取以下策略:

  1. 立即可做:检查项目中的配置对象或 API 聚合层,使用 Required<T> 替代繁琐的非空断言(!)。
  2. 最佳实践:为了保持代码的 DRY(Don't Repeat Yourself)原则,建议在项目的 types/utils.d.ts 中收藏 MarkRequired 工具类型,用于处理部分属性必选的场景。
  3. 注意性能:过度使用复杂的递归类型(如 DeepRequired)可能会增加 TypeScript 编译器的负担,在大型项目中应谨慎评估其影响范围。

深入React源码:解析setState的批量更新与异步机制

在 React 中,setState 的同步或异步行为取决于其调用的上下文环境。以下是详细分析:


一、同步更新场景

  1. 原生事件或非 React 控制的异步回调

    • 原生 DOM 事件:如 addEventListener('click', ...) 绑定的事件处理函数中调用 setState,会直接同步更新状态。

    • 定时器或 Promise:在 setTimeoutsetInterval 或 Promise.then() 中调用 setState,由于脱离 React 的控制流,状态更新会立即执行。

    • 示例

      // 原生事件中同步更新
      componentDidMount() {
        document.addEventListener('click', () => {
          this.setState({ count: 1 }, () => console.log('同步更新:', this.state.count));
        });
      }
      
  2. 直接修改 state 的引用
    若通过 this.state 直接修改(不推荐),会绕过 React 的状态管理机制,表现为同步,但可能导致不可预测的渲染问题。


二、异步更新场景

  1. React 控制的合成事件或生命周期方法

    • 合成事件:如 onClickonChange 等 React 封装的事件处理函数中,setState 会被批量处理,更新延迟到事件循环末尾。

    • 生命周期方法:如 componentDidMountshouldComponentUpdate 中调用 setState,同样触发批量更新。

    • 示例

      // 合成事件中异步更新
      handleClick = () => {
        this.setState({ count: this.state.count + 1 });
        console.log('异步更新前:', this.state.count); // 输出旧值
      };
      
  2. React 18 的自动批处理(Automatic Batching)

    • React 18 默认对所有更新(包括 Promise、原生事件等)进行批处理,即使是非 React 控制的上下文,setState 也可能表现为异步。

    • 需通过 flushSync 强制同步更新:

      import { flushSync } from 'react-dom';
      flushSync(() => {
        this.setState({ count: 1 });
      });
      

三、控制同步/异步的机制

  1. **批量更新标志 isBatchingUpdates**

    • React 内部通过 isBatchingUpdates 变量控制是否合并更新。默认情况下,React 控制的上下文中该值为 true,触发异步更新;其他场景为 false,直接同步更新。
    • 批量更新优化了性能,避免多次渲染(如连续多次 setState 仅触发一次渲染)。
  2. 函数式更新与回调函数

    • 函数式更新:通过传入函数 (prevState) => newState,可确保基于最新状态更新,避免因异步导致的竞态条件。

    • 回调函数:在 setState 的第二个参数中传入回调函数,可在状态更新完成后执行逻辑。

      this.setState(
        { count: this.state.count + 1 },
        () => console.log('更新完成:', this.state.count)
      );
      

四、React 18 的变化

  • 自动批处理增强:React 18 进一步扩大了批处理范围,即使是非 React 控制的异步操作(如 PromiseMutationObserver)也会合并更新。
  • **flushSync 的必要性**:若需强制同步更新,需显式调用 flushSync,但需谨慎使用以避免性能问题。

总结

场景 同步/异步 原因
原生事件、定时器、Promise 同步 脱离 React 控制流,无批量更新机制。
合成事件、生命周期方法 异步 React 控制上下文,启用批量更新优化性能。
函数式更新或回调函数 逻辑同步 函数式更新基于最新状态,回调函数在更新完成后执行。

通过理解上下文和机制,开发者可合理选择同步或异步策略,避免状态更新引发的渲染问题。

程序员都该掌握的“质因数分解”

说在前面

还记得小学数学课上的“质因数分解”吗?这个看似基础的概念,实际上是现代数论的基石。在草稿纸上进行 质因数分解 大家应该都会,那怎么通过代码来实现呢?它又能解决什么问题?

什么是质因数分解?

概念

质因数分解 = 把一个合数,拆成「若干个质数相乘」的形式

例子

12 = 2 × 2 × 3
  • 2、3 都是质数(只能被 1 和自己整除)
  • 12 是合数(能继续拆)
  • 拆到不能再拆,只剩质数,就叫质因数分解

定理

数学里有一条超级重要的定理:

任何一个大于 1 的整数,只有唯一一种质因数分解方式

怎么做质因数分解?

最实用、最好用的方法:短除法

步骤

  • 1.从最小的质数 2 开始试
  • 2.能除就除,除到不能除为止
  • 3.再换下一个质数 3、5、7、11…
  • 4.直到最后结果是 1

例子

180 进行质因数分解

180 ÷ 2 = 90
90  ÷ 2 = 45
45  ÷ 3 = 15
15  ÷ 3 = 5
5   ÷ 5 = 1

所以: 180 = 2² × 3² × 5¹

质因数分解有什么用?

1. 将“乘除”降维成“加减”

在编程中进行算数乘除运算很容易会遇到两个问题:

  • 数字溢出:几个数一相乘,结果可能超出计算机能表示的最大整数范围

  • 精度丢失:一旦引入除法,就可能出现小数,而浮点数的存储和比较天生存在精度误差
1 / 6 * 5 * 5 * 2 * 3

上面这个式子我们快速过一遍不难看出最后的结果应该是 25,但是电脑算出来的结果却是 24.999999999999996

质因子分解 便可以比较优雅的避免这两个问题

例子

我们可以把每个数字“升维”,用一个指数向量来表示它:

12 = 2² × 3¹ × 5⁰ => 向量 [2, 1, 0]
10 = 2¹ × 3⁰ × 5¹ => 向量 [1, 0, 1]
  • 乘法 → 向量加法 12 × 10 = 120 对应的向量运算是:[2, 1, 0] + [1, 0, 1] = [3, 1, 1]

    验证一下:120 = 8 × 3 × 5 = 2³ × 3¹ × 5¹。向量正是 [3, 1, 1]

  • 除法 → 向量减法 120 / 10 = 12 对应的向量运算是:[3, 1, 1] - [1, 0, 1] = [2, 1, 0]

    结果 [2, 1, 0] 正是 12 的向量表示

通过质因数分解,我们可以将复杂的、易出错的乘除法,转换成了简单、精确的整数加减法。

2.最大公因数、最小公倍数

辗转相除法 求最大公因数大家都知道吧,那质因数分解 也能求最大公因数你们知道吗?

比如求 1830GCDLCM

分解

18 = 2¹ × 3²
30 = 2¹ × 3¹ × 5¹

求最大公因数 (GCD)

取每个公共质因子的最低次幂,然后相乘

  • 公共质因子是 23
  • 2 的最低次幂是 min(1, 1) = 1
  • 3 的最低次幂是 min(2, 1) = 1
  • GCD = 2¹ × 3¹ = 6

求最小公倍数 (LCM)

取所有出现过的质因子的最高次幂,然后相乘

  • 所有质因子是 2, 3, 5
  • 2 的最高次幂是 max(1, 1) = 1
  • 3 的最高次幂是 max(2, 1) = 2
  • 5 的最高次幂是 max(0, 1) = 1
  • LCM = 2¹ × 3² × 5¹ = 90

3.现代密码学的基石

我们每天都在使用的 HTTPS、网上银行、数字签名,其安全性的根基,都与质因数分解的“不对称性”有关。

RSA 加密算法。其核心思想可以通俗地理解为:

给你两个巨大的质数 pq,让你把它们乘起来得到 N,这在计算上非常容易。 但是,反过来,只告诉你乘积 N,让你找出原始的 pq 是什么,这在计算上极其困难。

代码实现

说了这么多,那我们如何用代码来实现质因数分解呢?其实非常简单:

/**
 * 对一个正整数进行质因数分解
 * @param {number} n - 需要分解的正整数
 * @returns {Map<number, number>} - 返回一个 Map,键是质因子,值是其指数
 */
function primeFactorize(n) {
  if (n <= 1) {
    return new Map();
  }
  const factors = new Map();
  // 不断除以2,处理所有偶数因子
  while (n % 2 === 0) {
    factors.set(2, (factors.get(2) || 0) + 1);
    n /= 2;
  }
  // 从3开始遍历奇数,直到 n 的平方根
  // 如果 n 有一个大于其平方根的因子,必然会有一个小于其平方根的因子
  for (let i = 3; i * i <= n; i += 2) {
    while (n % i === 0) {
      factors.set(i, (factors.get(i) || 0) + 1);
      n /= i;
    }
  }
  // 如果最后 n 还大于1,那么 n 本身也是一个质数
  if (n > 1) {
    factors.set(n, (factors.get(n) || 0) + 1);
  }
  return factors;
}
console.log(primeFactorize(120)); 
// 输出: Map { 2 => 3, 3 => 1, 5 => 1 }
console.log(primeFactorize(999));
// 输出: Map {3 => 3, 37 => 1}

公众号

关注公众号『 前端也能这么有趣 』,获取更多有趣内容~

发送 加群 还能加入前端交流群,和大家一起讨论技术、分享经验,偶尔也能摸鱼聊天~

说在后面

🎉 这里是 JYeontu,现在是一名前端工程师,有空会刷刷算法题,平时喜欢打羽毛球 🏸 ,平时也喜欢写些东西,既为自己记录 📋,也希望可以对大家有那么一丢丢的帮助,写的不好望多多谅解 🙇,写错的地方望指出,定会认真改进 😊,偶尔也会在自己的公众号『前端也能这么有趣』发一些比较有趣的文章,有兴趣的也可以关注下。在此谢谢大家的支持,我们下文再见 🙌。

有了HTML、CSS、JS为什么还需要React?

在前端开发的日常工作中,HTML负责结构、CSS负责样式、JavaScript负责交互,三者似乎已经构成了完整的开发体系。但随着Web应用复杂度的提升,开发者逐渐发现,传统的开发方式在处理动态交互、状态管理等场景时,会遇到越来越多的挑战。React的出现,为这些问题提供了全新的解决方案。本文将从简单功能入手,逐步深入,探讨React相比原生开发的核心优势。

一、简单部分:从基础计数器说起

我们先从一个最基础的功能——“点击按钮增加计数”说起,对比原生HTML+JS与React的实现差异。

1. 原生HTML+JS实现(命令式编程)

<!-- c:\Users\Administrator\Desktop\React-review\react-html\1.html#L1-25 -->
<!DOCTYPE html>
<html lang="en">
<head>
    <meta charset="UTF-8">
    <meta name="viewport" content="width=device-width, initial-scale=1.0">
    <title>计数器</title>
</head>
<body>
    <div class="card">
        <button id="countBtn">count is 0</button>
    </div>
    <script>
        let count = 0;
        const btn = document.getElementById('countBtn');
        btn.addEventListener('click', function () {
            count = count + 1;
            btn.textContent = `count is ${count}`;
        })
    </script>
</body>
</html>

分析
在原生实现中,我们需要:

  • 声明一个全局变量 count 存储状态;
  • 通过 getElementById 获取DOM元素;
  • 使用 addEventListener 绑定点击事件;
  • 在事件回调中手动更新 count 值,并通过 textContent 修改DOM内容。

这种方式是命令式编程:开发者需要明确告诉浏览器“每一步该做什么”——如何获取元素、如何更新状态、如何修改DOM。

2. React实现(声明式编程)

// c:\Users\Administrator\Desktop\React-review\react-html\react-demo\src\App.jsx#L1-15
import { useState } from 'react'

function App() {
  const [count, setCount] = useState(0)

  return (
      <div className="card">
        <button onClick={() => setCount((count) => count + 1)}>
          count is {count}
        </button>

  </div>
  )
}

export default App

分析
在React实现中,我们需要:

  • 通过 useState 钩子声明状态 count 和更新函数 setCount
  • 在JSX中直接使用 {count} 渲染状态值;
  • 通过 onClick 属性绑定事件,调用 setCount 更新状态。

这种方式是声明式编程:开发者只需描述“UI应该是什么样的”——当状态 count 变化时,按钮文本应显示新的计数,而不需要关心“如何更新DOM”。React会自动处理状态变化到UI更新的过程。

3. 简单场景下React的优势

对比两种实现,即使是最基础的计数器功能,React也展现出明显优势:

  • 代码更简洁:无需手动获取DOM元素、绑定事件监听器或修改DOM内容,JSX语法将结构与逻辑融合,减少冗余代码。
  • 状态管理更清晰:通过 useState 钩子管理状态,避免了全局变量的使用(全局变量在复杂应用中易引发冲突)。
  • 事件处理更直观:通过 onClick 等属性直接绑定事件回调,无需调用 addEventListener,代码可读性更高。
  • 自动DOM更新:当状态变化时,React会自动重新渲染组件,开发者无需手动操作DOM,减少了出错的可能性。

二、复杂部分:从“单功能”到“复杂应用”

当应用功能从“基础计数器”扩展到“带历史记录的计数器”时,原生开发与React的差异会更加明显,React的优势也会进一步凸显。

1. 原生HTML+JS实现复杂功能的挑战

假设我们要为计数器添加“历史记录”功能(记录每次点击后的计数),原生实现可能会像这样(参考之前的完整代码):

let count = 0;
let history = [];
const countEl = document.getElementById('count');
const historyEl = document.getElementById('history');

function update() {
  countEl.textContent = count;  // 更新计数
  
  historyEl.innerHTML = '';   // 清空历史列表
  history.forEach((num, i) => {
    const li = document.createElement('li');
    li.textContent = `#${i + 1}: ${num}`;
    historyEl.appendChild(li);  // 逐个重建
  });
}

document.getElementById('add').onclick = () => {
  count++;
  history.push(count);
  update();  // 每次都要手动调用更新
};

document.getElementById('clear').onclick = () => {
  history = [];
  update();
};

挑战

  • 手动DOM操作繁琐:每次状态变化都需要调用 update() 函数,手动清空并重建历史列表,代码冗余且易出错。
  • 状态与UI同步复杂:当状态(counthistory)变化时,需要开发者手动确保所有相关UI元素(计数显示、历史列表)同步更新。
  • 代码可维护性差:随着功能增加,状态管理和DOM操作会混杂在一起,代码会变得越来越难以理解和维护。

2. React实现复杂功能的简洁性

同样的“带历史记录的计数器”功能,React的实现如下(参考之前的完整代码):

import { useState } from 'react';

function App() {
  const [count, setCount] = useState(0);
  const [history, setHistory] = useState([]);

  return (
    <>
      <p>当前: {count}</p>
      <button onClick={() => {
        setCount(count + 1);
        setHistory([...history, count + 1]);
      }}>+1</button>
      <button onClick={() => setHistory([])}>清空历史</button>

      <ul>
        {history.map((num, i) => (
          <li key={i}>#{i + 1}: {num}</li>
        ))}
      </ul>
    </>
  );
}

export default App;

优势

  • 自动UI更新:当 counthistory 状态变化时,React会自动重新渲染组件,无需手动调用更新函数。
  • 状态管理集中:通过 useState 分别管理 counthistory 状态,逻辑清晰,互不干扰。
  • 声明式渲染:历史列表通过 history.map() 直接渲染,无需手动创建和追加DOM元素,代码更简洁。
  • 组件化思想:相关的状态和逻辑被封装在 App 组件中,便于复用和维护(例如,可将历史列表拆分为独立组件)。

3. React的核心优势:从“功能实现”到“架构设计”

当应用复杂度进一步提升时,React的核心优势会更加突出:

  • 虚拟DOM与性能优化:React通过虚拟DOM技术,只更新变化的部分(而非整个DOM树),大幅提升渲染性能。例如,当历史列表增加一项时,React只会添加新的 <li> 元素,而不会重建整个列表。
  • 组件化与代码复用:React的组件化思想允许将UI拆分为独立、可复用的组件(如按钮、列表项等),减少重复代码,提高开发效率。例如,一个复杂的表单可以拆分为输入框、下拉菜单等多个组件。
  • 生态系统与工具链:React拥有庞大的生态系统,如React Router(路由管理)、Redux(状态管理)、Material-UI(UI组件库)等,为开发复杂应用提供了完整的解决方案。此外,Create React App、Vite等工具简化了项目搭建和构建过程。
  • 跨平台能力:通过React Native,开发者可以使用React的语法和思想构建原生移动应用(iOS/Android),实现“一次编写,多处运行”,降低了跨平台开发的成本。

三、结论:React的价值与适用场景

从基础的计数器功能到复杂的Web应用,React通过声明式编程、自动DOM更新、组件化思想等核心特性,大幅简化了前端开发流程,提高了代码的可维护性和应用性能。

当然,这并不意味着React适用于所有场景:

  • 对于简单的静态页面(如公司官网、个人博客),原生HTML+JS可能仍然是更直接的选择,因为React的脚手架和依赖会增加项目的复杂度。
  • 对于需要频繁交互、处理复杂状态的现代Web应用(如电商平台、管理系统、社交应用),React则能充分发挥其优势,显著提升开发效率和用户体验。

总之,React的出现不是为了替代HTML、CSS、JS,而是为了在这些基础技术之上,提供一种更高效、更可维护的开发方式。正如我们从“简单计数器”到“复杂应用”的分析中看到的,React的价值在于它让开发者能够更专注于业务逻辑的实现,而不是陷入繁琐的DOM操作和状态管理中——这也是它成为当今最流行的前端框架之一的根本原因。

❌