别再直接 Fork 别人的 Claude Skill:真正有用的 Skill,都是从项目里长出来的
AI Coding 系列第 05 篇 · 核心工具
我第一次批量导入公开 Skill 模板的时候,是真的以为自己走了捷径。
GitHub 上一堆 star 很高的仓库,code review、需求分析、文档编写、调研、拆任务,看起来什么都有。我当时的想法很直接:既然别人已经把常见工作流整理好了,我直接 fork 一份,全量导入,不就能让 Claude 立刻更稳、更懂项目吗?
结果用了几天,我反而越来越不放心。
不是因为它“明显做错了什么”,而是因为它总在看起来没问题的地方出问题。格式完整,措辞专业,检查项也不少,可真正让我在项目里反复吃亏的那几件事,它一次都没替我盯住。异步链里是不是又漏了 await,这次 migration 有没有回滚方案,新同学是不是又顺手写了 throw new Error(),数据库 schema 改了之后 Prisma 类型是不是也一起更新了。
它会提醒一堆“大家普遍都应该注意”的东西,却不知道“我们团队到底最怕什么”。
后来我才明白,问题不是 Skill 机制不好,而是我导入的根本不是“自己的 Skill”,只是别人整理好的经验。
这些经验当然有价值,但它们解决的是共性问题,不会天然长成你项目里的“肌肉记忆”。
真正有用的 Skill,恰恰应该做一件事:
把那些你本来总要重复提醒、总会漏掉、总会在项目里反复踩坑的动作,固化成默认动作。
也就是一句话:
Skill 的本质,不是收藏经验,而是固化默认动作。
这篇文章会从最基本的边界讲起,一路走到 SKILL.md、源码机制、任务类型和可执行能力。内容不少,但我尽量只保留真正有助于你在项目里把 Skill 用起来的部分。
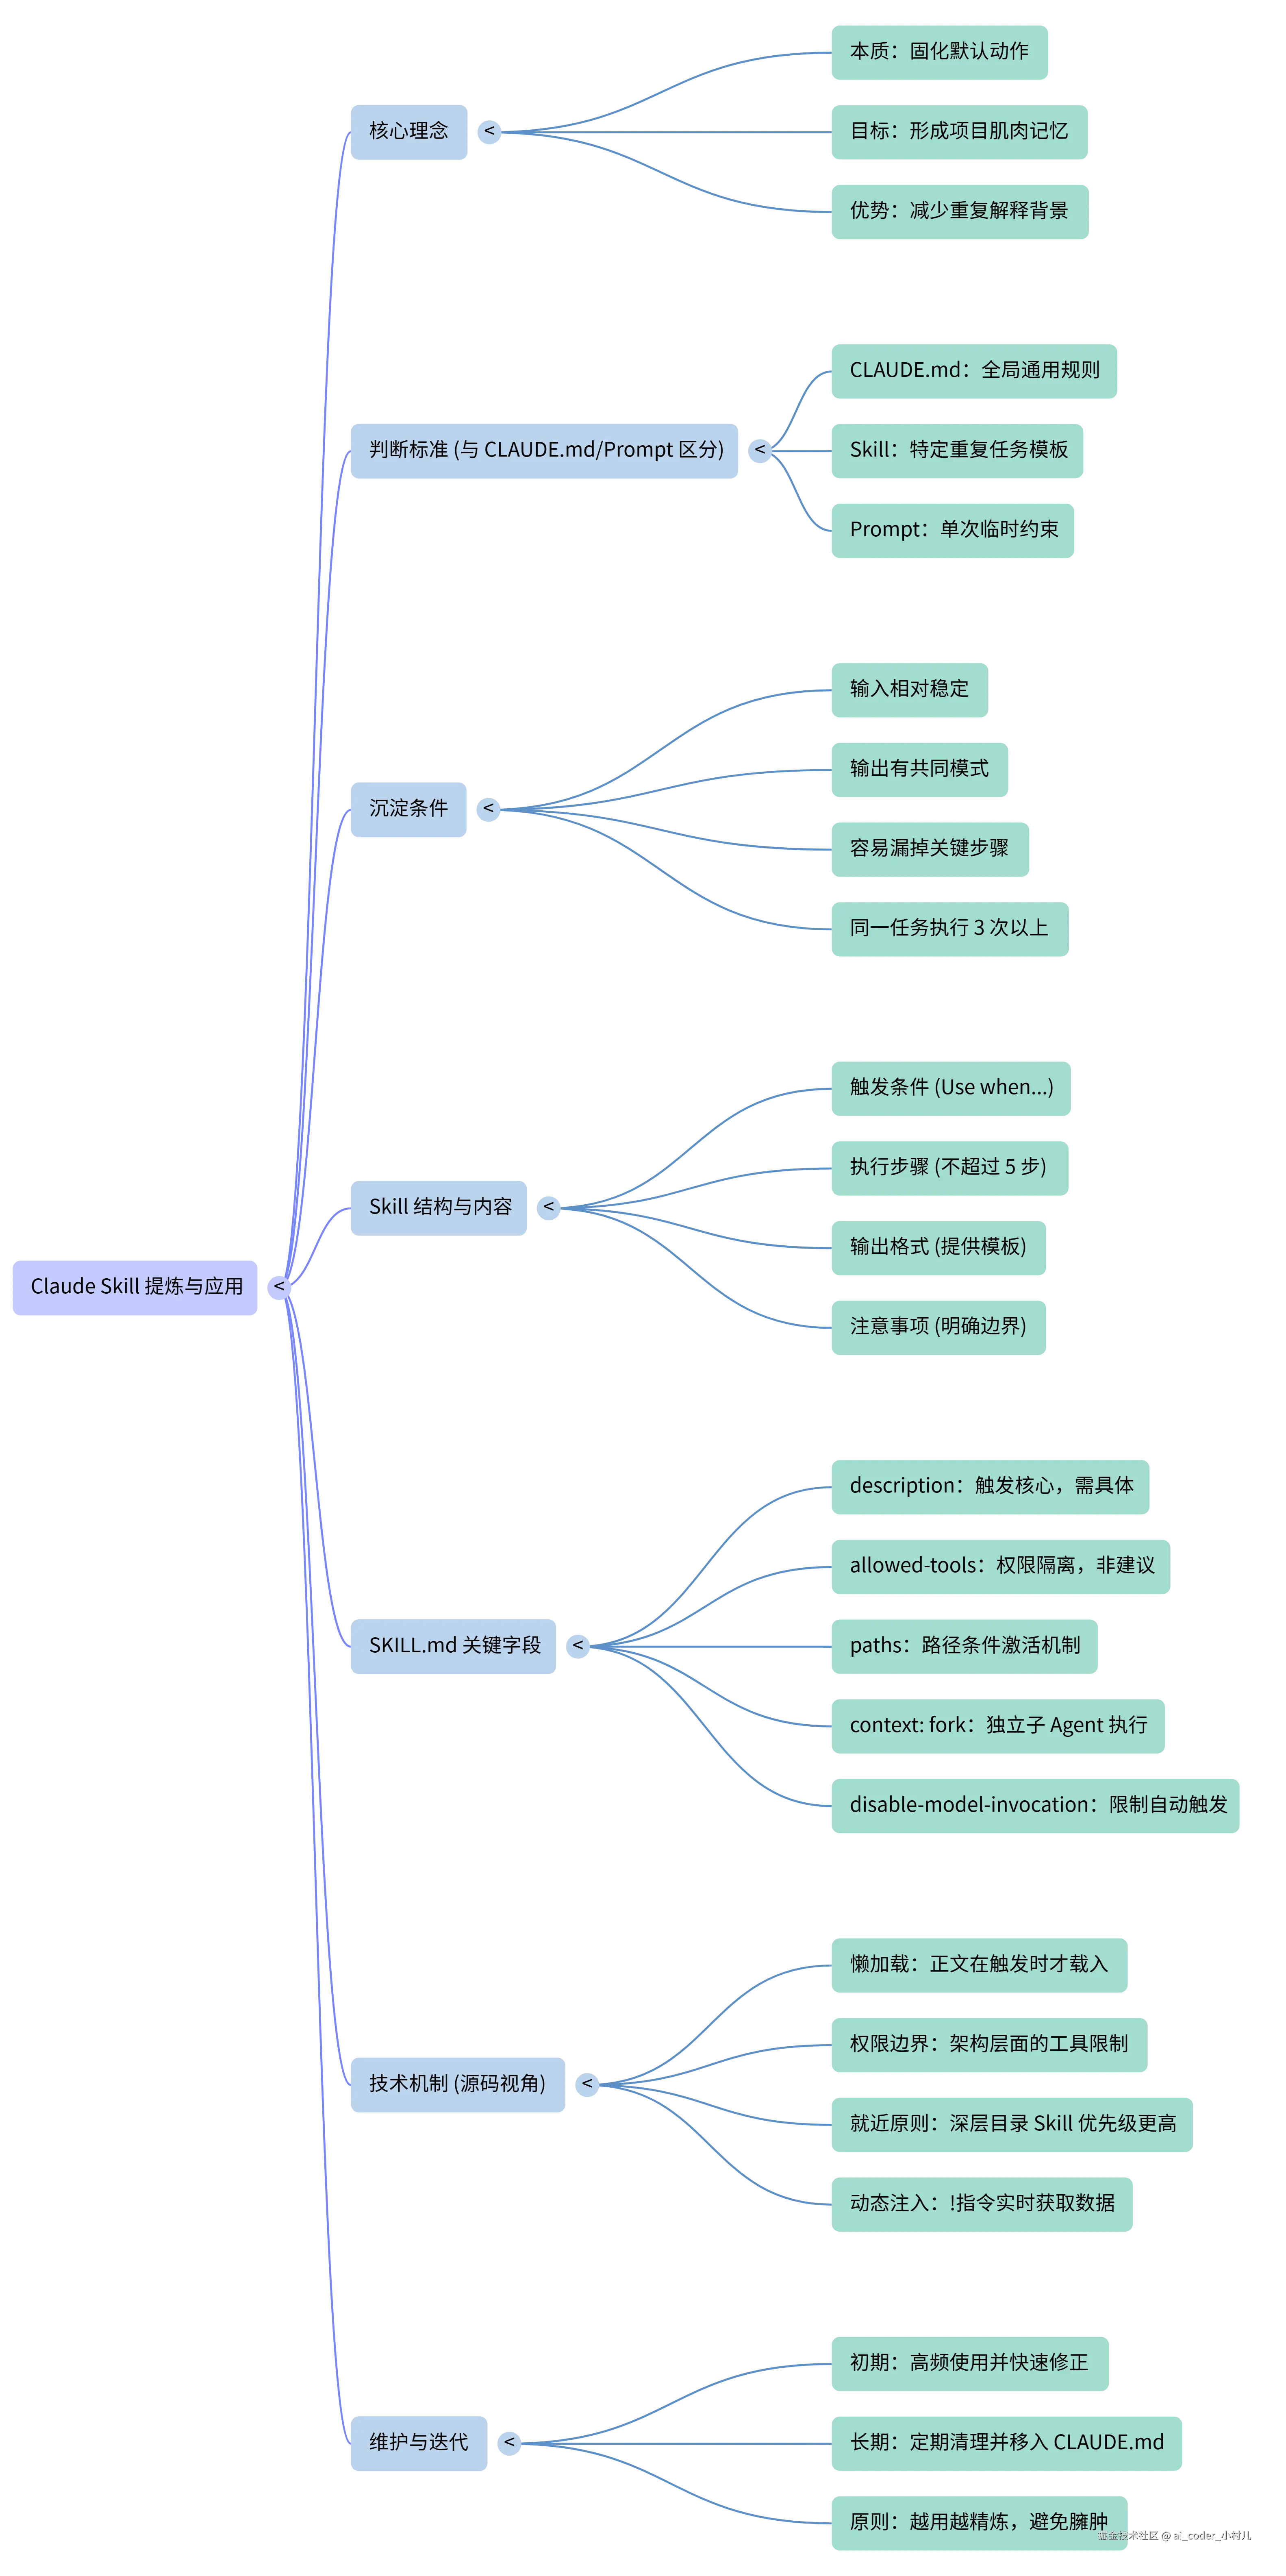
先说结论
如果你只记住这几条,这篇文章就已经值回时间:
- 对所有任务都生效的规则,写进
CLAUDE.md;只对某类重复任务生效的,做成 Skill;只对这一次有效的,写进 Prompt
- 只有“输入相对稳定、输出有模式、而且容易漏步骤”的任务,才值得沉淀为 Skill
- 通用 Skill 模板只能当原材料,项目级 Skill 必须自己裁剪、自己维护
-
description 不是装饰字段,它承担了触发场景的职责,最好把 Use when... 直接写进去,关键词前置、长度克制
- Claude 启动时主要只看 frontmatter,Skill 正文在真正触发时才按需载入
-
allowed-tools 是权限边界,不是行为建议;paths 是条件激活,不是说明文字
- 第一个 Skill 不要挑最关键的任务,先拿中等风险任务练手
一、公开 Skill 模板为什么一开始很香,后来却越用越别扭
我现在反而会对“看起来很全”的公开 Skill 模板保持一点警惕。
不是因为它们没用,而是因为它们太容易制造一种错觉:好像什么都覆盖到了,但真正最重要的东西其实没进去。
公开模板最常见的问题,不是方向错,而是下面这三种。
1. 太宽泛
它什么都管一点,但什么都不够深。
它会告诉你“注意异常处理”“注意性能”“注意安全”,这些当然没错。但这些话本身不构成你项目里的工作流。它不知道你们统一用的是 AppError,不知道你们数据库变更必须检查回滚,也不知道你们哪几个目录历史包袱最重。
2. 太嘈杂
50 行模板里,真正有价值的可能只有 5 行。
剩下的 45 行不是完全没用,而是在和那 5 行争夺 Claude 的注意力。对于 agent 来说,规则不是越多越强。很多时候,8 行写透项目约束的 Skill,比 50 行“样样都提一点”的模板更有用。
3. 太不像你的项目
这点最致命。
公开模板知道“大家普遍应该注意什么”,但不知道“你们团队反复死在哪些地方”。而真正有价值的 Skill,恰恰应该把那些项目特有、团队高频踩坑的东西固化下来。
说得更直白一点:你把一个新同事扔进团队,给他一份行业通用培训材料,当然比什么都不给强;但如果你不告诉他“我们团队最容易出错的是哪三件事”,他依然干不好你最在意的活。
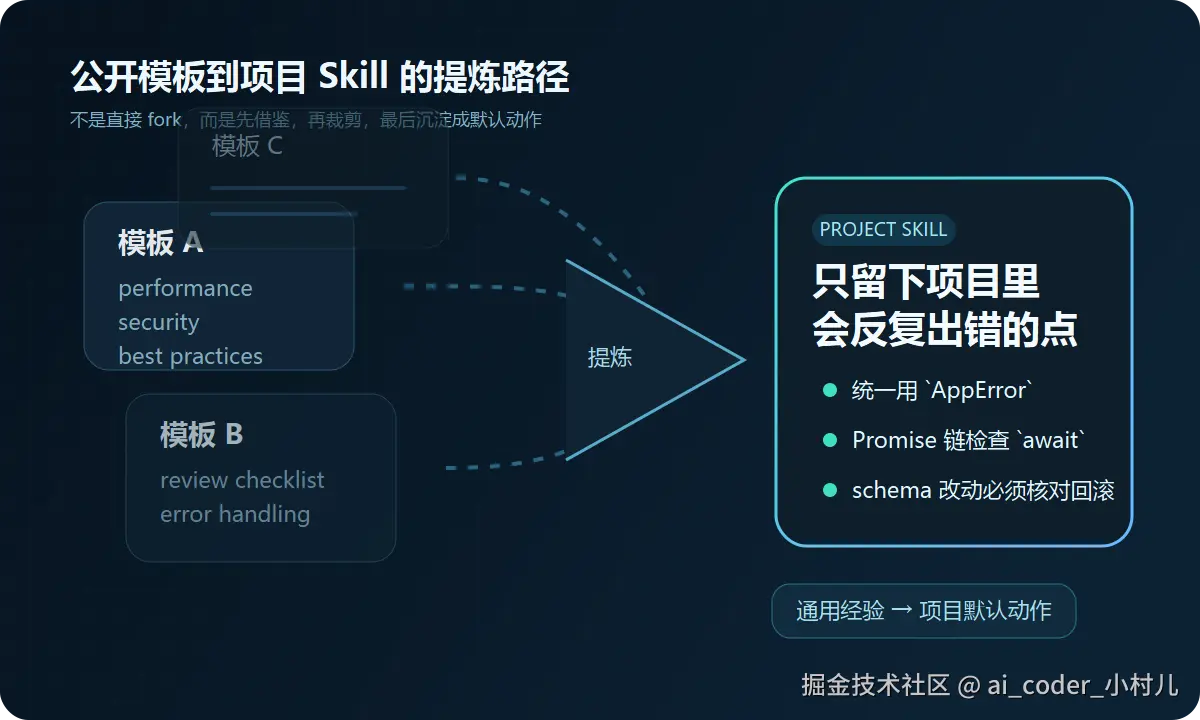
所以正确姿势不是“找一个最全的模板直接用”,而是:
先借鉴,再裁剪,最后只留下真正属于你项目的那几条。
二、先把 Prompt、CLAUDE.md、Skill 这三件事彻底分清楚
很多人不是不会写 Skill,而是一开始就把这三件事混在一起了。
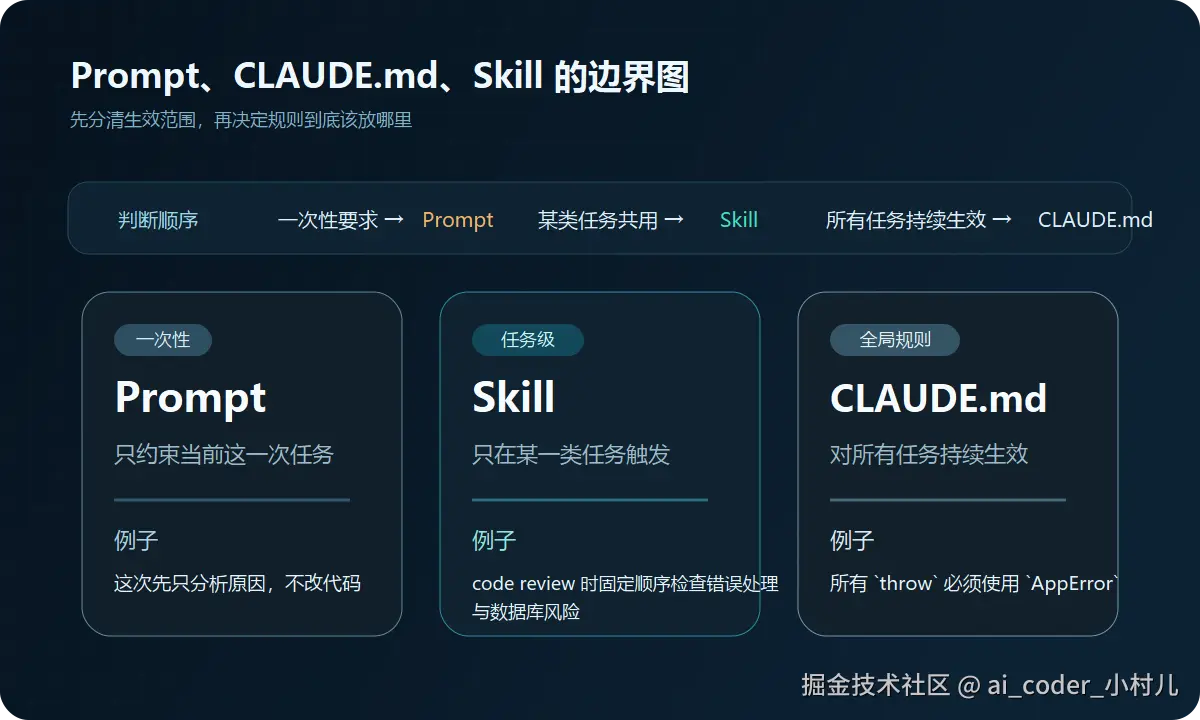
判断方法其实很简单,只问一个问题:
这个要求的作用范围到底有多大?
- 这个要求对所有任务都成立吗?如果是,放
CLAUDE.md
- 这个要求只对某一类任务成立吗?如果是,做成
Skill
- 这个要求只对这一次成立吗?如果是,写进
Prompt
举几个特别典型的例子:
“所有 throw 必须是 AppError”
这是全局规则。不管你是在写新功能、修 bug,还是做重构,都要遵守。它应该进 CLAUDE.md。
“代码审查时按固定顺序检查数据库、异步和错误处理”
这只在 code review 这种任务里才触发,它不是全局规则,而是任务模板,所以应该做成 Skill。
“这次先只分析原因,不要动代码”
这只对当前这次任务有效,应该写进 Prompt。
最容易搞混的是 CLAUDE.md 和 Skill。它们都能约束 Claude 的行为,但本质完全不同:
-
CLAUDE.md 是永远生效的规则
-
Skill 是遇到对应任务才触发的模板
如果要打个比方:
-
CLAUDE.md 是交通规则
-
Skill 是导航路线
-
Prompt 是你这次上车前临时交代的一句话
这三层一旦分清楚,后面 80% 的混乱都会自动消失。
一个常见误判:很多问题根本不需要写 Skill
我后来发现,很多人想写 Skill,并不是因为真的存在一个稳定、重复、值得沉淀的任务,而是因为这一次和 Claude 协作得不顺。
比如目标没说清,边界没收紧,上下文没给够,或者你真正缺的是一条全局规则,却误以为自己需要一份任务模板。这个时候你如果急着把它沉淀成 Skill,本质上只是把一次性的混乱模板化。
几个很常见的误判场景是:
- 这次需求本身还在摇摆,连你自己都没想清楚要什么
- 这个问题只发生过一次,下次未必还会以同样的形状出现
- 你真正缺的是全局约定,比如错误处理、目录规范、命名规则
- 你只是想表达“这次先别改代码”“这次先只分析原因”这种一次性约束
写 Skill 之前,先问自己一句话:
这个问题下次还会以差不多的形状再来一次吗?如果不会,先别急着写 Skill。
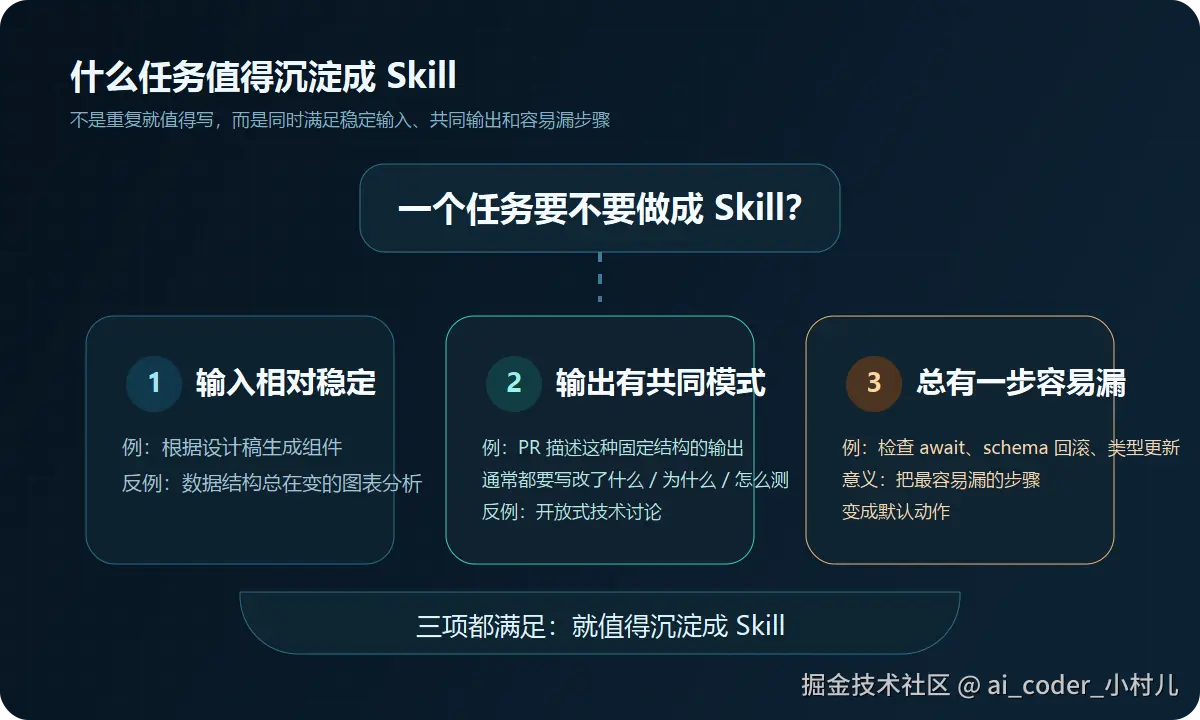
三、什么时候一个任务真的值得被沉淀成 Skill
不是所有重复任务都值得沉淀。
我现在给自己的标准其实很克制,就一句话:
同一类任务做了三次以上,而且每次都要重新给 Claude 解释背景。
反过来说,如果某个任务每次背景和目的都完全不同,就不值得沉淀。比如“写文档”这个动作本身很常见,但公司文档、API 文档、用户手册的写法完全不同,它们应该是三个不同的 Skill,而不是一个叫“写文档”的通用模板。
在真正开始写之前,我会先做三个检查。
1. 输入是否稳定
“根据 Figma 设计稿生成 React 组件”这种任务,输入格式相对稳定,比较适合沉淀。
“根据 SQL 查询结果生成图表”这种任务,每次数据格式和图表类型都可能差很多,Skill 会很难写得稳。
2. 输出是否有共同模式
“写 Pull Request 描述”很适合,因为它天然就有固定框架:改了什么、为什么改、怎么测试。
但“和 AI 讨论技术方案”这种任务,每次深度、重点、结论都不同,就不太适合硬沉淀成一个模板。
3. 有没有容易漏掉的关键步骤
最值得沉淀成 Skill 的任务,通常不是“最复杂”的任务,而是那些不特别提醒就容易漏一步的任务。
Skill 最有价值的地方,不是让 Claude 变得更聪明,而是把你每次最容易忘的检查项,固化成默认动作。
所以一个任务如果同时满足下面三点:
它就很值得沉淀成 Skill。
四、从一个真实痛点开始,走完 Skill 的提炼过程
光讲判断标准还是有点抽象,不如走一遍完整例子。
代码审查,几乎每个后端工程师每周都在做,也是最容易进入“重复解释”困境的任务。用它来走一遍完整的 Skill 提炼过程会很清楚。
你反复踩的坑
假设你们团队每周都做代码审查,而且总在重复盯这几件事:
- 有人改一个功能,顺手动了三个不相关模块
- 新同学不知道项目里统一用
AppError,直接 throw new Error()
- Promise 链里漏了
await
- 数据库查询没有索引,或者潜在 N+1 没被看出来
这就是非常典型的“该沉淀 Skill 的信号”。
先设计内容,再去想格式
一个好 Skill,先别急着写文件。先把内容层想清楚,只要回答四个问题:
1. 什么时候用
不是写“代码审查”四个字,而是写清楚触发场景。
❌ 代码审查
✅ 当我提交 PR 前,检查我的 TypeScript 后端代码是否符合项目约定
差别在于:模糊的描述会让 Claude 在不该用的时候乱触发,而具体的场景描述更容易精准命中。
2. 按什么顺序做
步骤尽量不要超过五步。
你从公开模板里借灵感,但通用模板有 50 行,而你真正关心的可能只有四件事:改动范围、错误处理、异步操作、数据库查询。
1. 读完整个改动的 diff,确认改动是否只涉及这个 PR 的范围
2. 检查错误处理:所有 throw 都必须是 throw new AppError()
3. 检查异步操作:Promise 链是否有遗漏的 await
4. 检查数据库查询:是否有 N+1 问题,关键查询是否 explain 过
3. 输出长什么样
不要写“请清晰输出”。这种话几乎没有约束力。直接给格式。
🔴 Critical: ...
🟡 Warning: ...
✅ Suggestion: ...
Summary: X critical issues to fix before merge.
4. 什么时候不适用
写清楚边界比写清楚功能更重要。
比如:
- 不审查 UI 层代码
- 不关注代码风格
- 改动超过 500 行先拆 PR
这些“我不做什么”的声明,往往比“我会做什么”更能防止 Claude 越界。
到这里,你脑子里其实已经有一个能用的 Skill 了。下一步只是把它放进 Claude Code 认识的格式里。
五、真正落到 SKILL.md 文件层,哪些字段值得你认真写
一个完整的 SKILL.md,通常会长这样:
---
name: code-review
description: Review TypeScript backend code before merging. Use when asked to review code, check a PR, or verify implementation before committing.
allowed-tools:
  - Read
  - Grep
  - Glob
  - Bash(git diff *)
argument-hint: "[PR 分支名或文件路径]"
arguments:
  - target
---

# Code Review

## 步骤
1. 读取 ${target} 的改动 diff
2. 检查错误处理:所有 throw 必须是 throw new AppError()
3. 检查异步操作:Promise 链是否有遗漏的 await
4. 检查数据库查询:是否有 N+1 问题

## 输出格式
🔴 Critical: ...
🟡 Warning: ...
✅ 通过: ...
这里最值得你认真写的,其实是下面几个字段。
name
名字别太抽象。要让人一眼知道它是做什么的。像 helper、utils、tools 这种名字几乎没有路由价值,远不如 code-review、pr-summary、api-conventions 这种具体命名。
description
这是现在最关键的字段。它不只是“简介”,还承担了“触发场景”的职责。你最好直接把 Use when... 写进去,而不是写一句空话。更重要的是,别把它写成长段说明文。关键词尽量前置,长度最好控制在 250 字符左右,太长往往只会稀释命中信号。官方还特别提醒,description 最好用第三人称去写,像 “Analyzes pull requests...” 这种句式,比 “I can help...” 或 “You can use this...” 更稳。
allowed-tools
它决定这个 Skill 具备哪些能力。这个字段后面我会在源码部分展开讲,因为它比很多人想象的更“硬”。
arguments
让 Skill 接受参数,比如目标文件、目录、分支名。${target} 会在正文里被替换成你传进去的实际值;如果你喜欢按位置拿参数,也可以用 $0、$1 这类方式。
还有几个很好用,但不是每次都要上的字段。
argument-hint
告诉调用者这个 Skill 期待什么参数。
model: haiku
简单任务可以指定更轻量的模型,直接省成本。像格式化、重命名、简单改写这类工作,很多时候没必要上更重的模型。
paths
让 Skill 只在某些路径下激活。适合模块边界明确的项目。
context: fork
高风险操作放进独立上下文,避免污染主会话。
disable-model-invocation: true
禁止 Claude 自动触发,只允许你手动 /skill-name 调用。部署、发版、发邮件这类有副作用的 Skill,应该优先考虑加上。
大多数 Skill 根本不需要把字段填满。真正实用的思路不是“功能全”,而是“正好够用”。
如果一个 Skill 只是做常规代码审查,name、description、allowed-tools、arguments 往往就够了。只有当你真的遇到参数化、模块隔离、上下文隔离这些需求时,再往上加。
SKILL.md 不是整个 Skill,它只是入口
很多人以为一个 Skill 就是一份 SKILL.md。其实不是。
更实用的做法通常是:把 SKILL.md 控制在足够短、足够清楚的范围里,让它承担“入口”和“调度”职责;真正长的规范、示例、脚本都拆出去。
一个 Skill 目录完全可以长这样:
my-skill/
├── SKILL.md
├── reference.md
├── examples/
│   └── sample.md
└── scripts/
    └── helper.py
这里的关键点不是“可以放很多文件”,而是:这些文件不会自动加载,必须在 SKILL.md 里显式引用。
比如:
## 参考资料
- 完整的 API 规范见 [reference.md](reference.md),需要查接口细节时读它
- 期望的输出格式见 [examples/sample.md](examples/sample.md)
这个设计和前面说的懒加载是同一套思路:不是 Skill 触发时把所有材料都灌进上下文,而是只在真正需要的时候再去读。
所以:
-
reference.md 适合放项目特有知识,比如内部 API 规范、禁用库、架构约定
-
examples/ 适合放期望输出样例,帮助 Claude 对齐格式
-
scripts/ 适合放真正可执行的辅助脚本,让 Skill 不只是“描述怎么做”,还能“先把上下文准备好”
这点很重要,因为它决定了 Skill 的上限不是“几行 prompt”,而是“一个有入口、有知识、有执行能力的局部工作流”。
Skill 放在哪,决定它是谁的能力
这点很容易被忽略,但工程上很重要。
同样是一个 Skill,放在不同位置,意义完全不一样:
-
~/.claude/skills:你个人所有项目都能用,适合个人长期习惯
-
.claude/skills:只在当前项目生效,适合团队项目约定
-
<plugin>/skills:跟着插件走,适合做模块化分发
如果不同层级里恰好有同名 Skill,优先级也不是平均的。官方规则更接近:企业级配置优先于个人级,个人级优先于项目级;插件 Skill 因为带命名空间,通常不会和前面这些直接撞名。
官方文档里甚至把这件事讲得很直接:Skill 存放的位置,本身就是它的作用域设计。
这背后的工程含义非常大。
如果你把一个强项目耦合的 Skill 放进个人目录,它就会带着这个项目的假设跑到别的仓库里;反过来,如果你把一个本该跨项目复用的通用 Skill 只塞在项目目录里,它的复用价值又被锁死了。
在 monorepo 里,这件事更有意思。Claude Code 会自动发现子目录下的 .claude/skills/。也就是说,你完全可以让 packages/frontend/.claude/skills/ 只服务前端包,让 packages/backend/.claude/skills/ 只服务后端包,而不是把所有知识都堆在仓库根目录。
这时 Skill 就不只是“提示词文件”,而是团队知识的分发机制:
- 个人层的 Skill,固化的是你的工作习惯
- 项目层的 Skill,固化的是团队约定
- 包级 Skill,固化的是模块边界里的局部知识
如果你能把这层想清楚,很多“这个规则到底该放哪”的问题,答案会比只看内容本身更清楚。
六、如果只停在经验层,这篇还差半口气:我后来去翻了源码
前面这些判断,靠经验其实也能总结出来。
但我后来还是不太满足。因为有几个问题如果不看实现,心里总会悬着:
-
description 到底是不是自动触发的关键?
-
allowed-tools 到底只是提示,还是硬限制?
-
paths 到底是真过滤,还是只是写给人看的说明?
我后来去翻了一遍源码,结论是:这些字段比我一开始以为的更“硬”。
1. 为什么触发逻辑主要看 frontmatter,而不是正文
loadSkillsDir.ts 里有一个函数 estimateSkillFrontmatterTokens,注释写得非常直接:
/**
 * Estimates token count for a skill based on frontmatter only
 * (name, description, whenToUse) since full content is only loaded on invocation.
 */
export function estimateSkillFrontmatterTokens(skill: Command): number {
  const frontmatterText = [skill.name, skill.description, skill.whenToUse]
    .filter(Boolean)
    .join(' ')
  return roughTokenCountEstimation(frontmatterText)
}
这段代码背后的意思非常重要。
Claude Code 启动时,主要只把每个 Skill 的 frontmatter 信息算进上下文。Skill 正文不是一开始就全量塞进去,而是在你真正触发它的时候才加载。
这直接解释了两件事。
第一,Claude 不是先把你整篇 Skill 读完再判断要不要触发,它先看的就是前面这几行。换句话说,触发效果主要取决于 frontmatter,不取决于正文写得多漂亮。
第二,Skill 多不等于上下文立刻爆炸,因为启动时压进去的不是全文,而是 frontmatter。
源码里保留了 whenToUse 这个概念,但从现在的文档实践看,推荐做法已经更偏向把触发描述直接写进 description。所以对大多数人来说,最稳的策略不是纠结“要不要额外写一个触发字段”,而是把 description 写得具体、可命中、带触发场景。
比如:
description: Review TypeScript backend code before merging. Use when asked to review code, check a PR, or verify implementation before committing.
比“代码审查 Skill”这种描述强太多了。
源码注释里其实还暗含了一个很实用的提醒:触发描述不是越长越稳。冗长的 whenToUse 或 description 不会线性提高命中率,很多时候只是在白白消耗首轮缓存和注意力。所以对这个字段最好的优化,不是“多写一点”,而是“把真正会命中的词放到前面”。
2. 为什么 allowed-tools 不是建议,而是权限边界
这一点是我看源码之后感受最强的一处。
Skill 执行时,getPromptForCommand 会在返回内容之前把 allowedTools 写进工具权限上下文:
getAppState() {
  const appState = toolUseContext.getAppState()
  return {
    ...appState,
    toolPermissionContext: {
      ...appState.toolPermissionContext,
      alwaysAllowRules: {
        ...appState.toolPermissionContext.alwaysAllowRules,
        command: allowedTools,
      },
    },
  }
}
这说明 allowed-tools 不是“提醒 Claude 尽量这样做”,而是权限层的强制限制。
比如一个 code review Skill 只开放 Read、Grep、Glob 和 Bash(git diff *),那它就不是“理论上不该写文件”,而是从架构上根本没有写文件的能力。Bash(git diff *) 这种写法也不是装饰,它真的只允许 git diff 开头的命令,其他 Bash 调用会被挡住。
这让我对 allowed-tools 的理解完全变了。它不是“不信任模型”,而是最小权限设计。就像你给数据库只读账号只开 SELECT 权限,不是因为你怀疑这账号会作恶,而是因为这个任务本来就不该拥有写权限。
3. 为什么 paths 不是说明文字,而是条件激活机制
源码里,带 paths 的 Skill 在加载时会被单独分流到一个 conditionalSkills Map:
// Separate conditional skills (with paths frontmatter) from unconditional ones
for (const skill of deduplicatedSkills) {
  if (skill.type === 'prompt' && skill.paths && skill.paths.length > 0
      && !activatedConditionalSkillNames.has(skill.name)) {
    newConditionalSkills.push(skill)
  } else {
    unconditionalSkills.push(skill)
  }
}

// Store conditional skills for later activation when matching files are touched
for (const skill of newConditionalSkills) {
  conditionalSkills.set(skill.name, skill)
}

// 最后只返回无条件的 Skill
return unconditionalSkills
这段逻辑的含义是:带 paths 的 Skill,根本不会像普通 Skill 一样直接进入启动时上下文。它会先待在一个“条件激活区”里,只有当你在会话里碰到了匹配路径的文件,它才会被真正激活。
这点对复杂项目非常有价值。
比如你给支付模块写一个 paths: src/payment/** 的 Skill,在你处理用户系统、文章系统、管理后台时,这个 Skill 对 Claude 几乎是隐身的。只有当你真的进入 src/payment/ 相关文件,它才“出现”。
这也是我现在很认同的一种团队实践:不要在根目录堆一个什么都想管的大 Skill 集合,而是让复杂模块在自己的目录附近维护自己的 Skill。
4. 为什么大型项目不该只在根目录维护一套总 Skill
还有一个很容易被忽略,但工程上非常实用的机制:Claude Code 会从当前文件所在目录一路向上寻找 .claude/skills。
源码大概是这样:
// Walk up to cwd but NOT including cwd itself
while (currentDir.startsWith(resolvedCwd + pathSep)) {
  const skillDir = join(currentDir, '.claude', 'skills')
  // ...check if exists, then load
  currentDir = dirname(currentDir)
}

// Sort by path depth (deepest first) so skills closer to the file take precedence
return newDirs.sort((a, b) => b.split(pathSep).length - a.split(pathSep).length)
这里最关键的是最后一行:deepest first。也就是说,越靠近当前文件的 Skill,优先级越高。
这意味着你放在 src/auth/.claude/skills/ 里的 Skill,可以自然覆盖根目录下更通用的同名 Skill。对 monorepo 或大仓库来说,这个机制非常好用:
-
packages/api/.claude/skills/ 可以放 API 专属 Skill
-
packages/web/.claude/skills/ 可以放前端专属 Skill
- 根目录只保留真正的全局规则
如果把上面四点放在一起看,设计 Skill 的顺序其实会变得很清楚:
- 先把 frontmatter 写准,再去打磨正文步骤
- 先按最小权限收紧
allowed-tools,再考虑要不要给更多能力
- 只有模块边界明确时再上
paths,不要为了“高级”硬加
- 多目录项目优先做“离代码更近”的局部 Skill,而不是维护一个大而全的总模板
5. 为什么长对话里,Skill 不会轻易“失忆”
还有一个很多人会担心的问题:会话一长、上下文一压缩,前面调过的 Skill 会不会就悄悄失效了?
从实现思路看,Claude Code 不是简单把它们扔掉,而是会把最近调用过的 Skill 重新注入压缩后的上下文。工程上你可以把它理解成:Skill 不是“一次触发完就全靠模型自己记住”,而是一个可以被系统再次带回来的工作单元。
当然,这也不是说你可以无限制地把 Skill 写成超长文档。实现上会有保留预算,比如最近调用的 Skill 只会保留前一段核心内容,而不是把所有正文永久塞在上下文里。所以前面那条原则依然成立:把 frontmatter 写准,把正文写短,把真正长的材料拆到 reference 或脚本里。

七、不是所有 Skill 都应该让 Claude 自动触发
到这里,其实已经够你写出一个基础可用的 Skill 了。
但如果你真的准备在项目里长期用,接下来有一个问题迟早会遇到:
这个 Skill 到底应该让 Claude 自动触发,还是只能我手动触发?
这背后其实对应两种完全不同的 Skill。
1. 参考型 Skill:给 Claude 补充背景知识
这类 Skill 的作用不是“执行一个任务”,而是“把某个项目知识注入到当前工作里”。
比如 API 设计规范、错误处理约定、数据库命名规则。这些东西你希望 Claude 在写代码、改代码、review 代码时,只要场景合适就自动想起来。
这类 Skill 的特点是:
- 倾向自动触发
- 内容会留在主对话上下文里
- 更像“局部规范”而不是“独立任务”
比如:
---
name: api-conventions
description: API design patterns and conventions for this codebase. Use when writing or reviewing API endpoints.
---

响应格式统一用 { success, data, timestamp }
禁止在 controller 层直接写 SQL,通过 service 层操作
所有异步函数必须有 try-catch,错误统一 throw new AppError()
2. 任务型 Skill:给 Claude 一个要完成的动作
这类 Skill 有明确边界,通常还可能带副作用。
比如 /deploy、/send-release-email、/prepare-release-notes、/migrate-db。这类 Skill 更像一段可执行流程,而不是知识注入。
这类 Skill 的特点是:
- 通常应该手动触发
- 有副作用时最好加
disable-model-invocation: true
- 有风险时再配
context: fork
比如:
---
name: deploy
description: Deploy the application to production. Manual trigger only.
context: fork
disable-model-invocation: true
allowed-tools:
  - Bash(npm run test)
  - Bash(npm run build)
  - Bash(git push *)
---

1. 跑完整测试:npm run test
2. 确认测试全绿后构建:npm run build
3. 推送到部署分支
4. 等待 CI 完成并检查健康状态
这里的关键不是字段多了,而是触发权变了。
你真正要想清楚的问题是:
这件事我愿不愿意让 Claude 自己判断“现在该触发了”?
如果答案是“不愿意”,那就不要让它自动触发。
3. disable-model-invocation: true 和 user-invocable: false 不是一回事
这是一个很容易混淆,但又非常关键的区别。
默认情况下,你和 Claude 都可以调用一个 Skill。你可以手动 /skill-name,Claude 也可以在觉得合适时自动加载它。
但很多人会把下面两个字段混为一谈:
disable-model-invocation: trueuser-invocable: false
它们看起来都像“限制调用”,其实限制的是两件完全不同的事。
disable-model-invocation: true 的意思是:Claude 不能自己触发,只有你能手动触发。 这类 Skill 适合部署、发版、发邮件、推送消息这类你必须自己掌握时机的动作。更重要的是,它还会把这个 Skill 的描述从 Claude 的常驻上下文里拿掉,平时的上下文成本直接归零,只有你手动调用时才完整加载。
user-invocable: false 的意思则是:你不能从 / 菜单里把它当命令来点,但 Claude 仍然可以在合适时自动用它。 这类 Skill 更适合背景知识,比如老系统架构、内部缩写、遗留约定。这些东西你希望 Claude 在相关任务里自动想起来,但你并不需要一个显眼的 /legacy-context 命令天天挂在菜单里。
所以更准确的判断应该是:
- 有副作用、要你亲自控制时机:
disable-model-invocation: true
- 只是背景知识、不适合被人手动当命令点:
user-invocable: false
- 想限制 Claude 到底能不能调用某些 Skill:去配权限规则,而不是只盯菜单显示
这组区别值得写进脑子里,因为它直接决定了 Skill 的“触发权”到底属于谁。

八、Skill 的天花板:从静态模板到可执行能力
前面几节讲的,主要还是“怎么把经验写成一个好模板”。但如果 Skill 只能放静态文字,它的上限其实并不高。
真实项目里,很多任务依赖的是实时信息:当前 PR 的 diff、评论区讨论、今天的测试结果、最新 schema、CI 状态。你当然可以在 Skill 里写“先去看这些东西”,但这样一来,最关键的一步又变回 Claude 自己先兜一圈去找。
Claude Code 里真正更有意思的地方是:Skill 不只是 prompt 模板,它还可以在触发瞬间先准备上下文。
1. 动态注入:先拿真实数据,再交给 Claude
比如你要做一个 PR 总结 Skill,不一定要让 Claude 先自己去猜该看哪些信息,你可以直接让 Skill 触发时先把它们准备好:
---
name: pr-summary
description: Summarize the current pull request. Use when asked to review or summarize a PR.
context: fork
allowed-tools:
  - Bash(gh *)
---

## 当前 PR 信息
- diff:!`gh pr diff`
- 评论区讨论:!`gh pr view --comments`
- 涉及文件:!`gh pr diff --name-only`

## 你的任务
基于以上真实数据,总结这个 PR 做了什么、为什么改、有哪些潜在风险。
这个 Skill 真正触发时,前面的命令会先执行,输出直接注入到 prompt 里。Claude 拿到的不是“请你去看看 PR”这种模糊要求,而是已经准备好的真实上下文。
这也是为什么前面说 scripts/ 不是装饰。如果一个 Skill 需要先查状态、先取数、先做一轮预处理,那它就不再只是“告诉 Claude 怎么做”,而是在执行前把材料也一起备好了。更复杂一点时,你完全可以把逻辑放进 scripts/,再通过 CLAUDE_SKILL_DIR 去调用目录里的脚本,让 Skill 触发时先跑一轮取数或整理。
2. 这件事为什么重要:它决定了 Skill 的上限
一旦你理解了动态注入这层能力,就会发现 Skill 的上限根本不只是“几行 prompt”。
它可以同时承担三件事:
- 定义触发条件
- 限制工具权限
- 在执行前准备实时上下文
换句话说,Skill 不是只能做静态模板,它完全可以长成一个带入口、带约束、还能主动取数的局部能力单元。
不要只把 Skill 当成“写给模型的一段话”,而要把它当成“一个局部工作流的入口”。
3. 从架构位置看,Skill 不是 Tool,也不是 Agent
如果再往上抽一层,我现在对 Skill 的理解是:
-
Tool 是原子能力
-
Skill 是任务知识和操作规约
-
Agent 是执行与编排单元
这个分层不一定是官方唯一表述,但作为工程心智模型非常有用。因为一旦把 Skill 放到 Tool 和 Agent 中间去理解,很多判断都会顺下来:
- 该写成脚本的,别硬写进 Skill 正文
- 该放进
CLAUDE.md 的全局规则,别误沉淀成任务 Skill
- 该拆给 SubAgent 的复杂协作,别硬让一个 Skill 扛完
Skill 真正做的事,不是替代 Tool,也不是替代 Agent,而是把“什么场景下、按什么步骤、调用哪些能力”组织成可复用的任务单元。
九、真正让 Skill 变靠谱的,不是写出来,而是验证出来
这是我觉得官方 best practices 里最容易被忽略、但最能拉开水平差距的一点。
很多人写 Skill 的方式是:先凭感觉写一版,再上项目里试试。这样当然也能跑,但它很容易陷进一种错觉里: 你以为自己在“优化 Skill”,其实只是一直在补想象中的问题。
官方更推荐的思路其实更工程化:
先准备评测样例,再写 Skill。
最轻量、也最实用的做法,是先找出三个真实场景:
- 一个 Claude 原本就能做得不错的
- 一个 Claude 容易漏步骤的
- 一个 Claude 容易理解偏、触发错或者输出不稳的
先不用 Skill 跑一遍,记录基线。看它具体错在哪:
- 是没想到要用这个 Skill
- 是触发了,但没读对参考资料
- 是步骤顺序不稳
- 是输出格式飘了
- 是该脚本处理的确定性工作,被它自己“猜”过去了
然后再写最小版本的 Skill,只补刚才暴露出来的那几个缺口,而不是一上来把所有可能性都写满。
把这个过程压缩成一句话,其实就是:
- 先找失败样例
- 再写最小 Skill
- 再看它是不是真的修掉了失败样例
如果三轮下来都没有明显提升,那大概率不是 Skill 写得不够多,而是这个问题根本不该沉淀成 Skill。
不要只看结果,还要看 Claude 是怎么“导航”这个 Skill 的
只看最终结果对不对还不够,更重要的是看 Claude 在过程中到底是怎么用这个 Skill 的。
官方专门建议观察 Claude 实际怎么使用 Skill,而不是只看最终结果对不对。比如:
- 它是不是总在错误顺序里读文件
- 它是不是老是忽略某个引用文件
- 它是不是每次都反复读同一个 reference,那这部分也许该往
SKILL.md 主体里提
- 某个 examples 文件是不是从来没被读过,那它可能根本没价值,或者信号太弱
这些观察特别重要,因为它能直接反推出信息架构是不是合理。
我现在会把一个 Skill 是否成熟,简单看成四个问题:
- 会不会在该触发的时候触发
- 触发后会不会按预期去读材料
- 执行过程会不会漏掉关键步骤
- 输出结果能不能稳定复现
如果你团队里会混用不同模型,官方还建议至少跨你计划使用的模型测一遍。不是因为所有模型都得兼容,而是因为有些 Skill 对提示强度和结构依赖更高,换模型后会暴露出你原来没看到的问题。
说到底,Skill 的成熟度,不是靠“我觉得写得挺全”来判断,而是靠一组真实任务能不能稳定跑通来判断。
十、写 Skill 时,最常见的四种设计模式,以及最容易踩的反模式
这里先说清楚:下面这四种名字,不是官方文档逐字给出的固定术语,而是我结合 Anthropic 官方 best practices 做的工程化归纳。
但它们确实能覆盖大多数项目里真正会遇到的 Skill 设计问题。
1. 模板驱动模式:解决“输出不稳定”
这类 Skill 的核心不是让 Claude 更会想,而是让它更稳定地按结构输出。
适合:
它的关键不是“给一个模板”,而是把模板当成输出接口。模板负责格式,SKILL.md 负责路由和规则。模板里不要塞判断逻辑,也不要把一个模板写成一套小程序。
如果一个模板已经长到一百多行,而且开始出现大量条件分支,通常不是你模板写得认真,而是职责已经混了。
2. 脚本增强模式:解决“结果不稳定”
这类 Skill 的核心是:确定性的事交给脚本,不要交给模型猜。
适合:
- 指标统计
- CSV 解析
- 正则匹配
- Git / PR / CI 状态抓取
- 需要预处理的上下文准备
官方对这件事的说法很直白:solve, don't punt。能脚本算出来的,就别只写一句“请 Claude 自行分析”。
这类 Skill 真正提高的,不是文风,而是可靠性。你把概率型推理替换成确定性执行,整个 Skill 的下限会明显抬高。
3. 知识分层模式:解决“上下文过载”
这是官方反复强调的 progressive disclosure 思路。
也就是:SKILL.md 只做入口和导航,把大块知识拆进 reference/、examples/、forms/ 这类文件里,按需读取,而不是一次灌满。
这类模式适合:
- 领域知识很多的 Skill
- 不同子领域差异很大的 Skill
- 需要高级用法、边界情况、案例库的 Skill
它的关键不是“拆文件”,而是“拆得有层次”。官方明确不建议深层嵌套引用。最稳的做法是所有重要材料都从 SKILL.md 一层直达,别让 Claude 从 advanced.md 再跳 details.md 才看到真正关键信息。
4. 工具隔离模式:解决“能力边界失控”
这类模式最容易被低估。
很多人写 Skill 时只关注“让它能做事”,但真正稳定的 Skill 往往同样重视“让它不能乱做事”。
适合:
- 部署
- 发版
- 写数据库迁移
- 调外部系统
- 会改文件、发消息、推远端的任务
这一类 Skill 的核心组合通常是:
-
allowed-tools 收到最小
- 必要时配
context: fork
- 不希望自动触发时加
disable-model-invocation: true
它不是在限制 Claude 的创造力,而是在设计这个能力包的安全边界。
最常见的反模式
如果把前面四种模式反过来看,最常见的坑基本也就集中在下面这些地方:
- 一个 Skill 管太多事,什么都想覆盖,最后什么都不够准
-
description 写得很空,只写“处理文档”“帮助分析”这种谁都能套上的话
- 一上来给一堆方案,不给默认路径,让 Claude 自己从五六种做法里摇摆
- 模板里写判断逻辑,或者把本该脚本做的事丢给模型推理
- reference 层级太深,真正关键信息藏在第二跳、第三跳文件里
- 把会过期的信息硬写进 Skill,比如时间敏感规则、旧接口切换说明
- 默认假设工具和依赖都已经装好,结果一跑就断
- 在路径里写 Windows 反斜杠,跨环境直接出问题
你会发现,所谓反模式,本质上就是一句话:
该约束的地方没约束,该拆开的地方没拆开,该交给脚本的地方还在让模型猜。
十一、完整案例:把一个通用 code review 模板,提炼成你项目真正需要的 Skill
上面说了这么多抽象原则,不如走一遍完整例子。
假设你们团队每周都做后端代码审查,而且总在重复盯这几件事:
- 有人改一个功能,顺手动了三个不相关模块
- 新同学不知道项目里统一用
AppError,直接 throw new Error()
- Promise 链里漏了
await
- 数据库查询没有索引,或者潜在 N+1 没被看出来
这就是非常典型的“该沉淀 Skill 的信号”。
第一步:先确认痛点到底是什么
这一步别着急写模板,先把“你们到底在反复出什么问题”说清楚。
很多团队的问题不是“没有 code review”,而是每次 review 的注意力都被分散了。真正高频出错的点,永远是那几类项目特有的约束。
所以要沉淀的不是“代码审查”这四个字,而是你们团队在代码审查里最容易漏掉的那几类检查。
第二步:从公开模板里提取真正有用的部分
这时候公开模板就有用了,但它的用途不是直接上生产,而是当素材库。
假设你找到一个 50 行的通用 code review 模板。你真正该提取的,可能只有下面这几类东西:
- 逻辑正确性,尤其是异步操作
- 项目约定的遵守,比如
AppError、错误处理模式
- 数据库相关的风险,比如 N+1、索引、查询范围
- 改动范围是否聚焦,不要顺手改不相干文件
剩下那些跟你们项目关系不大的部分,就应该果断删掉。
第三步:把它压缩成一个真正能用的 Skill
最后落地出来的 Skill,应该更像这样:
---
name: code-review
description: Review TypeScript backend code before merging. Use when asked to review code, check a PR, or verify implementation before committing.
allowed-tools:
  - Read
  - Grep
  - Glob
  - Bash(git diff *)
argument-hint: "[PR 分支名或文件路径]"
---

# Code Review Skill

## Steps
1. 读 $ARGUMENTS 的改动 diff,确认改动是否只涉及这个 PR 的范围(不要顺手改无关文件)
2. 检查错误处理:所有 throw 都必须是 throw new AppError(),不能 throw new Error()
3. 检查异步操作:Promise 链是否有遗漏的 await,错误是否被正确 catch
4. 检查数据库查询:是否有 SELECT * 的懒惰写法,是否明显的 N+1 查询,关键查询是否 explain 过

## Output Format
Issues found (Critical → Warning → Info):

🔴 **Line 45**: Missing `.select()` in Prisma query - this will fetch unnecessary columns
🟡 **Line 67**: Potential N+1: loop inside `posts.map()` should use `Promise.all()`
✅ **No AppError violations** — all errors properly handled

Summary: 1 critical issue to fix before merge.

## Caveats
- 不审查 UI 层代码(只关心后端逻辑)
- 不关注代码风格(那是 prettier 的事)
- 如果一个改动涉及多个不相干功能,分别提交 PR 再 review
你会发现,到这一步之后,Skill 就不再是“通用模板的中文版”了,而是你们项目真正有用的一个局部工作流。
50 行公开模板,最后可能只剩下 4 个真正属于你项目的核心关注点。但恰恰是这 4 个点,才决定它到底值不值得用。
第四步:在真实使用里继续迭代
Skill 从来不是一次写完的。
比如你用了两周之后,又发现一个常见问题:改了数据库 schema,但忘记更新 Prisma 类型。那就把它加进去:
4.5. 检查 Prisma 类型:如果改了数据库,Prisma schema 和生成的 types 是否都已更新
这时候你会发现,Skill 真正的价值不是“第一次写出来”,而是在真实工作里被持续打磨。
十二、Skill 的维护节奏,比第一次写出来更重要
Skill 不是写好就扔。
如果你写完之后三个月不看,它很快就会从“项目经验”重新退化成“历史遗留文档”。
我更推荐一个更贴近实际的轻量节奏:
前一两周
高频使用,快速迭代。每次用完就问自己三个问题:步骤是不是太复杂?输出是不是太啰嗦?有没有漏掉今天刚踩到的新坑?
稳定之后每周一次
回顾一次。看看最近有没有经常被遗漏的步骤,有没有新的痛点需要加入。对 Skill 这种高频小迭代的东西来说,按周看通常比按月看更合适。
每个月做一次清理
把已经不再是问题的注意事项删掉,把那些已经变成全局共识的规则移进 CLAUDE.md。这一步的重点不是加内容,而是防止 Skill 越写越胖。
Skill 应该越用越精炼,而不是越写越臃肿。
十三、一个特别反直觉,但很重要的经验:第一个 Skill,故意别写最重要的任务
这条我非常想单独拿出来讲。
因为很多人第一次沉淀 Skill,会本能地想挑一个最关键的任务,比如“生产环境发布前检查”“数据库迁移前审查”“支付流程改动 review”。
但工程上更稳的做法,其实正好相反。
大多数人写的第一个 Skill,质量都不会太高。触发条件偏模糊,步骤偏啰嗦,输出格式也不够稳定。这很正常,因为你第一次做这件事时,对“什么是好的 Skill”还没有直觉。
如果你一开始就把它用在最关键的任务上,一旦写得不够好,伤害会非常直接:要么关键场合出问题,要么你从此对这套机制失去信心。
更好的策略是:先拿一个重要程度中等、容错率比较高的任务练手。
比如:
- 写周报
- 生成 PR 描述
- 做一次常规 code review
先跑两周,迭代两三次,等你对 Skill 的节奏有感觉了,再去沉淀真正关键的流程。
第一个 Skill 的目的,不是直接解决最大的问题,而是让你学会怎么写 Skill。
十四、如果你今天就想开始,可以直接做这三个动作
别先想着搭一整套系统,直接从最小动作开始:
任务一: 列出你最近一个月里重复做过三次以上的任务。用第一节的判断法(对所有任务成立?→ CLAUDE.md;只对某类任务成立?→ Skill;只对这次成立?→ Prompt),确认你要处理的是 Skill 还是 CLAUDE.md 的事。
任务二: 为这个任务写一个 Skill。先想清楚四个问题(什么时候用、按什么顺序、输出长什么样、什么时候不适用),然后包装成 SKILL.md。目标是精炼——大多数好 Skill 的有效指令不超过 10 行。记住:第一次的目的是练手,不是写出完美的 Skill。
任务三: 选三个你最近真的遇到过的场景,先不用 Skill 跑一遍,再用 Skill 跑一遍,对比它到底有没有少漏步骤、少返工、少补充解释。然后在 SKILL.md 里补一行今天发现的问题(哪个步骤漏了,或者哪个注意事项需要加)。这就是 Skill 的维护节奏,也是最轻量的评测方法。
真正好的 Skill,几乎都不是第一次就写对的,而是在实际使用里慢慢长出来的。
下篇预告
第 06 篇:Sub-agents 实战——什么时候应该拆任务,怎么设计子任务边界
单个 Claude 实例有上下文上限,复杂任务拆成多个子任务让 Sub-agents 并行处理,理论上能大幅提速。但什么时候值得拆?拆错了会有什么代价?下一篇会拆开 Sub-agents 的真实适用场景,以及最常见的过度设计陷阱。
写在最后
公开 Skill 模板当然有用,但它的价值更像脚手架,而不是成品。
你不需要一个很复杂的 Skill 系统。你需要的,往往只是把团队最容易反复犯错的那几件事提前写下来,让 Claude 每次都替你盯住。
如果你现在想动手,就直接做这三步:列出最近一个月里重复做过三次以上的任务;用"三问法"确认它该放 CLAUDE.md、Skill 还是 Prompt;先写一个只有 5 到 10 行的版本,实际用一次,再立刻改第一轮。不要追求第一版完美——Skill 的价值,从来不是"写出来的那一刻",而是"它开始帮你减少重复错误的那一天"。
评论区想聊一个问题:你现在最卡的,到底是"写不出规则",还是"没分清哪些该放 CLAUDE.md、哪些该做成 Skill"? 这两个问题看起来很像,但解法完全不同。
觉得这篇有帮助,点个赞让更多工程师看到 👍
AI Coding 系列持续更新。用别人的 Skill 模板是起点,不是终点。真正管用的 Skill,只有你自己的项目才能提炼出来。