A Linux distribution (or “distro”) is an operating system built on the Linux kernel, combined with GNU tools, libraries, and software packages. Each distro includes a desktop environment, package manager, and preinstalled applications tailored to specific use cases.
With hundreds of Linux distributions available, choosing the right one can be overwhelming. This guide covers the best Linux distributions for different types of users, from complete beginners to security professionals.
Ubuntu is the most popular Linux distribution and an excellent starting point for newcomers. Developed by Canonical, it offers a polished desktop experience with the GNOME environment and extensive hardware support.
Ubuntu comes in several editions:
Ubuntu Desktop — Standard desktop with GNOME
Ubuntu Server — For server deployments
Kubuntu, Lubuntu, Xubuntu — Alternative desktop environments
Ubuntu releases new versions every six months, with Long Term Support (LTS) versions every two years receiving five years of security updates.
Linux Mint is an excellent choice for users coming from Windows. Its Cinnamon desktop environment provides a familiar layout with a taskbar, start menu, and system tray.
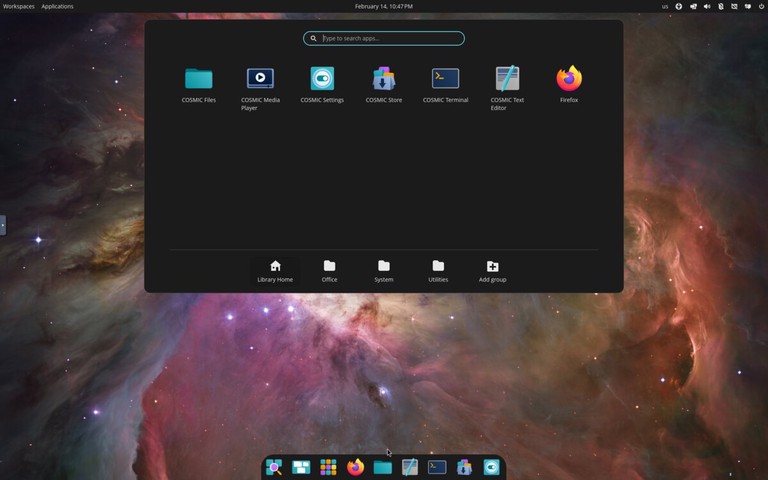
Developed by System76, Pop!_OS is based on Ubuntu but optimized for productivity and gaming. It ships with the COSMIC desktop environment (built in Rust by System76), featuring built-in window tiling, a launcher for quick app access, and excellent NVIDIA driver support out of the box.
Zorin OS is a beginner-focused distribution designed to make the move from Windows or macOS easier. It includes polished desktop layouts, strong hardware compatibility, and a simple settings experience for new users.
Zorin OS is a strong option when you want:
A familiar desktop layout with minimal setup
Stable Ubuntu-based package compatibility
Good out-of-the-box support for everyday desktop tasks
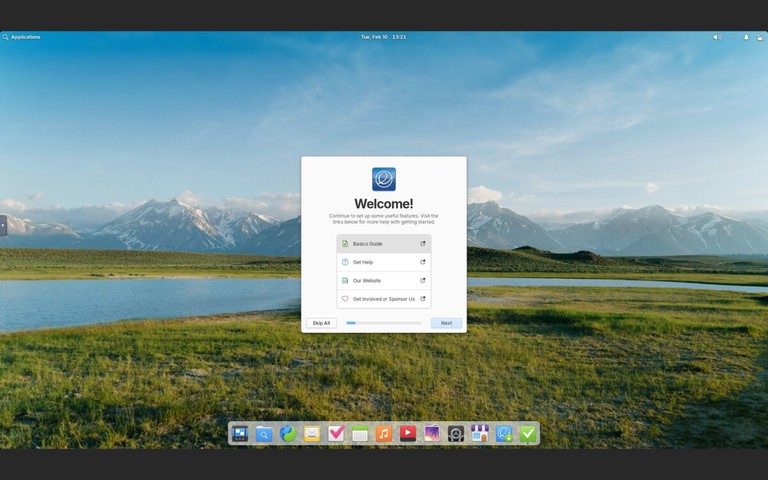
elementary OS is a design-focused distribution with a macOS-like interface called Pantheon. It emphasizes simplicity, consistency, and a curated app experience through its AppCenter.
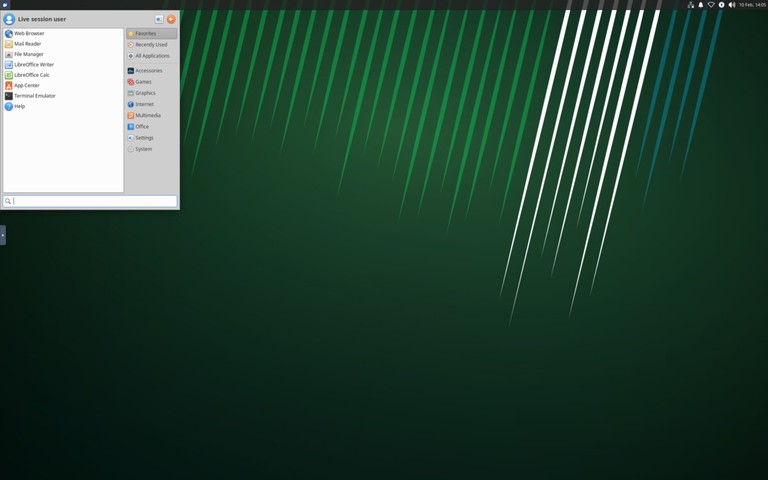
Xubuntu combines Ubuntu’s reliability with the Xfce desktop environment, offering a good balance between performance and features. It is lighter than standard Ubuntu while remaining full-featured for daily desktop use.
Lubuntu uses the LXQt desktop environment, making it one of the lightest Ubuntu-based distributions available. It is designed for very old or resource-constrained hardware where even Xfce feels heavy.
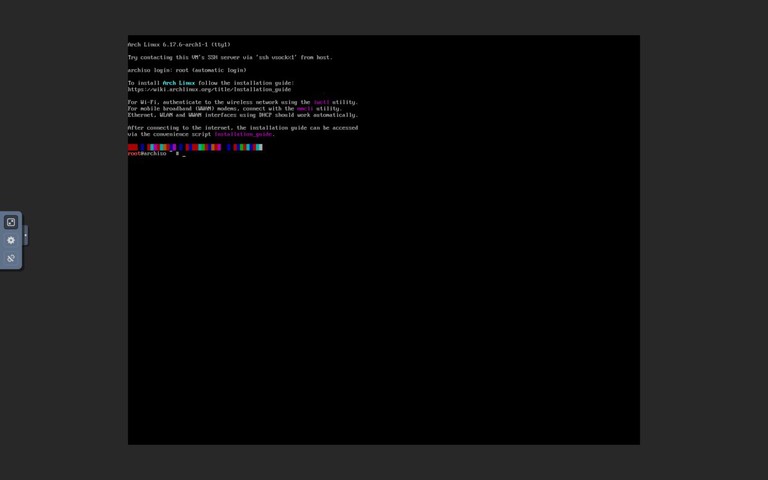
Arch Linux follows a “do-it-yourself” philosophy, providing a minimal base system that users build according to their needs. It uses a rolling release model, meaning you always have the latest software without major version upgrades.
Key features:
Pacman package manager with access to vast repositories
EndeavourOS is an Arch-based distribution that keeps the Arch philosophy while simplifying installation and initial setup. It is popular among users who want a near-Arch experience without doing a fully manual install.
EndeavourOS gives you:
Rolling release updates
Access to Arch repositories and AUR packages
A cleaner onboarding path than a base Arch install
Fedora is a cutting-edge distribution sponsored by Red Hat. It showcases the latest open-source technologies while maintaining stability, making it popular among developers and system administrators.
Fedora editions include:
Fedora Workstation — Desktop with GNOME
Fedora Server — For server deployments
Fedora Silverblue — Immutable desktop OS
Fedora Spins — Alternative desktops (KDE, Xfce, etc.)
Many Red Hat technologies debut in Fedora before reaching RHEL, making it ideal for learning enterprise Linux.
openSUSE is a community-driven distribution known for its stability and powerful administration tools. It offers two main variants:
openSUSE Leap — Regular releases based on SUSE Linux Enterprise
openSUSE Tumbleweed — Rolling release with the latest packages
The YaST (Yet another Setup Tool) configuration utility makes system administration straightforward, handling everything from software installation to network configuration.
Bazzite is an immutable Fedora-based desktop optimized for gaming and handheld devices. It ships with gaming-focused defaults and integrates well with Steam, Proton, and modern GPU drivers.
Bazzite is ideal when you want:
A Steam-first gaming setup
Reliable rollback and update behavior from an immutable base
A distro tuned for gaming PCs and handheld hardware
Debian is one of the oldest and most influential Linux distributions. Known for its rock-solid stability and rigorous testing process, it serves as the foundation for Ubuntu, Linux Mint, Kali Linux, and many other distributions.
Debian offers three release channels:
Stable — Thoroughly tested, ideal for production servers
Testing — Upcoming stable release with newer packages
Unstable (Sid) — Rolling release with the latest software
With over 59,000 packages in its repositories, Debian supports more hardware architectures than any other Linux distribution.
After CentOS shifted to CentOS Stream, Rocky Linux emerged as a community-driven RHEL-compatible distribution. Founded by one of the original CentOS creators, it provides 1:1 binary compatibility with RHEL.
Rocky Linux is ideal for:
Organizations previously using CentOS
Production servers requiring stability
Anyone needing RHEL compatibility without the cost
Ubuntu Server is widely used for cloud deployments and containerized workloads. It powers a significant portion of public cloud instances on AWS, Google Cloud, and Azure.
Kali Linux is the industry-standard platform for penetration testing and security research. Maintained by Offensive Security, it includes hundreds of security tools preinstalled.
Common use cases:
Penetration testing
Security auditing
Digital forensics
Reverse engineering
Warning
Kali Linux is designed for security professionals. It should not be used as a daily driver operating system.
Tails (The Amnesic Incognito Live System) is a portable operating system designed for privacy and anonymity. It runs from a USB drive and routes all traffic through the Tor network.
Key features:
Leaves no trace on the host computer
All connections go through Tor
Built-in encryption tools
Amnesic by design (forgets everything on shutdown)
Qubes OS takes a unique approach to security by isolating different activities in separate virtual machines called “qubes.” If one qube is compromised, others remain protected.
The Xen hypervisor runs directly on hardware, providing strong isolation between:
Parrot Security is a Debian-based distribution for security testing, development, and privacy. It is lighter than Kali Linux and can serve as a daily driver.
Which Linux distro is best for beginners?
Ubuntu, Linux Mint, and Zorin OS are the best choices for beginners. Ubuntu has the largest community and most documentation, while Linux Mint and Zorin OS provide a familiar desktop experience.
Can I try a Linux distro without installing it?
Yes. Most distributions support “live booting” from a USB drive, allowing you to test the system without making any changes to your computer.
Is Linux free?
Most Linux distributions are completely free to download and use. Some enterprise distros like RHEL offer paid support subscriptions.
Can I run Windows software on Linux?
Many Windows applications run on Linux through Wine or Proton (for games via Steam). Native alternatives like LibreOffice, GIMP, and Firefox are also available.
What is a rolling release distro?
A rolling release distro (like Arch Linux or openSUSE Tumbleweed) delivers continuous updates instead of major version upgrades. You always have the latest software, but updates require more attention.
The best Linux distribution depends entirely on your needs and experience level. If you are new to Linux, start with Ubuntu, Linux Mint, or Zorin OS. If you want full control over your system, try Arch Linux, EndeavourOS, or Fedora. For gaming, Pop!_OS and Bazzite are strong options. For servers, Debian, Rocky Linux, Ubuntu Server, and RHEL are all solid choices. For security testing, Kali Linux and Parrot Security are the industry standards.
Most distributions are free to download and try. Create a bootable USB, test a few options, and find the one that fits your workflow.
If you have any questions, feel free to leave a comment below.
The getopts command is a Bash built-in that provides a clean, structured way to parse command-line options in your scripts. Instead of manually looping through arguments with case and shift, getopts handles option parsing, argument extraction, and error reporting for you.
This guide explains how to use getopts to process options and arguments in Bash scripts. If you are new to command-line arguments, start with our guide on positional parameters
.
whilegetopts"optstring" VARNAME;docase$VARNAME in
# handle each optionesacdone
optstring — A string that defines which options the script accepts
VARNAME — A variable that holds the current option letter on each iteration
Each time the while loop runs, getopts processes the next option from the command line and stores the option letter in VARNAME. The loop ends when there are no more options to process.
The option string tells getopts which option letters are valid and which ones require an argument. There are three patterns:
f — A simple flag (no argument). Used for boolean switches like -v for verbose.
f: — An option that requires an argument. The colon after the letter means the user must provide a value, such as -f filename.
: (leading colon) — Enables silent error mode. When placed at the very beginning of the option string, getopts suppresses its default error messages so you can handle errors yourself.
For example, the option string ":vf:o:" means:
: — Silent error mode
v — A simple flag (-v)
f: — An option requiring an argument (-f filename)
The OPTARG variable holds the argument value for options that require one. When you define an option with a trailing colon (e.g., f:), the value the user passes after -f is stored in OPTARG:
~/optarg_example.shsh
#!/bin/bash
whilegetopts"f:o:" opt;docase$opt in
f)echo"Input file: $OPTARG";; o)echo"Output file: $OPTARG";;esacdone
The OPTIND variable holds the index of the next argument to be processed. It starts at 1 and increments as getopts processes each option. After the while loop finishes, OPTIND points to the first non-option argument.
Use shift $((OPTIND - 1)) after the loop to remove all processed options, leaving only the remaining positional arguments in $@:
~/optind_example.shsh
#!/bin/bash
whilegetopts"v" opt;docase$opt in
v)echo"Verbose mode enabled";;esacdoneshift$((OPTIND -1))echo"Remaining arguments: $@"
The shift $((OPTIND - 1)) line is a common pattern. Without it, the processed options would still be part of the positional parameters, making it difficult to access the non-option arguments.
Silent mode is enabled by adding a colon at the beginning of the option string. In this mode, getopts suppresses its default error messages and gives you more control:
For an invalid option, opt is set to ? and OPTARG contains the invalid option character.
For a missing argument, opt is set to : and OPTARG contains the option that was missing its argument.
This example shows a script that wraps another command, passing different configurations based on the options provided:
~/deploy.shsh
#!/bin/bash
ENV="staging"DRY_RUN=falseTAG="latest"whilegetopts":e:t:dh" opt;docase$opt in
e)ENV="$OPTARG";; t)TAG="$OPTARG";; d)DRY_RUN=true;; h)echo"Usage: $0 [-e environment] [-t tag] [-d] service"echo""echo" -e env Target environment (default: staging)"echo" -t tag Image tag (default: latest)"echo" -d Dry run mode"exit0;;\?)echo"Error: Invalid option -$OPTARG" >&2;exit1;; :)echo"Error: Option -$OPTARG requires an argument" >&2;exit1;;esacdoneshift$((OPTIND -1))SERVICE="${1:?Error: Service name required}"echo"Deploying '$SERVICE' to $ENV with tag '$TAG'"if["$DRY_RUN"=true];thenecho"[DRY RUN] Would execute: docker pull myregistry/$SERVICE:$TAG"echo"[DRY RUN] Would execute: kubectl set image deployment/$SERVICE$SERVICE=myregistry/$SERVICE:$TAG -n $ENV"elseecho"Pulling image and updating deployment..."fi
Terminal
./deploy.sh -e production -t v2.1.0 -d webapp
output
Deploying 'webapp' to production with tag 'v2.1.0'
[DRY RUN] Would execute: docker pull myregistry/webapp:v2.1.0
[DRY RUN] Would execute: kubectl set image deployment/webapp webapp=myregistry/webapp:v2.1.0 -n production
The getopts built-in is often confused with the external getopt command. Here are the key differences:
Feature
getopts (built-in)
getopt (external)
Type
Bash/POSIX built-in
External program (/usr/bin/getopt)
Long options
Not supported
Supported (--verbose)
Portability
Works on all POSIX shells
Varies by OS (GNU vs BSD)
Whitespace handling
Handles correctly
GNU version handles correctly
Error handling
Built-in verbose/silent modes
Manual
Speed
Faster (no subprocess)
Slower (spawns a process)
Use getopts when you only need short options and want maximum portability. Use getopt (GNU version) when you need long options like --verbose or --output.
Options are not being parsed
Make sure your options come before any non-option arguments. The getopts command stops parsing when it encounters the first non-option argument. For example, ./script.sh file.txt -v will not parse -v because file.txt comes first.
OPTIND is not resetting between function calls
If you use getopts inside a function
and call that function multiple times, you need to reset OPTIND to 1 before each call. Otherwise, getopts will start from where it left off.
Missing argument not detected
If an option requires an argument but getopts does not report an error, check that you included a colon after the option letter in the option string. For example, use "f:" instead of "f" if -f needs an argument.
Unexpected ? in the variable
In verbose mode (no leading colon), getopts sets the variable to ? for both invalid options and missing arguments. Switch to silent mode (leading colon) to distinguish between the two cases and write custom error messages.
Does getopts support long options like –verbose?
No. The getopts built-in only supports single-character options (e.g., -v). For long options, use the external getopt command (GNU version) or parse them manually with a case statement
and shift.
Can I combine options like -vf file?
Yes. The getopts command automatically handles combined options. When it encounters -vf file, it processes -v first, then -f with file as its argument.
What happens if I forget shift $((OPTIND - 1))?
The processed options will remain in the positional parameters. Any code that accesses $1, $2, or $@ after the getopts loop will still see the option flags instead of just the remaining arguments.
Is getopts POSIX compliant?
Yes. The getopts command is defined by the POSIX standard and works in all POSIX-compliant shells, including bash, dash, ksh, and zsh. This makes it more portable than the external getopt command.
How do I make an option’s argument optional?
The getopts built-in does not support optional arguments for options. An option either always requires an argument (using :) or never takes one. If you need optional arguments, handle the logic manually after parsing.
The getopts built-in provides a reliable way to parse command-line options in Bash scripts. It handles option string definitions, argument extraction, combined flags, and error reporting with minimal code.
If you have any questions, feel free to leave a comment below.
The git revert command creates a new commit that undoes the changes introduced by a specified commit. Unlike git reset
, which rewrites the commit history, git revert preserves the full history and is the safe way to undo changes that have already been pushed to a shared repository.
This guide explains how to use git revert to undo one or more commits with practical examples.
Before diving into examples, it is important to understand the difference between git revert and git reset, as they serve different purposes:
git revert — Creates a new commit that undoes the changes from a previous commit. The original commit remains in the history. This is safe to use on branches that have been pushed to a remote repository.
git reset — Moves the HEAD pointer backward, effectively removing commits from the history. This rewrites the commit history and should not be used on shared branches without coordinating with your team.
As a general rule, use git revert for commits that have already been pushed, and git reset
for local commits that have not been shared.
By default, git revert automatically creates a new commit. If you want to stage the reverted changes without committing them, use the --no-commit (or -n) option:
Terminal
git revert --no-commit HEAD
The changes will be applied to the working directory and staging area, but no commit is created. You can then review the changes, make additional modifications, and commit manually:
Terminal
git status
git commit -m "Revert feature and clean up related code"
This is useful when you want to combine the revert with other changes in a single commit.
To revert a range of consecutive commits, specify the range using the .. notation:
Terminal
git revert --no-commit HEAD~3..HEAD
This reverts the last three commits. The --no-commit option stages all the reverted changes without creating individual revert commits, allowing you to commit them as a single revert:
Terminal
git commit -m "Revert last three commits"
Without --no-commit, Git will create a separate revert commit for each commit in the range.
Merge commits have two parent commits, so Git needs to know which parent to revert to. Use the -m option followed by the parent number (usually 1 for the branch you merged into):
Terminal
git revert -m 1 MERGE_COMMIT_HASH
In the following example, we revert a merge commit and keep the main branch as the base:
Terminal
git revert -m 1 a1b2c3d
-m 1 — Tells Git to use the first parent (the branch the merge was made into, typically main or master) as the base.
-m 2 — Would use the second parent (the branch that was merged in).
You can check the parents of a merge commit using:
If the code has changed since the original commit, Git may encounter conflicts when applying the revert. When this happens, Git will pause the revert and show conflicting files:
output
CONFLICT (content): Merge conflict in src/app.js
error: could not revert abc1234... Add new feature
hint: After resolving the conflicts, mark the corrected paths
hint: with 'git add <paths>' and run 'git revert --continue'.
To resolve the conflict:
Open the conflicting files and resolve the merge conflicts manually.
Stage the resolved files:
Terminal
git add src/app.js
Continue the revert:
Terminal
git revert --continue
If you decide not to proceed with the revert, you can abort it:
Terminal
git revert --abort
This restores the repository to the state before you started the revert.
Revert is in progress
If you see a message that a revert is in progress, either continue with git revert --continue after resolving conflicts or cancel with git revert --abort.
Revert skips a commit
If Git reports that a commit was skipped because it was already applied, it means the changes are already present. You can proceed or use git revert --skip to continue.
What is the difference between git revert and git reset? git revert creates a new commit that undoes changes while preserving the full commit history. git reset moves the HEAD pointer backward and can remove commits from the history. Use git revert for shared branches and git reset for local, unpushed changes.
Can I revert a commit that has already been pushed?
Yes. This is exactly what git revert is designed for. Since it creates a new commit rather than rewriting history, it is safe to push to shared repositories without disrupting other collaborators.
How do I revert a merge commit?
Use the -m option to specify the parent number. For example, git revert -m 1 MERGE_HASH reverts the merge and keeps the first parent (usually the main branch) as the base.
Can I undo a git revert?
Yes. Since a revert is just a regular commit, you can revert the revert commit itself: git revert REVERT_COMMIT_HASH. This effectively re-applies the original changes.
What happens if there are conflicts during a revert?
Git will pause the revert and mark the conflicting files. You need to resolve the conflicts manually, stage the files with git add, and then run git revert --continue to complete the operation.
The git revert command is the safest way to undo changes in a Git repository, especially for commits that have already been pushed. It creates a new commit that reverses the specified changes while keeping the full commit history intact.
If you have any questions, feel free to leave a comment below.
Linuxize publishes practical Linux tutorials and guides for system administrators, DevOps engineers, and developers. This policy explains how we research, test, update, and correct our content.
Linuxize was founded by Dejan Panovski
, an RHCSA-certified Linux professional with over 20 years of experience as a system administrator, DevOps engineer, and technical writer. The vast majority of articles on this site are written and maintained by Dejan. Guest contributors follow the same editorial standards outlined below.
We test commands and workflows on real systems whenever possible. For distro-specific posts, we verify instructions on the named distribution and version. If a procedure changes across versions, we note the difference or provide separate versions.
We regularly review and update published articles to keep them accurate and current. Updated articles display a “Last updated” date to indicate when they were last revised. Common reasons for updates include:
Software version changes or deprecated commands
Improved procedures or better practices
Reader feedback and error reports
New sections such as FAQ, Quick Reference, or Troubleshooting
If you find an error, outdated step, or missing detail, please contact us at hello@linuxize.com. We review corrections promptly and update the article when needed.
Guest submissions follow the same standards for accuracy, testing, and clarity. All submissions are reviewed for technical correctness and editorial consistency before publication.
A time zone is a geographic region that has the same standard time. Using the correct time zone is essential for many system tasks and processes. For example, the cron
daemon uses the system’s time zone for executing cron jobs, and the timestamps in log files are based on the same time zone.
On Debian 13 (Trixie), the system’s time zone is set during the installation, but it can be easily changed at a later time.
This article explains how to set or change the time zone on Debian 13.
timedatectl is a command-line utility that allows you to view and change the system’s time and date. It is available on all modern systemd-based Linux systems, including Debian 13.
To view the current time zone, run the timedatectl command without any options:
Terminal
timedatectl
The output below shows that the system’s time zone is set to UTC:
output
 Local time: Sat 2026-02-07 14:30:44 UTC
Universal time: Sat 2026-02-07 14:30:44 UTC
RTC time: Sat 2026-02-07 14:30:44
Time zone: Etc/UTC (UTC, +0000)
System clock synchronized: yes
systemd-timesyncd.service active: yes
RTC in local TZ: no
The system time zone is configured by symlinking the /etc/localtime file to a binary time zone identifier in the /usr/share/zoneinfo directory. You can also check the time zone by viewing the path the symlink points to using the ls
command:
To filter the list for a specific region or city, pipe the output through grep:
Terminal
timedatectl list-timezones | grep -i "europe"
Once you identify the correct time zone for your location, run the following command as root or user with sudo privileges
:
Terminal
sudo timedatectl set-timezone <your_time_zone>
For example, to change the system’s time zone to Europe/London, you would run:
Terminal
sudo timedatectl set-timezone Europe/London
Verify the change by invoking the timedatectl command again:
Terminal
timedatectl
output
 Local time: Sat 2026-02-07 14:35:09 GMT
Universal time: Sat 2026-02-07 14:35:09 UTC
RTC time: Sat 2026-02-07 14:35:09
Time zone: Europe/London (GMT, +0000)
System clock synchronized: yes
systemd-timesyncd.service active: yes
RTC in local TZ: no
On Debian systems, you can also change the time zone using the tzdata package. This method provides an interactive text-based interface:
Terminal
sudo dpkg-reconfigure tzdata
The command opens a menu where you can select the geographic area and then the city or region. After making your selection, the system time zone is updated automatically.
Changes do not persist after reboot
Ensure /etc/localtime is a symlink to a valid file in /usr/share/zoneinfo and re-run sudo timedatectl set-timezone Region/City.
Clock is still wrong after changing the time zone
Check that NTP sync is active with timedatectl status. If it is disabled, enable time synchronization: sudo timedatectl set-ntp true.
How do I check the current time zone on Debian 13?
Run the timedatectl command without any arguments. The “Time zone” line in the output shows the currently configured time zone.
Can I change the time zone without restarting?
Yes. The timedatectl set-timezone command takes effect immediately. There is no need to restart the system or any services.
What is the difference between timedatectl and dpkg-reconfigure tzdata?
Both methods achieve the same result. timedatectl is a single command that works on any systemd-based distribution. dpkg-reconfigure tzdata provides an interactive menu and is specific to Debian and Ubuntu systems.
Where are the time zone files stored?
Time zone data files are stored in the /usr/share/zoneinfo directory. The /etc/localtime file is a symlink that points to the active time zone file in that directory.