引言
React 16 引入了 Fiber 架构,这是 React 核心算法的重构。Fiber 把渲染工作拆成多个小的工作单元(fiber 节点),每个工作单元可以独立执行、暂停和恢复。这种可中断的渲染机制让 React 能更好地控制渲染时机,为后续的并发特性打下了基础。关于 Fiber 架构的详细原理,可以参考这篇文章。
基于 Fiber 架构,React 18 引入了并发特性(Concurrent Features),这是 React 历史上最重要的架构升级之一。并发渲染让 React 能在渲染过程中中断和恢复工作,从而保持用户界面的响应性。useTransition Hook 正是这一特性的核心 API 之一,它允许我们把某些状态更新标记为"非紧急",让 React 优先处理更重要的更新(比如用户输入),从而显著提升用户体验。
在本文中,我们会通过一个实际的演示案例,深入对比三种不同的更新策略:同步更新、防抖更新和并发更新(useTransition),然后从 React 源码层面解析 useTransition 的实现原理,帮你全面理解这个强大的性能优化工具。
交互式演示
在深入技术细节之前,我们先通过一个交互式演示来直观感受三种策略的差异:

在这个演示里,你可以:
- 在输入框里输入文字,输入越长,图表渲染的数据点越多
- 切换三种不同的更新策略(Synchronous、Debounced、Concurrent)
- 观察右上角的时钟动画,它是检测 UI 是否卡顿的"晴雨表"
性能对比演示
我们通过三个 GIF 动图来直观对比三种策略的表现:
1. 同步更新(Synchronous)
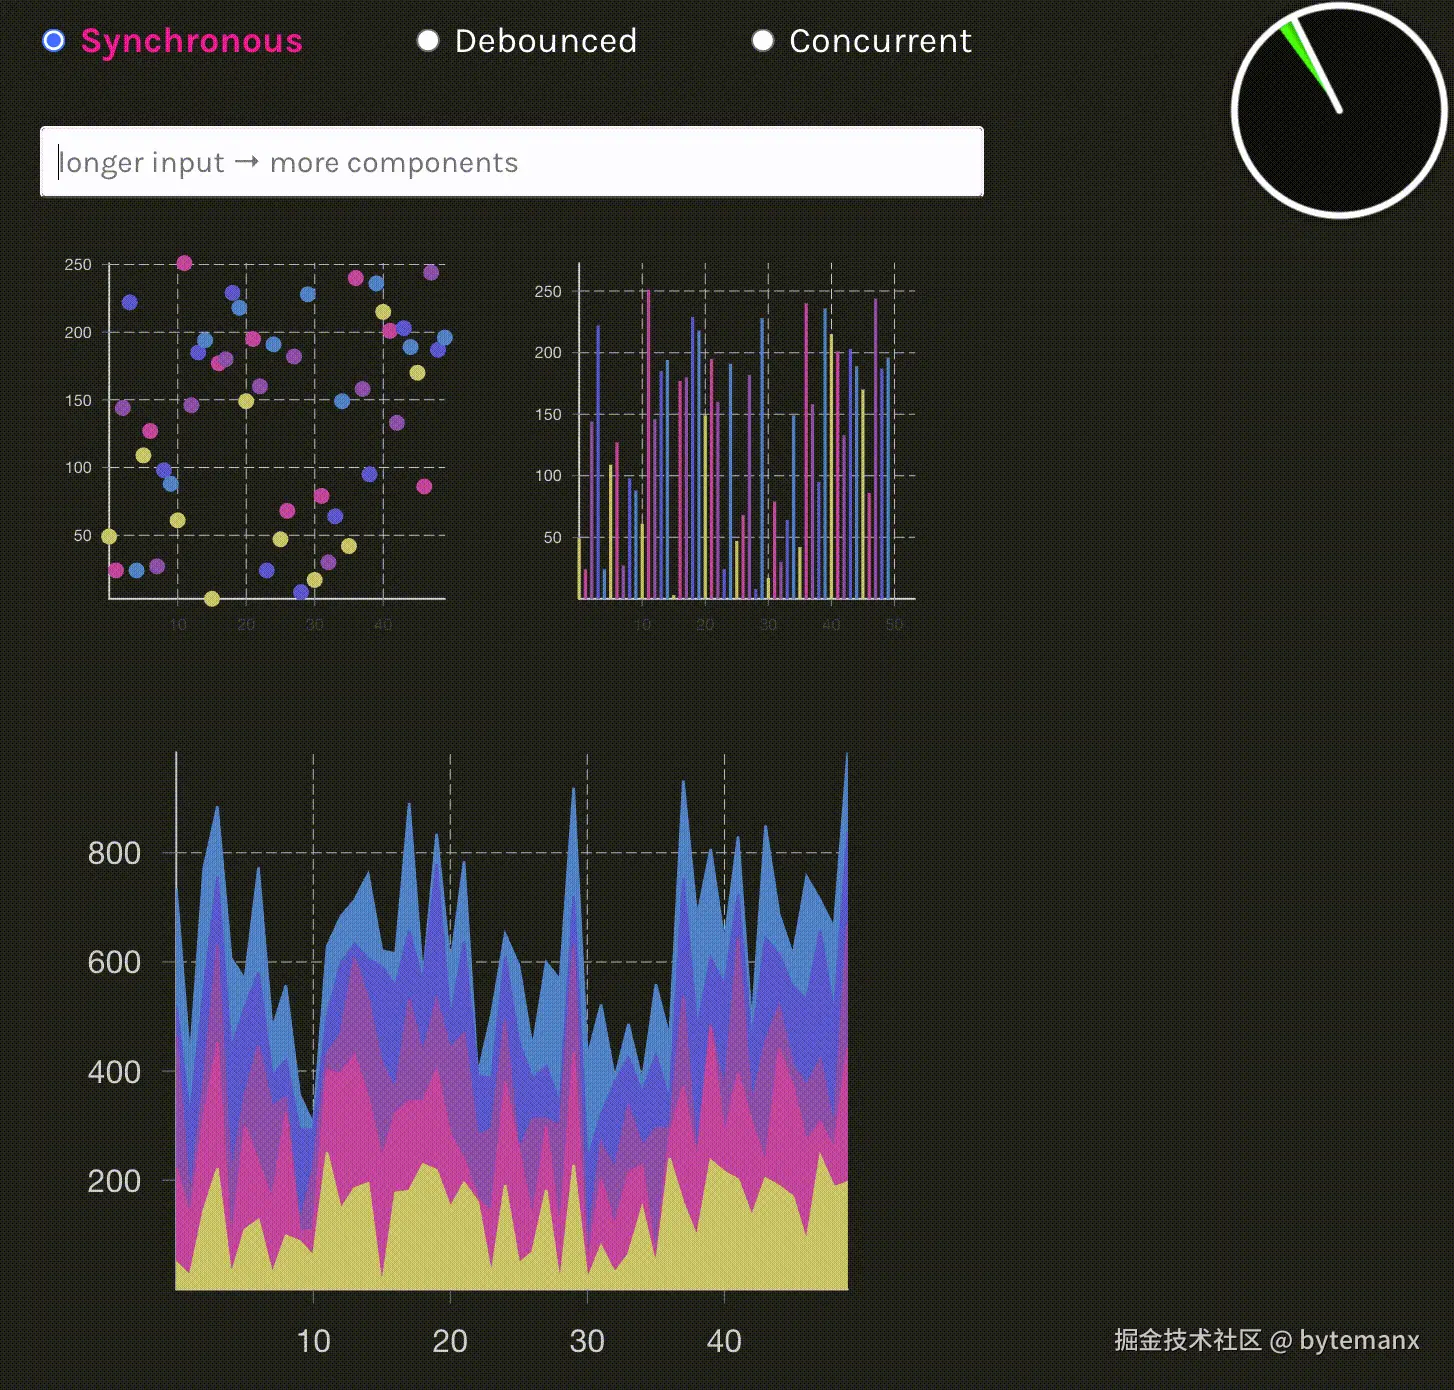
重要说明:图中显示的输入暂停是页面卡顿导致的结果,不是用户主动停止输入。当用户持续输入时,由于同步渲染阻塞了主线程,导致输入框无法及时响应。右上角时钟动画的明显卡顿证明了主线程被渲染任务完全阻塞。这是同步更新的最大问题:即使输入响应即时,但渲染会阻塞用户交互。
特点:
- ✅ 输入响应即时,无延迟
- ❌ 每次输入都会立即触发完整渲染
- ❌ 当数据量大时,时钟动画会明显卡顿
- ❌ 用户输入可能被阻塞,体验不流畅
适用场景:数据量小、渲染简单的场景
2. 防抖更新(Debounced)
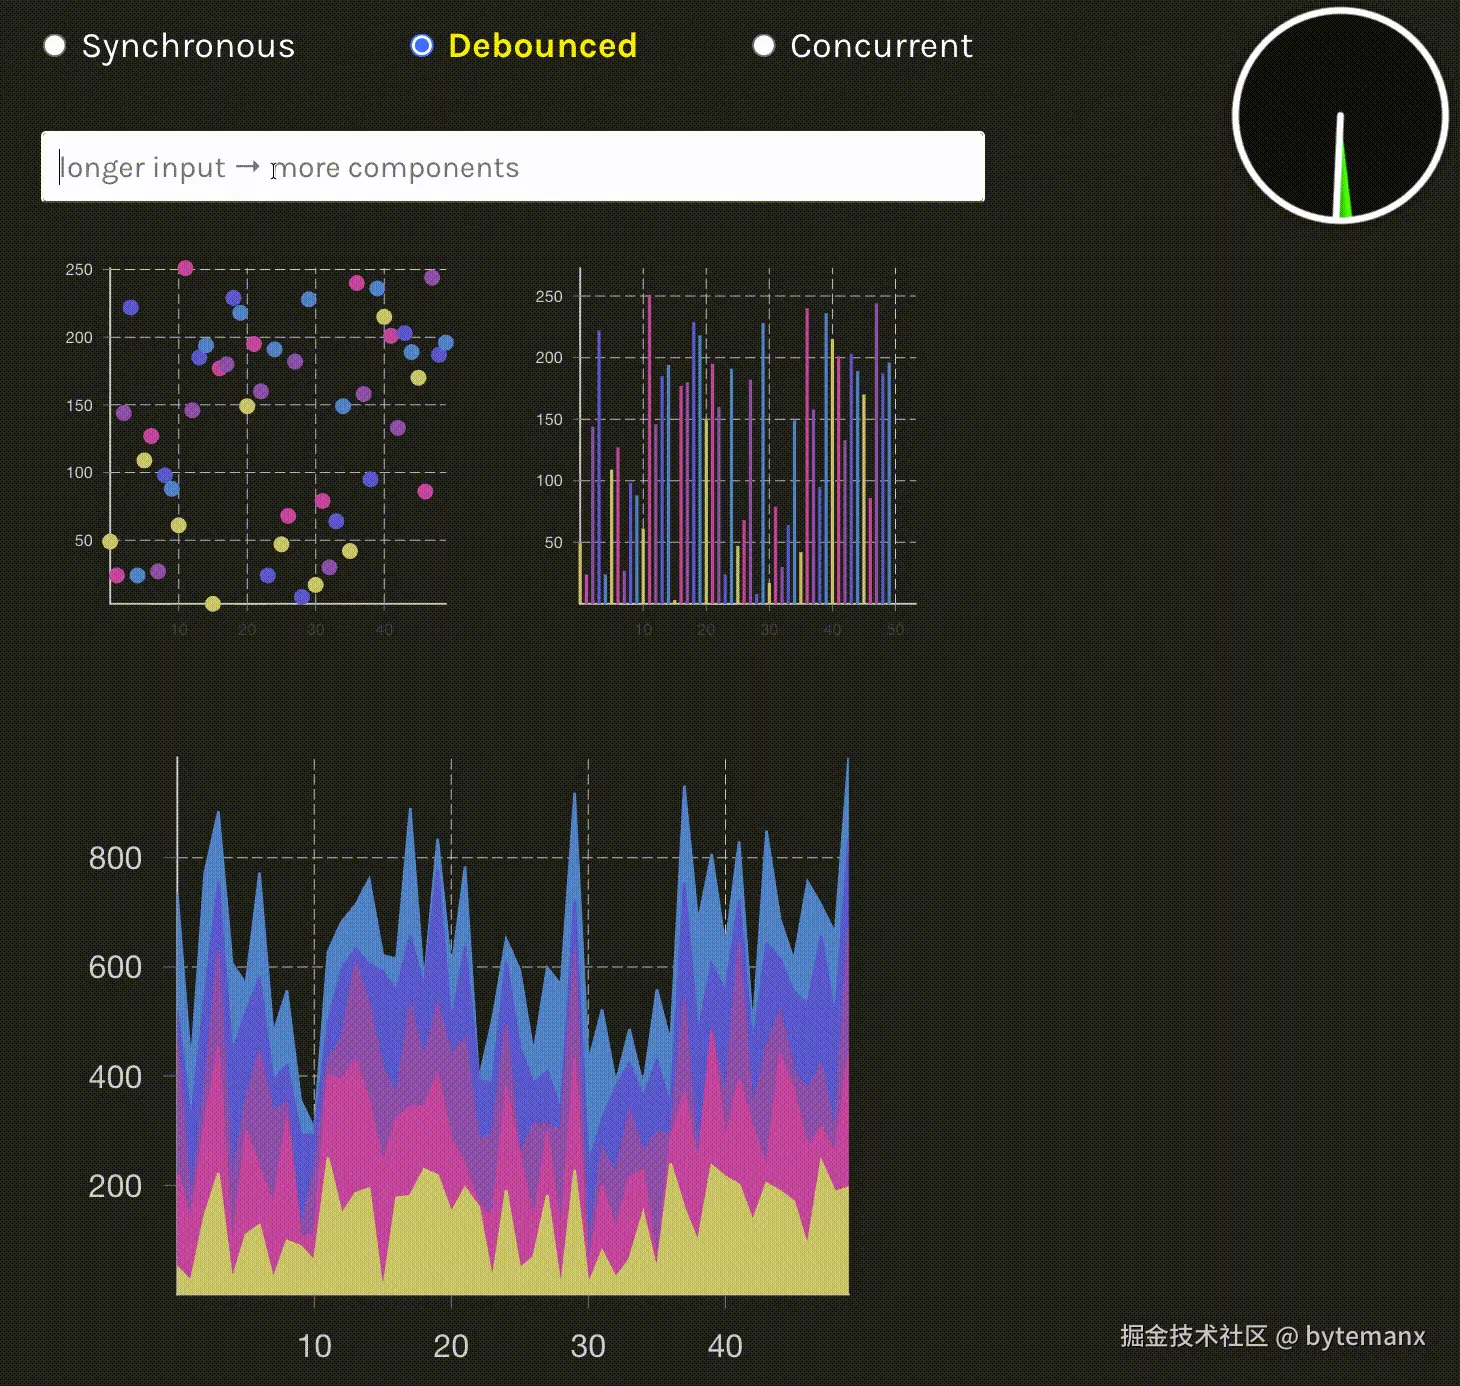
重要说明:图中显示的等待期间是防抖延迟机制的表现(固定1000ms延迟)。防抖的延迟太大,用户输入后需要等1秒才能看到结果更新。虽然避免了频繁渲染,但固定的延迟时间影响了用户体验。用户无法及时看到输入反馈,需要等防抖时间结束。
特点:
- ✅ 减少渲染次数,避免频繁更新
- ✅ 等待用户停止输入后才更新
- ❌ 有固定的延迟(1000ms),用户需要等待
- ❌ 时钟动画在等待期间可能不流畅
- ❌ 无法利用 React 的并发特性
适用场景:需要减少 API 调用或计算次数的场景
3. 并发更新(Concurrent / useTransition)
重要说明:图中显示的流畅表现是并发渲染的效果。并发模式可以及时响应用户输入,无需等待延迟,输入框立即响应。即使在大数据量渲染时,时钟动画始终保持流畅,证明主线程未被阻塞。渲染过程可以被中断,优先处理用户输入,然后继续完成渲染任务。这是并发更新的核心优势:既保证了输入响应性,又完成了复杂渲染。
特点:
- ✅ 输入响应即时,无延迟
- ✅ 渲染过程可中断,保持 UI 响应性
- ✅ 时钟动画始终保持流畅
- ✅ 自动平衡输入响应和渲染性能
- ✅ 利用 React 18 的并发特性
适用场景:需要保持 UI 响应性的复杂渲染场景
演示代码解析
这个演示应用基于 React 官方的 time-slicing fixture,展示了三种不同的状态更新策略。我们来看看关键代码实现:
三种更新策略
function AppContent({ complexity }: AppProps) {
  const [value, setValue] = useState('');
  const [strategy, setStrategy] = useState<Strategy>('sync');
  const [isPending, startTransition] = useTransition();

  // 防抖处理函数
  const debouncedSetValue = useMemo(
    () =>
      debounce((newValue: string) => {
        setValue(newValue);
      }, 1000),
    []
  );

  const handleChange = useCallback(
    (e: React.ChangeEvent<HTMLInputElement>) => {
      const newValue = e.target.value;
      switch (strategy) {
        case 'sync':
          // 策略 1: 同步更新 - 立即触发渲染
          setValue(newValue);
          break;
        case 'debounced':
          // 策略 2: 防抖更新 - 延迟 1000ms 后更新
          debouncedSetValue(newValue);
          break;
        case 'async':
          // 策略 3: 并发更新 - 使用 useTransition
          startTransition(() => {
            setValue(newValue);
          });
          break;
      }
    },
    [strategy, debouncedSetValue, startTransition]
  );

  const data = getStreamData(value, complexity);
  // ...
}
useTransition 使用详解
在上面的代码里,我们看到了 useTransition 的基本使用。我们详细解析一下:
1. useTransition 的基本用法
useTransition 是一个 Hook,它返回一个包含两个元素的数组:
const [isPending, startTransition] = useTransition();
-
isPending:一个布尔值,表示当前有没有正在进行的 transition 更新。当 startTransition 里的更新正在处理时,isPending 为 true;更新完成后变为 false。
-
startTransition:一个函数,用来把状态更新标记为"非紧急"的 transition 更新。
2. startTransition 的使用方式
startTransition 接收一个回调函数,在这个回调函数里执行的状态更新会被标记为低优先级:
case 'async':
  // 策略 3: 并发更新 - 使用 useTransition
  startTransition(() => {
    setValue(newValue);
  });
  break;
关键点:
3. isPending 的实际应用
isPending 可以用来向用户提供视觉反馈,表示应用正在处理 transition 更新。在演示代码里,我们用 isPending 来改变输入框的透明度:
<input
  className={`p-3 sm:p-4 text-xl sm:text-3xl w-full block bg-white text-black rounded ${inputColorClass} ${
    isPending ? 'opacity-70' : ''
  }`}
  placeholder="longer input → more components"
  onChange={handleChange}
/>
当 isPending 为 true 时,输入框会变成半透明(opacity-70),给用户一个视觉提示,表明后台正在处理更新。
关键组件说明
1. Charts 组件
用 Victory 图表库渲染大量数据点。根据输入长度动态生成数据复杂度:
function getStreamData(input: string, complexity: number): StreamData {
  const cacheKey = `${input}-${complexity}`;
  if (cachedData.has(cacheKey)) {
    return cachedData.get(cacheKey)!;
  }
  const multiplier = input.length !== 0 ? input.length : 1;
  const data = range(5).map(() =>
    range(complexity * multiplier).map((j: number) => ({
      x: j,
      y: random(0, 255),
    }))
  );
  cachedData.set(cacheKey, data);
  return data;
}
2. Clock 组件
一个实时 SVG 动画时钟,用来检测 UI 是否卡顿。如果主线程被阻塞,时钟动画会明显掉帧。
3. 数据生成策略
- 输入长度越长,生成的数据点越多
- 用缓存机制避免重复计算
- 复杂度参数控制基础数据量
React 源码深度解析
我们用了很多次 useTransition,也看到了它的效果。现在来看看 React 源码里它是怎么实现的。
useTransition 入口函数
useTransition 的入口在 packages/react/src/ReactHooks.js 文件中:
export function useTransition(): [
  boolean,
  (callback: () => void, options?: StartTransitionOptions) => void,
] {
  const dispatcher = resolveDispatcher();
  return dispatcher.useTransition();
}
很简单,就是通过 resolveDispatcher() 拿到 dispatcher,然后调用 dispatcher.useTransition()。
这个 dispatcher 是什么呢?React 会根据当前是首次渲染还是更新渲染,给你不同的 dispatcher。首次渲染的时候,dispatcher 里的 useTransition 会调用 mountTransition;更新渲染的时候,会调用 updateTransition。
有同学说,为什么要这样设计?因为 React 需要区分首次渲染和更新渲染。首次渲染的时候,需要创建新的 Hook 对象;更新渲染的时候,需要复用之前的 Hook 对象。
mountTransition:首次渲染
组件首次渲染时,会调用 mountTransition。我们来看看它的实现:
在 packages/react-reconciler/src/ReactFiberHooks.js 中:
function mountTransition(): [
  boolean,
  (callback: () => void, options?: StartTransitionOptions) => void,
] {
  const stateHook = mountStateImpl((false: Thenable<boolean> | boolean));
  // The `start` method never changes.
  const start = startTransition.bind(
    null,
    currentlyRenderingFiber,
    stateHook.queue,
    true,
    false,
  );
  const hook = mountWorkInProgressHook();
  hook.memoizedState = start;
  return [false, start];
}
这段代码做了几件事:
- 用
mountStateImpl 创建一个内部状态,初始值是 false。这个状态用来表示当前是不是 pending 状态。
- 通过
bind 创建一个 start 函数,绑定了当前 fiber 和 state queue。这个 start 函数就是 startTransition,但已经绑定了必要的上下文。
- 把
start 函数存到 hook 的 memoizedState 里,这样下次更新的时候还能拿到同一个函数。
- 返回
[false, start],初始状态不是 pending。
updateTransition:更新渲染
组件更新渲染时,会调用 updateTransition:
在 packages/react-reconciler/src/ReactFiberHooks.js 中:
function updateTransition(): [
  boolean,
  (callback: () => void, options?: StartTransitionOptions) => void,
] {
  const [booleanOrThenable] = updateState(false);
  const hook = updateWorkInProgressHook();
  const start = hook.memoizedState;
  const isPending =
    typeof booleanOrThenable === 'boolean'
      ? booleanOrThenable
      : // This will suspend until the async action scope has finished.
        useThenable(booleanOrThenable);
  return [isPending, start];
}
这里做了几件事:
- 调用
updateState(false) 获取当前的 pending 状态。这个状态在 startTransition 执行的时候会被更新。
- 从 hook 的
memoizedState 里拿到之前存的 start 函数。这个函数在首次渲染的时候就创建好了,之后不会变。
- 判断
isPending。如果状态是 boolean,直接返回;如果是 Promise(比如异步 action),就用 useThenable 等待它完成。
- 返回
[isPending, start]。
体会到 useTransition 的设计了么?它本质上就是 useState + startTransition。用 useState 来管理 pending 状态,用 startTransition 来标记更新为低优先级。
startTransition 函数实现
startTransition 的实现在 packages/react/src/ReactStartTransition.js 文件中。这个函数的核心作用是设置一个全局的 transition 上下文,让 React 知道当前正在执行 transition 更新。
export function startTransition(
  scope: () => void,
  options?: StartTransitionOptions,
): void {
  const prevTransition = ReactSharedInternals.T;
  const currentTransition: Transition = ({}: any);
  if (enableViewTransition) {
    currentTransition.types =
      prevTransition !== null
        ? // If we're a nested transition, we should use the same set as the parent
          // since we're conceptually always joined into the same entangled transition.
          // In practice, this only matters if we add transition types in the inner
          // without setting state. In that case, the inner transition can finish
          // without waiting for the outer.
          prevTransition.types
        : null;
  }
  if (enableGestureTransition) {
    currentTransition.gesture = null;
  }
  if (enableTransitionTracing) {
    currentTransition.name =
      options !== undefined && options.name !== undefined ? options.name : null;
    currentTransition.startTime = -1; // TODO: This should read the timestamp.
  }
  if (__DEV__) {
    currentTransition._updatedFibers = new Set();
  }
  ReactSharedInternals.T = currentTransition;

  try {
    const returnValue = scope();
    const onStartTransitionFinish = ReactSharedInternals.S;
    if (onStartTransitionFinish !== null) {
      onStartTransitionFinish(currentTransition, returnValue);
    }
    if (
      typeof returnValue === 'object' &&
      returnValue !== null &&
      typeof returnValue.then === 'function'
    ) {
      if (__DEV__) {
        // Keep track of the number of async transitions still running so we can warn.
        ReactSharedInternals.asyncTransitions++;
        returnValue.then(releaseAsyncTransition, releaseAsyncTransition);
      }
      returnValue.then(noop, reportGlobalError);
    }
  } catch (error) {
    reportGlobalError(error);
  } finally {
    warnAboutTransitionSubscriptions(prevTransition, currentTransition);
    if (prevTransition !== null && currentTransition.types !== null) {
      // If we created a new types set in the inner transition, we transfer it to the parent
      // since they should share the same set. They're conceptually entangled.
      if (__DEV__) {
        if (
          prevTransition.types !== null &&
          prevTransition.types !== currentTransition.types
        ) {
          // Just assert that assumption holds that we're not overriding anything.
          console.error(
            'We expected inner Transitions to have transferred the outer types set and ' +
              'that you cannot add to the outer Transition while inside the inner.' +
              'This is a bug in React.',
          );
        }
      }
      prevTransition.types = currentTransition.types;
    }
    ReactSharedInternals.T = prevTransition;
  }
}
这段代码的逻辑很简单:
-
保存之前的 transition:先把当前的
ReactSharedInternals.T 存起来,因为可能已经有 transition 在运行了(支持嵌套)。
-
创建新的 transition 对象:初始化一个新的 transition 对象。如果是嵌套的 transition,会继承外层的 types。
-
设置全局 transition:把新创建的 transition 赋值给
ReactSharedInternals.T。这样,在 scope 函数里调用的 setState 就能知道当前在 transition 里了。
-
执行用户代码:在 try 块里执行你传入的
scope 函数。
-
处理异步返回值:如果
scope 返回的是 Promise,会做一些处理,比如在开发模式下跟踪异步 transition 的数量。
-
恢复状态:在 finally 块里恢复之前的 transition 状态。这样嵌套的 transition 就能正确恢复。
这个设计还支持嵌套 transition。比如你在一个 startTransition 里又调用了另一个 startTransition,内层的会继承外层的 types,它们会被当作同一个 transition 处理。
优先级调度机制
React 用 Lane 模型来管理更新的优先级。Lane 就是"车道"的意思,不同的更新走不同的车道,优先级高的车道可以先走。
当你在 startTransition 里调用 setState 的时候,React 怎么知道这个更新是低优先级的呢?我们来看看 requestUpdateLane 这个函数:
在 packages/react-reconciler/src/ReactFiberWorkLoop.js 中:
export function requestUpdateLane(fiber: Fiber): Lane {
  // Special cases
  const mode = fiber.mode;
  if (!disableLegacyMode && (mode & ConcurrentMode) === NoMode) {
    return (SyncLane: Lane);
  } else if (
    (executionContext & RenderContext) !== NoContext &&
    workInProgressRootRenderLanes !== NoLanes
  ) {
    // This is a render phase update. These are not officially supported. The
    // old behavior is to give this the same "thread" (lanes) as
    // whatever is currently rendering. So if you call `setState` on a component
    // that happens later in the same render, it will flush. Ideally, we want to
    // remove the special case and treat them as if they came from an
    // interleaved event. Regardless, this pattern is not officially supported.
    // This behavior is only a fallback. The flag only exists until we can roll
    // out the setState warning, since existing code might accidentally rely on
    // the current behavior.
    return pickArbitraryLane(workInProgressRootRenderLanes);
  }

  const transition = requestCurrentTransition();
  if (transition !== null) {
    if (enableGestureTransition) {
      if (transition.gesture) {
        throw new Error(
          'Cannot setState on regular state inside a startGestureTransition. ' +
            'Gestures can only update the useOptimistic() hook. There should be no ' +
            'side-effects associated with starting a Gesture until its Action is ' +
            'invoked. Move side-effects to the Action instead.',
        );
      }
    }
    if (__DEV__) {
      if (!transition._updatedFibers) {
        transition._updatedFibers = new Set();
      }
      transition._updatedFibers.add(fiber);
    }

    return requestTransitionLane(transition);
  }

  return eventPriorityToLane(resolveUpdatePriority());
}
这个函数的工作流程很简单:
- 先检查 fiber 的模式,如果不是并发模式,直接返回同步 lane。
- 检查是不是在渲染阶段更新(这个不推荐,但 React 还是支持了)。
-
关键步骤:调用
requestCurrentTransition() 检查当前有没有 active transition。这个函数会去读 ReactSharedInternals.T,也就是 startTransition 设置的那个全局变量。
- 如果有 transition,调用
requestTransitionLane() 返回 transition lane(低优先级)。
- 否则,用
eventPriorityToLane() 返回默认的 event priority lane(高优先级)。
所以,当你在 startTransition 里调用 setState 的时候,React 会检查到当前有 active transition,然后给你分配一个低优先级的 lane。
requestTransitionLane
requestTransitionLane 负责分配 transition lane。我们来看看它的实现:
在 packages/react-reconciler/src/ReactFiberRootScheduler.js 中:
export function requestTransitionLane(
  // This argument isn't used, it's only here to encourage the caller to
  // check that it's inside a transition before calling this function.
  // TODO: Make this non-nullable. Requires a tweak to useOptimistic.
  transition: Transition | null,
): Lane {
  // The algorithm for assigning an update to a lane should be stable for all
  // updates at the same priority within the same event. To do this, the
  // inputs to the algorithm must be the same.
  //
  // The trick we use is to cache the first of each of these inputs within an
  // event. Then reset the cached values once we can be sure the event is
  // over. Our heuristic for that is whenever we enter a concurrent work loop.
  if (currentEventTransitionLane === NoLane) {
    // All transitions within the same event are assigned the same lane.
    const actionScopeLane = peekEntangledActionLane();
    currentEventTransitionLane =
      actionScopeLane !== NoLane
        ? // We're inside an async action scope. Reuse the same lane.
          actionScopeLane
        : // We may or may not be inside an async action scope. If we are, this
          // is the first update in that scope. Either way, we need to get a
          // fresh transition lane.
          claimNextTransitionUpdateLane();
  }
  return currentEventTransitionLane;
}
这个函数做了几件事:
-
事件级别的 lane 缓存:同一个事件里的所有 transition 更新共享同一个 lane。比如你在一个事件处理函数里调用了多个
startTransition,它们会用同一个 lane。
-
异步 action scope 支持:如果你在异步 action scope 里(比如 Server Action),会复用相同的 lane。
-
lane 分配:如果没有缓存的 lane,就用
claimNextTransitionUpdateLane() 分配一个新的 transition lane。
Lane 优先级系统
Lane 是用位运算实现的,这样判断和分配都很快。我们来看看 transition lane 是怎么分配的:
在 packages/react-reconciler/src/ReactFiberLane.js 中:
export function isTransitionLane(lane: Lane): boolean {
  return (lane & TransitionLanes) !== NoLanes;
}

export function claimNextTransitionUpdateLane(): Lane {
  // Cycle through the lanes, assigning each new transition to the next lane.
  // In most cases, this means every transition gets its own lane, until we
  // run out of lanes and cycle back to the beginning.
  const lane = nextTransitionUpdateLane;
  nextTransitionUpdateLane <<= 1;
  if ((nextTransitionUpdateLane & TransitionUpdateLanes) === NoLanes) {
    nextTransitionUpdateLane = TransitionLane1;
  }
  return lane;
}
claimNextTransitionUpdateLane 的逻辑很简单:
- 取当前的
nextTransitionUpdateLane 作为要返回的 lane。
- 把
nextTransitionUpdateLane 左移一位(相当于乘以 2),这样下次就能分配下一个 lane。
- 如果左移后超出了 transition lanes 的范围,就循环回到第一个 transition lane。
这样,每个新的 transition 都会得到自己的 lane,直到 lanes 用尽,然后循环使用。
Lane 的优先级规则是:Transition lanes 的优先级低于同步 lanes(SyncLane)和默认 lanes(DefaultLane)。所以当有高优先级的更新(比如用户输入)时,React 会中断 transition 的渲染,先处理高优先级的更新,然后再回来继续渲染 transition。
工作原理流程图
让我们通过流程图来理解 useTransition 的完整工作流程:
flowchart TD
    A[用户调用 startTransition] --> B[设置 ReactSharedInternals.T]
    B --> C[执行 scope 函数]
    C --> D[调用 setState]
    D --> E[requestUpdateLane]
    E --> F{检查是否有 active transition?}
    F -->|是| G[requestTransitionLane]
    F -->|否| H[eventPriorityToLane]
    G --> I[分配 Transition Lane]
    I --> J[标记更新为低优先级]
    J --> K[React 调度器处理]
    K --> L{有更高优先级更新?}
    L -->|是| M[中断 transition 渲染]
    L -->|否| N[继续渲染 transition 更新]
    M --> O[处理高优先级更新]
    O --> P[恢复 transition 渲染]
    N --> Q[完成渲染]
    P --> Q
    Q --> R[恢复 ReactSharedInternals.T]

    style I fill:#e1f5ff
    style J fill:#e1f5ff
    style M fill:#fff4e6
    style O fill:#fff4e6
流程说明:
- 用户调用
startTransition,设置全局 transition 上下文
- 在 scope 中调用
setState 触发更新
- React 通过
requestUpdateLane 检查是否有 active transition
- 如果有,分配 transition lane(低优先级)
- React 调度器可以中断 transition 渲染来处理更高优先级的更新
- 高优先级更新完成后,恢复 transition 渲染
- 最终恢复 transition 上下文
最佳实践
何时使用 useTransition
useTransition 特别适合以下场景:
-
搜索和筛选
const [isPending, startTransition] = useTransition();
const [query, setQuery] = useState('');

const handleSearch = (value: string) => {
  setQuery(value); // 高优先级:立即更新输入框
  startTransition(() => {
    setFilteredResults(filterResults(value)); // 低优先级:延迟更新结果
  });
};
-
标签切换
const [isPending, startTransition] = useTransition();
const [activeTab, setActiveTab] = useState('home');

const handleTabChange = (tab: string) => {
  startTransition(() => {
    setActiveTab(tab); // 标签内容渲染可以延迟
  });
};
-
列表渲染
const [isPending, startTransition] = useTransition();
const [items, setItems] = useState([]);

const loadMoreItems = () => {
  startTransition(() => {
    setItems(prev => [...prev, ...newItems]); // 大量列表项渲染
  });
};
与防抖/节流的区别
| 特性 |
useTransition |
防抖/节流 |
| 延迟机制 |
基于优先级调度 |
基于时间延迟 |
| 输入响应 |
即时响应 |
有固定延迟 |
| 渲染控制 |
React 自动管理 |
手动控制 |
| 中断能力 |
支持中断和恢复 |
不支持 |
| 适用场景 |
复杂渲染场景 |
减少计算/请求 |
关键区别:
-
useTransition 不会延迟用户输入,而是让 React 智能地调度渲染
- 防抖/节流会固定延迟,可能影响用户体验
-
useTransition 利用 React 的并发特性,可以中断和恢复渲染
注意事项和限制
-
不要用于紧急更新
// ❌ 错误:紧急更新不应该用 useTransition
startTransition(() => {
  setError(error); // 错误信息应该立即显示
});

// ✅ 正确:非紧急的 UI 更新
startTransition(() => {
  setSearchResults(results); // 搜索结果可以延迟显示
});
-
isPending 的使用
const [isPending, startTransition] = useTransition();

return (
  <div>
    <input onChange={handleChange} />
    {isPending && <Spinner />} {/* 显示加载状态 */}
  </div>
);
-
避免在 transition 中进行副作用
// ❌ 错误:副作用应该在 transition 外
startTransition(() => {
  setState(newState);
  document.title = 'Updated'; // 副作用
});

// ✅ 正确:只更新状态
startTransition(() => {
  setState(newState);
});
document.title = 'Updated'; // 副作用在 transition 外
-
与 Suspense 配合使用
<Suspense fallback={<Loading />}>
  <SearchResults query={query} />
</Suspense>
总结
useTransition 是 React 18 并发特性的核心 API 之一,它通过以下机制实现了优秀的性能优化:
-
优先级调度:将非紧急更新标记为低优先级,让 React 优先处理用户交互
-
可中断渲染:支持中断和恢复,保持 UI 响应性
-
智能平衡:自动平衡输入响应和渲染性能
通过本文的源码分析,我们了解到:
-
useTransition 通过内部状态管理 pending 状态
-
startTransition 通过设置全局上下文标记更新为低优先级
- React 调度器通过 Lane 模型管理不同优先级的更新
- Transition lanes 的优先级低于同步和默认 lanes
在实际开发中,我们应该:
- 将非紧急的 UI 更新包装在
startTransition 中
- 使用
isPending 提供加载反馈
- 避免在 transition 中进行副作用
- 理解与防抖/节流的区别,选择合适的技术
React 18 的并发特性为构建高性能、响应迅速的用户界面提供了强大的工具。useTransition 作为其中的重要组成部分,值得我们深入理解和合理使用。
参考资料